December 28, 2021

A Look Back at 2021

December, January, and February are the winter months of my agrarian year. Winter is a good time for analyzing our goals, reflection, research, and then listing and prioritizing the upcoming year's plans and projects. A look back at what we've accomplished in the last annual cycle is the foundation for looking ahead and planning for the upcoming one.

January

The '20-'21 winter project was building a new buck barn. By January, Dan was working on the roof and walls. My projects were indoor types, as I focused on mending socks and gloves, and learning about haybox cooking.

February

Kidding commenced in February. First, Miracle had twin does, then River had a baby boy. We were fortunate to get mild days, but I also decided that the weather is too iffy in February. This fall I postponed breeding to have due dates during warmer weather. The other thing that kept me busy was spring cleaning.

March

March is the beginning of spring and also my get-busy-with-the-garden month. My fall and winter plantings kicked into growing gear with the longer days and warmer temperatures. Between that and spring foraging, we ate well. In preparation for summer, I got my tomatoes started. Dan made progress on the buck barn by getting rain catchment installed.

April

This is the month I start to plant warm weather veggies. In preparation, I added several more ollas to various garden beds and containers and then got busy planting. My two biggest problems in April were slugs and a late frost!

May

In May, we finally put our chicken tractor to use. We used it to house our two remaining Dominique hens while we raised six Speckled Sussex chicks in the chicken coop. We started on plans to build a summer kitchen in the carport.

June

June was the month of garden experiments. One was wicking pots. These seemed like a great way to beat our hot, dry spells, so I was anxious to give it a try. The other was learning about landrace seeds. I decided to experiment and started with cucumbers. Click here, for how I'm doing it.

July

July is the month of blazing sun here, so shade is on our minds. One project Dan completed in July, was the first of two pergolas to shade the afternoon sun facing windows on the house. My shade project, was to experiment with living shade on my hoop house. To keep cool, we worked in the shade as much as possible threashing and winnowing our winter wheat harvest.

August

We finally got a driveway gate installed! It was accompanied by a huge sense of relief. I tied a small piece of cattle panel to the bottom of the trellis next to it, so our yard is no longer accessible by dogs. There's a small gap on top of the railroad ties that the cats use. After that, Dan got started on a cookstove for our outdoor kitchen, and I researched forest gardens.

September


September was the month we finally got a new rooster. As you can see from the above photo, he's grown into quite a handsome fellow. Dan made progress on the outdoor cookstove, and we started putting some of the things we were learning from our permaculture videos into practice.

October

Dan got a lot done on the outdoor kitchen cookstove, He finished the firebox and installed the tops, while I started assessing for our first forest garden.

November


A busy month. Dan installed three more 300-gallon totes behind the carport to catch rainwater from the carport roof. We learned how to make biochar, we got Muscovy ducks, and had our first fall kids. Dan finished the outdoor cookstove and we tested it out.

December


Dan worked on fence repair throughout autumn and finished it in December. It had been trashed by falling trees and needed major repair and a new gates.


After that, we started working on our first swale, which I'll share more about in an upcoming post. Also notable, we finally won a battle we have every year with mice! And without the help of the cats. Speaking of cats . . .

Parting Shot

Sam

How about you? Are you preparing for another new year?

A Look Back at 2021 © December 2021

December 19, 2021

Winning a War (Finally)

With four cats around, our mouse population is kept pretty much under control. I think only once or twice we've seen a mouse in the house (which didn't last long). Even so, every winter we've had mice move into the walls in one particular corner of the house. We can hear them. The cats can hear them. But they stay in the wall so we never see them. 

The problem with mice in the walls is that they gnaw on things. Thinks like electrical wiring. Not good, and not a risk we want to take, so every year Dan has diligently tried to mouse-proof the house. He's blocked off cracks and filled holes, but when the cold weather months arrive, they still get into their hidey spot in the wall. 

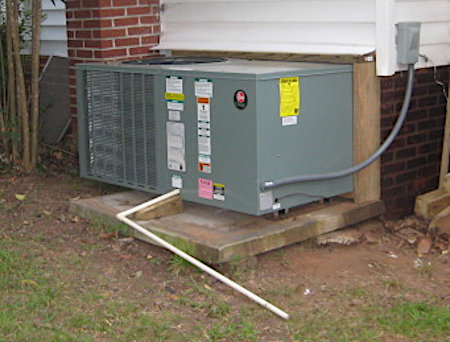
We're pretty sure that they've been getting in somewhere around the HVAC. 

Our HVAC when it was newly installed.

When it was installed, the new unit was set on the old oil heater's concrete pad. It overhung it by several inches, but Dan figured that framing it where it butted up to the house would seal off the crawl space. After years of trying to second guess mousy holes and entrances, Dan finally pulled it out to see what he could do to keep mice out for good.


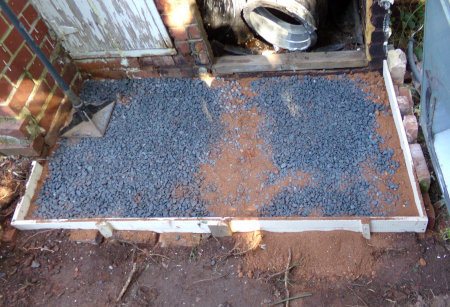
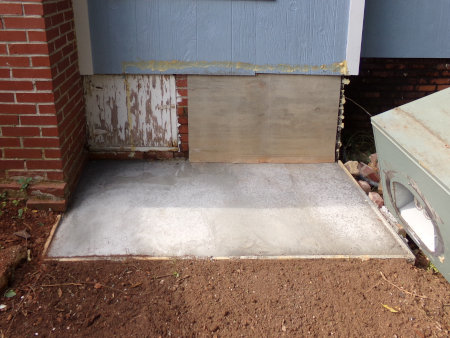
What Dan discovered is that the unit has holes in its framework that are perfect mouse entries. That's how they were getting in. The old concrete pad was removed and Dan poured a new one to properly accommodate the unit.


The other thing he  Dan's solution to completely wall off the HVAC opening in the foundation.

That might be shocking to some, but long-time readers may recall that we gave up using the HVAC years ago. We now live with wood heat in winter and modest natural methods of keeping the house cool in summer. It's been that way for the past six years, and we've acclimated. The bottom line is that winter is cold and summer is hot and that's just the way it is! If needs must, it can always be hooked back up. Anyway. . .


Three months later, still no mice! It worked! What a relief. 

December 15, 2021

Lacto-Fermented Cranberry Pineapple

Last year, I started experimenting with lacto-fermented fruit. One that I made contained apples, cranberries, and pecans, and it was delicious. I blogged about that one. The other contained pineapple, cranberry, and apple, but I didn't blog about that one. Unfortunately, that means that I can't find the recipe! I do believe I bookmarked it, but that was on a now dead computer and so is lost. I found a similar recipe after a lot of internet searching, and ended up combining the two. This time I'm going to document it! Following is my adaptation.

Lacto-Fermented Cranberry Pineapple

  • 12 oz bag of cranberries, chopped
  • 4 small apples, chopped
  • 1 fresh pineapple, peeled, cored, and chopped
  • 1/2 cup sugar, honey, or maple syrup
  • 2 tsp salt
  • 1/2 cup whey
  • filtered water or juice (apple or pineapple) to cover contents of jar

Mix all but the water or juice and place in a half-gallon jar. Pound the fruit down and add water until contents are covered. Put a lid on the jar and let sit in a room temperature place for 2-3 days. Unscrew the lid occasionally, to release the build-up of carbon dioxide. Refrigerate or store in a cold cellar after that. It will gradually become more tart over time.

Fermenting pineapple, cranberries, and apples on the left.
Pineapple core and peel being made into vinegar on right.

One question I have been asked about fermenting fruit is, won't it turn to wine? My answer is no, and here's why. When wine is made, yeast (commercial or natural air-borne) and extra sugar are added. It's the yeast that converts the sugars to alcohol. For example, for my elderberry wine, I add equal weights of sugar and fruit, which gives the wine a 5% alcohol content.

With lacto-fermentation of fruit, no yeast and very little sugar (if any) is added. Plus, the fermenting jar is kept closed (except occasional "burping" to release the CO2), so that will keep most air-borne yeasts out. The process is a primarily a natural bacterial ferment. It's possible that some stray air-borne yeast could enter the ferment, but fortunately (or unfortunately) you won't get any more tipsy on it than from eating a ripe banana.

Lastly, a bit of promotion for something useful. I was able to source organic pineapple and cranberries through Misfits Market, an online ordering and delivery service. I finally joined and have been pleased to economically supplement our diet with organic produce I can't (or don't) grow in our home garden. Highly recommended. In fact, if you haven't joined Misfits yet, use my referral code COOKWME-SD6SOLPHRAB and we'll both get $10 off an order. There are no subscription fees and you can cancel any time.

December 11, 2021

My New Camera

 Thank you to everyone who commented on my Recommendations Wanted: What Is Your Dream Camera? blog post. Here's what I decided!

Canon EOS M50

There were too many things I liked about the mirrorless camera to not go with one. The Canon M50 received consistently positive reviews from consumers, camera websites, and serious photographers. The negatives were either inconsequential to me or not confirmed by other reviewers. In fact, it was interesting to me how many professional and serious photographers own and regularly use an M50 for personal use. YouTube comparison reviews for this class of camera usually used the M50 for their standard of comparison. Another plus is that it shoots in both JPG and RAW formats. RAW is the format used by professional photographers for the best quality photos. It's something I'm interested in exploring in the future.

Because it's such a popular digital camera, pricing for it is very competitive. Another plus! I was able to get the camera plus a used Canon mirrorless telephoto lens and two extra batteries and stay within my budget. I'll be looking into a macro lens in the future.

The camera does have an auto mode, which I'll use to learn all the buttons, menus, and icons. I found an excellent YouTube tutorial by Michael The Maven for my specific camera, which takes you through all those things. To practice, I'm going to do an activity I found called "Make 30 Photos."  I'll put these on my photography blog. You can follow that link to see how it's going. 

Once I'm comfortable with my M50, I plan to take a free online photography course to learn the manual mode - A Year With My Camera. I also found some free short classes over at Udemy (where I took Bill Mollison's permaculture design course). That might be a way to sample various teachers in case I want to take a paid course (which are very affordable at Udemy, even for me!) Then, there's always YouTube, of course.

So, there's my winter learning project. One that I'm really looking forward to!

My New Camera © December 2021

December 10, 2021

Giveaway Winner

 The winner of the Prepper's Livestock Handbook is . . . . . . .

Kristina! 

Thank you to everyone who helped! You can find all of my homesteading books at Kikobian.com.

I'd also like to encourage everyone to support your favorite authors and artisans by giving the gift of someone's labor and love. Yes, we do it because we love doing it, but also, we need to pay bills and buy food too. So consider giving unique, quality gifts that you can't find in the mass produced world. 

Giveaway Winner © December 2021

December 6, 2021

Recommendations Wanted: What Is Your Dream Camera?

That is a question for all you photography buffs out there. I'm asking because I received an unexpected gift of money that I want to put toward a better quality camera. My cameras have always been low-end, mostly point-and-shoot types that 1) never give the kind of photos I'm hoping for and 2) seem to have a short lifespan. Since this is a rare opportunity for me, I want to spend that money wisely. What I'm hoping for is a professional quality camera for under $1000 (if there is such a thing!) 

The function of this camera will be for documenting our homestead projects and progress. So, I'm not interested in all the bells and whistles, nor in having a large collection of lenses. Besides general purpose, I like to take close-ups and zoom shots, so I've approached my research with that in mind. 

One thing  I was surprised to learn, is about mirrorless cameras. These are different from the single-lens reflex (SLR) cameras because their viewfinder doesn't use a mirror. So, the first leg of my research wasn't comparing brands and models, but the differences between DSLR (digital single-lens reflex) and mirrorless cameras. Then I organized what I learned into pros and cons relevant to my personal goals and needs. Here's what I've learned so far:

DSLR

PROS
  • better battery life
  • less expensive
  • more lenses available
  • optical viewfinder can be used when the camera is off
CONS
  • larger
  • heavier
  • noisier
  • slower burst speed
  • optical viewfinder
    • doesn't show exposure as it is
    • doesn't show accurate depth of field
  • little to no current development of DSLR technology (camera manufacturers still make DSLR cameras, but have pretty much switched their emphasis and development to mirrorless cameras)
Mirrorless

PROS
  • smaller
  • lighter weight
  • quieter
  • faster
  • improved autofocus now rivals DSLR
  • electronic viewfinder
    • real time image preview (WYSIWYG)
    • shows exposure as it is
    • shows depth of field
  • better quality video
  • more mirrorless lenses available than previously

CONS
  • shorter battery life
  • more expensive
  • electronic VF
    • lower refresh rate (on lower end cameras)
    • can't use it when the camera is off

There are also a few things which I'm basically neutral about:
  • GPS - I know where I am
  • WIFI or bluetooth - everything goes through a photo editor before uploading to the internet
  • lens options
    • I'm only interested in 3 basic lenses
    • plus there lens adapters to use DSLR lenses on mirrorless cameras

At this point, I'm strongly leaning toward a mirrorless camera, but I'm open and ready for recommendations. If you're interested in photography and could buy your dream camera, what would it be and why? Opinions welcome!

December 1, 2021

Don't Forget the Gift of Books (& A Giveaway)

Here it is. My annual self-promotion post, hopefully in time for folks looking for economical ways to check family and friends off their gift-giving list. Given the way things are these days, the book I'd like to feature this year is one that's relevant in days of potential economic uncertainty. That book is 


Why do I think it's relevant? Here's an excerpt from the introduction.

"This book is for those who are looking for long-term preparedness that goes beyond simply stocking up on canned foods, dry goods, and other necessities. Gardening adds fresh vegetables and fruits to the diet, but keeping farm animals will enable you to have fresh eggs, milk, butter, cheese, and meat."

To this you might say, "but I live in an apartment, or in town, where the city or homeowners' association forbids keeping farm animals". But consider this - folks keep rabbits and quail in garages, basements, and spare rooms, and miniature breeds in backyards.  

That still might not convince you, but if you—or someone you know—is concerned about inflation, supply chains, and being able to feed their families, then please consider giving this book a read. Here's a little more from the introduction.

"Those of us who didn’t grow up farming are often puzzled about how to begin. We lack the skills and knowledge needed to make a start. Dan and I had to rely on research plus trial and error, but always with the question “what if?” on our minds. What if we could no longer buy layer pellets at the feed store? What if we could no longer buy filters for straining milk, or cultures and rennet for making cheese? What if the grid goes down—how will we store our eggs, milk, and meat? Some of what we tried worked, but some of it didn’t. This book is a compilation of everything we have learned about preparedness with livestock and how we put it into practice. Its aim is to give you the advantage of our research and experience, so that hopefully you can avoid some of the problems we have had."

"Prepper’s Livestock Handbook will give you the information you need to make workable choices for your own homestead. My goal is to give you a foundation upon which to build that you can adjust according to your personal goals and circumstances.

Maybe rather than me telling you why you should get the book, I'll just share some excerpts, along with a sampling of some of the charts in the book. It contains ten chapters, an extensive resource list, and is about 230 pages long.

Chapter 1, "First Things First"

"People keep livestock for many reasons: eggs, dairy, meat, vegetation control, manure for compost, to sell, as pets, for showing, for breed conservation, because they like a particular animal, or any combination of these. Your reasons for keeping farm animals will determine your livestock philosophy and methods, as will your location and terrain."

"Probably the most common questions are “How much land do I need?” and “How many animals can I keep on my property?” Called “stocking rates,” the answers to those questions are often unsatisfying, because they depend not only on the amount of land but on the quality of forage, as well as the kinds of animals you want to keep. I will give you a better idea on that in the next chapter, Best Breeds for Self-Reliance."

Chapter 2, "Best Breeds for Self-Reliance" 

"Most of the livestock breeds that people are familiar with are commercial breeds. These are the animals we see on farms in the movies and in children’s picture books. They are the most common breeds because industrialized agriculture is the most extensive form of farming practiced in the modern world. Commercial producers are looking for cost effectiveness: maximum output (profit) on the most economical inputs (expenses) possible. The breeds they use have been developed to increase production and weight gain on scientifically formulated feeds with the ability to tolerate overcrowding in confined spaces. Breeding and mothering instincts are considered nonessential and often bred out. Some commercial breeds of chickens and turkeys, for example, don’t know how to mate and don’t know how to hatch their eggs. Artificial insemination is used instead. For the homesteader, there are other options."

Sample of one of the charts in chapter 2. Click to biggify.

Chapter 3, "Barns, Shelters, and Fencing" 

"When Dan and I started preparing for livestock, we wondered if one of our two small outbuildings would be adequate shelter for chickens and goats. We made several modifications on what became our first “barn.” We learned a lot from that setup and from the animals too. We made a number of changes over the years, and when we finally built a chicken coop and a goat barn, we were able to build structures that met both their needs and ours."

"In the following pages, I’ll discuss basic livestock housing along with a few ideas to help you design shelter to meet your goals and needs. I’ll share fencing options with you, including the things we wish we’d known before we started on ours."

Chapter 4, "Forage and Feed" 

"Livestock feeding has become extremely modernized over the years. On the one hand, this is convenient. We can simply load our pickup trucks with 50-pound bags of nutritionally complete packaged feed (called concentrates) and an occasional sack of minerals—what could be easier? From a preparedness perspective, however, this approach means I must purchase and store as much hay and feed as my preparedness plan prescribes. Or I can learn how to grow my own. But how do I take the feed bag ingredient list of roughage products, plant protein products, and grain by-products, and use that to formulate my own feeds? In this chapter, we’ll take a look at feeding livestock from a self-reliance perspective."

Sample chart and tidbit from Chapter 4. Click to enlarge.

And another one.

Chapter 5, "Breeding and Pregnancy"

"Maintaining on ongoing supply of eggs, milk, and meat requires decision-making and planning. Chickens will lay eggs without a rooster, but milk and a yearly meat supply will require a male of your chosen species. This chapter will discuss the pros and cons of keeping males, how to know the best times for breeding, how to tell when your ladies are in season, how to detect pregnancy, and basic care during pregnancy."

Another sample chart. Click to enlarge

Chapter 6, "Blessed Events: Birthing and Hatching"

"The big day is approaching! How do you need to prepare? What can you expect? This chapter will help you get ready for birthing and hatching, know what to expect, plus help you identify some common
problems."

Sample chart from chapter 6. Click to enlarge.

Chapter 7, "Eggs, Milk, and Meat"

"If you ask folks why they keep livestock, I’m guessing that near the top of almost every list is for food. More and more people want to eat healthy, naturally raised, minimally processed eggs, milk, and meat from humanely treated animals fed healthy, natural diets. Having a self-sustaining food supply is also important to many folks, including most preppers.

As with fruits and vegetables, the production of eggs, milk, and meat is seasonal. There is an ebb and flow to our homegrown food supply, but we must eat every day. Vegetables, fruits, eggs, milk, dairy products, and meat are perishable, so we must learn how to either extend their production or preserve them. This chapter will cover the basics of producing animal foods, how to aim for year-round production, and ways to preserve them."

One of the many how-tos. Click to biggify.

Chapter 8, "Keeping Them Healthy"

"Healthy animals are happy animals. They are alert, bright-eyed, and interested in their surroundings. They have shiny coats or feathers, good appetites, and are in good condition (neither too thin nor overweight). Animals that are properly fed and cared for have the best chance of living long, productive lives."

"Much of what we’ve discussed in this book is the foundation for good livestock health:

  • Start with healthy, disease-free stock (Chapter 2).
  • Provide good shelter with adequate space (Chapter 3).
  • Feed the right diet with proper nutrition (Chapter 4).
  • Provide proper care during breeding and pregnancy (Chapter 5).
  • Provide good care during labor and delivery (Chapter 6).
  • Take good care of newborns (Chapter 6).
  • Keep them safe (coming in Chapter 9).

In this chapter, I will discuss routine care, prevention of problems, how to identify when something is wrong, and when you might need a veterinarian’s help."


Chapter 9, "Keeping Them Safe"

"One of the hard realities of keeping livestock is loss from predation. Sometimes you will find remains, or sometimes animals will completely disappear. Predation may be a recurring problem or it may be seasonal.

When you have missing animals or find remains, you want to know what caused it. This chapter will give you an idea of what predators are common, what they prey on, and how to identify them by what they leave behind. I’ll give you information on predator control and deterrents, plus other ways to protect your livestock."

A snippet from the 4+ page chart in the chapter. Click to enlarge

Chapter 10, "Keeping Things Manageable"

"Homestead burnout: It’s not something you think about when you first get started, but it does happen. Things start well but soon become overwhelming: too many projects, too little time, too many things going wrong. The workload gets heavier, the to-do list gets longer, and there are never-ending demands on your time and energy. Things aren’t working out the way you expected and the dream has become a nightmare. Changing lifestyles is a huge undertaking. In this chapter I’ll share the lessons Dan and I have learned about how to keep things manageable."

~

You can see the complete list of charts at the book's website, here. You will also see a partial list of where to buy it. It's available in both paperback (list price $15.95) and eBook (list price $11.99. Better prices for both are currently at Amazon.)

The Giveaway

So what about the giveaway? I'm hoping for some help to promote this book and am offering a chance to win a paperback copy of Prepper's Livestock Handbook for that help. Just grab this blog post's URL and use it to post a shout-out on your own blog or favorite social media. To enter the giveaway, leave a comment here with a link to your post. You can get additional entries by helping me on different venues. 

If you've already read it, you can earn entries by leaving a review at your favorite book site (think gift copy). Then come back and leave a link in the comments to that review. I'll announce the winner next Friday, Dec. 10.

Even though this is a shameless plug for myself, I'm confident that all the time and energy I put into researching and writing this book will make it a worthwhile resource for you or a friend.

November 27, 2021

Cooking Our First Sweet Potato Squash

I promised to let you all know about the sweet potato winter squash I grew this year (see the comments of "Not Pumpkins"). Our first taste test was a pie for Thanksgiving. Pumpkin pie is supposed to be the tradition, but I prefer sweet potato or winter squash pie, so that's what I make instead.

I chose the largest of the small squashes for my pie. 

This small one weighed in at 4 lbs., 5 oz.

The outside color wasn't impressive, but the color inside the squash was nice.

It contained a good amount of flesh. I saved some of the seeds and then chopped and fed the pulp to the goats and chickens. 

Next came cooking. I've tried both the oven baking method and the steaming method for cooking pumpkin and winter squash. Since I usually manage to make a mess in the oven from seeping juices, I prefer the steaming method.

The bonus with steaming is that the water in the bottom pot collects some of the juices and color. So I always use it for something, even if it's just watering plants after it cools. This time, I used it to make a pot of split pea soup.


I let it cool after it was cooked. It scooped out easily and made a smooth puree with the help of my Foley food mill. I needed two cups for my recipe, which is exactly what I got.


I might as well include the recipe! It's an adaptation of the Betty Crocker cookbook "old-fashioned pumpkin pie." Mainly, I omit the evaporated milk or cream, because I find that fresh homemade pumpkin or squash puree is more liquidy than commercial canned pumpkin. 

Not Pumpkin Pie

  • 2 cups winter squash puree
  • 2 eggs
  • 3/4 cup unbleached sugar
  • 1/2 tsp salt
  • 1 tsp cinnamon
  • 1/2 tsp ginger
  • 1/4 tsp cloves

Mix well and pour into a prepared, unbaked pie crust (my recipe is here).


Bake at 425°F (220°C) for 15 minutes, then 350°F (177°C) for 45 more minutes or until an inserted knife comes out clean. Cool and serve with whipped cream or ice cream (traditionally, we like cinnamon ice cream).

How was it? I have to say it was the best winter squash pie we've ever eaten! Better than pumpkin, better than cushaw, better than North Georgia candy roaster (which is awfully good). 

Now, I'm looking forward to trying it in pancakes and cake. I will definitely plant it again.

November 23, 2021

A Few Fall Photos

November has been the month of frost and falling leaves. Most of the trees on our place are oaks and pecans, which don't produce very spectacular autumn color. But I can still find bits of it here and there, so the goats and I took a trek. The girls hunted for acorns and I hunted for color. 


Here's what we found.


We have a nice seasonal view from the front porch, too.


A few other fall photos.

The last of my sweet potatoes are harvested.
There are from the African keyhole garden.

Sunday morning French toast. I love cooking on my wood cookstove.

Classic Sam

I have so much to be thankful for.

A Few Fall Photos © November 2021