November 30, 2009

Dining Room Floor: Getting There!

The hardwood floor is down. I can't believe we've finally gotten to this point!

Here are a few photos of the process:

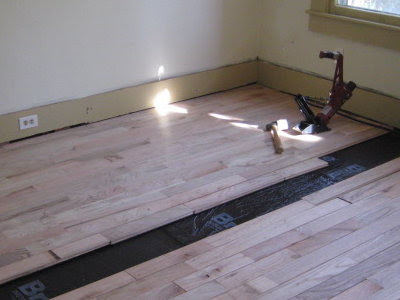
Getting started on the hardwood floor.We put down tongue and groove oak, 3.25 inches wide (real width), 3/4 inch thick. The first course was face-nailed next to the baseboard where the nails will be covered with quarter-round trim. This meant holes had to be drilled and the nails hammered by hand. The string served as a guide to get the first couple of rows in evenly. After that we just kept going. We did pretty well because the difference was only 1/8 inch off by the time we got to the other side of the room.

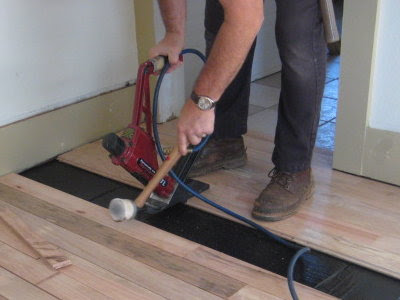
Pneumatic flooring nailer in actionWe rented a pneumatic nailer for this job. It is hooked up to an air compressor, but the nails are popped in manually with a mallet. One side of the mallet is used to tap the board into place (as above), the other is used to hit the "trigger."

Nailer nailsI've never helped put down an hardwood floor before, so I was surprised at the nails used (photo left). They are shot into the tongue of each row and so are hidden by the groove of the adjacent row of boards.


Woe is Rascal
Our snoopervisor was not at all happy with all the noise (compressor roaring and nailer popping loudly). After complaining about it to no avail, he eventually consoled himself with a nice long super-sound sleep.

It was slow going at first, but eventually we developed a rhythm. I set the succeeding rows in place while Dan nailed. Since I had pre-laid the floor, very little sawing was necessary and it went fairly quickly.


Making progress
Coming through the doorway to the hallThe doorway between the dining room and hall once had a door, but it was gone before we got here. We plan to leave it open, so no threshold is necessary here.

It ended up taking us two days to do the dining room and front portion of the hall.

Finished dining roomThe blue ribbon dangling from the dining room light, BTW, was put there by Dan because I kept hitting my head on it when I was laying out the floor. I thought is was a silly idea, but I never hit my head on it again, so it worked!

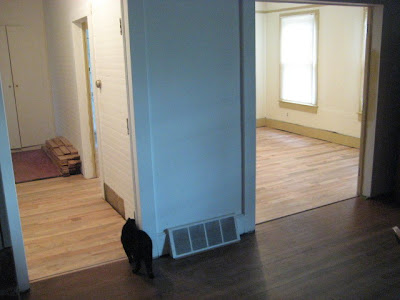
A view of both dining room & hallwayStill to do:
  • sanding
  • staining
  • finishing with polyurethane
  • refinishing the French and swinging kitchen doors
  • painting and remounting the built-in corner hutch doors
  • finishing the baseboard trim
  • new thresholds between living room/dining room & living room/hallway
As you can see, we have a way to go before we can declare it "done!" Hopefully we can do the sanding and staining next weekend.

Dining Room Floor: Getting There! photos & text copyright 

November 28, 2009

Sort Of Like A Jigsaw Puzzle

Laying out the flooring before nailing it downThe Challenge:

To make as many rows of flooring fit with a minimal amount of sawing

The Rules:

Lay all the flooring out before nailing it down
1/2 inch must be left between wall and board ends
Joins in each adjacent row must be a minimum of 6 inches apart
Use longer rather than shorter pieces on the ends

Fitted flooring boards like a jigsaw puzzleComing along and almost done.

Sort Of Like A Jigsaw Puzzle photos & text copyright 


November 25, 2009

Dining Room Floor: Removing The Old Linoleum

Let's see. The last time we were talking about the dining room, I was painting while DH was crawling around under it. Those tasks accomplished, the next step was to remove the old linoleum.

When we first bought the house, it had ugly wall-to-wall pink carpeting. (Glimpse of that here) Not that I have anything against pink, but to me it's an accent color, not a main attraction. Before we moved in, we pulled out the carpeting in both the living and dining room. The living room revealed a nice hardwood floor in pretty fair condition, the dining room floor was covered with linoleum. (Photos of that in this post.) Before we can put down the new hardwood floor, that has to come up too.

Old linoleum half pulled upWell, the sunlight coming in through the window is a bit of a bother here. But we have half the linoleum off the floor and rolled up ready to remove. The second half is still to go.

Close-up of the paste jobThe linoleum was put down with some sort of tarry paste, right over the tongue and groove floor boards. This is the only floor the dining room has. There is no subfloor. You can see the underside of these boards in the crawlspace. (Photo here.)

Scraping the stubborn stuffThe linoleum came up pretty easily, but we did have to scrape some spots.

Dining room - kitchen thresholdDan also took up the thresholds between the rooms. This gives us a pretty good idea of what we'll have to deal with when we do the kitchen floor. The ceramic tiles were mortared right to the floor boards, so I suspect it will be a real chore to redo this floor.

Linoleum gone!Once the linoleum was removed from the dining room, we he tackled the hallway.

What was under the hall carpet.Under the pink carpet was an ugly old linoleum which stirs up vague memories of my childhood home. This had to be pulled up as well, but it was really glued down and required a lot of scraping.

Hall floor scraped & readyFor right now, we're only going to put the flooring down on the prepared areas. We will wait on the remainder of the hall until after we calculate how much flooring we have left. Our original estimate left the linen closet in place. Now however, we are considering removing it. More on all that later.


November 23, 2009

Meet My Ginger Bug

This is a ginger bugPerhaps I should begin by explaining that this is another experiment in fermentation. This time I'm going to try my hand at ginger beer. This isn't anything like "real" beer, but is a naturally carbonated soft drink. Both Nourishing Traditions and Wild Fermentation (info on these and more in this post) contain recipes for ginger beer, but I opted for the one in Wild Fermentation because it makes a smaller quantity.

The "bug" serves as a starter and is easy to make:

1 cup warm water (I used non-chlorinated)
2 tsp sugar
2 tsp grated ginger

Keep in a warm place. Add the same amount of sugar and ginger every day or so until it starts to bubble. Mine only took a couple of days.

Once the bug was active, I boiled 2 quarts of water and added 2 inches of grated ginger and 1 & 1/2 cups sugar. These are boiled together for 15 minutes and then allowed to cool.

Once the mixture cooled I strained the ginger out, added the liquid from the strained "bug," and enough water to make a gallon total. The recipe also called for the juice of two lemons, but since I only had limes on hand, I used that. I poured the mixture into bottles, capped them, and they must now sit in a warm place for two weeks.

4 quart bottles of ginger beerHappily I've saved brown glass root beer bottles from quite a few years ago. I like to save colored glass to store tinctures in, but these quart bottles are perfect for the ginger beer.

Depending on how well we like this, I may or may not try the other recipe. What I'm aiming for is a substitute for soft drinks. We don't drink a lot of them, but they are part of our Pizza & Dessert Night tradition. We've always known they aren't good for us, but some food habits die hard.

One thing I learned a long time ago about making dietary changes, is that there is a better chance for success if the changes are small and adapted slowly. Drastic changes in diet don't last when the motivation for them has worn off. This is why so many folks "fail" at diets or attempts to switch to healthier foods. When I first introduced my family to whole grain flours, I mixed them with white flour, gradually increasing the amount of whole grain. I knew I'd been successful the day everyone commented on how "yucky" store bought white bread tasted.

So. In two weeks I'll let you know how well this one goes over. If acceptable, I will definitely start experimenting more with homemade soft drinks. Heck. I'll experiment even if it isn't acceptable.

Meet My Ginger Bug photos & text copyright 


November 21, 2009

Garden Goings On

I've been planning to write a summer garden summary, documenting the amount and type of seeds I planted, totals for produce and saved seeds, successes, failures, and other things I need to remember. What I'm waiting on to do that, are these...

I've still got tomatoes on the vine!
Peppers are still producing with 2 almost ready to pick.
Loads of okra buds, no pods.  :(...one last tomato plant, my lone bell pepper, and a whole row of okra, all of which survived our first frost. Amazingly we haven't had a second yet, so I'm hoping to get more tomatoes and peppers. The peppers are getting to be a pretty good size and the plant is still flowering. I have about 10 or 12 marble to golf ball size green tomatoes too, with loads more flowers on the plant. The okra however, is all show and no pods.

The fall garden is doing fair to middlin'. As you will see, much of it still needs to be mulched.

Both carrots and garlic seem to be happy together.Carrots and garlic appear to be doing well. This is the store bought garlic that several of you mentioned not having good success with. Well see.

Grow cabbages, grow!The cabbages haven't grown much since I've planted them though.

Delicious raw or steamed.Broccoli heads are small, but oh so tasty!

Not sure how well these are doing.Beets are camouflaged by the leaf mulch.

Turnips need to be thinned again.Loads of turnips. The greens are doing well but I'm not sure what's going on at the other end.

TURNIP UPDATE: 21 Nov. 2009, 4:28 PM ....


Wish I had more of theseMy Romaine lettuces have been very slow. Not a whole lot of them came up either.

Disappointed about the poor showing of spinach.My outrageously expensive onion sets are doing okay. The spinach they are companioned with, less so.

Still, it's one of the best fall gardens I've ever had.

Happily, the annual rye is coming up in next year's garden....

Annual rye looking quite well.And no more deer tracks to report. You can see the beginnings of our zig zag fence in the background. We're still waiting on the fruit trees, but have their new homes well prepared.

Most recently, DH tilled the first two herb beds for the beginnings of my herb gardens.

I've been removing the grass roots and seed heads. I'll work in some sand into the front one, as this will be for lavender and compatible culinary herbs. The one on the other side of the stepping stones will be for echinacea and whatever else I decide. After I finish weeding I'll mulch them both well until next spring.

For once in my gardening life I feel on top of things.

Garden Goings On photos & text copyright 


November 19, 2009

2009 Saved Seeds

My small but precious stash of seeds saved for next year's garden.These seeds are a real gift because I never planned on having seeds to save from my garden this year. In fact, a year ago I didn't know I would have a garden this summer. Just hoping. I bought quite a few seeds on faith and somehow managed to get quite a few heirlooms. Happily, I have been able to save several:

  • Clemson Spineless Okra
  • National Pickling Cucumber
  • Casaba Melon (from a seed saving neighbor)
  • Waltham Butternut Squash
  • Small Sugar Pumpkin
  • Kentucky Wonder Pole Beans
  • Mammoth Gray Sunflowers

I also have one Table Queen Acorn Squash in the pantry which I will save the seeds from. I hope to be able to save seeds from my fall garden as well.

The dates on the envelopes (hard to read, I know) are planting dates. The first is for spring, the second for a fall planting. I'm thinking that if I file them by date rather than alphabetically, I'll have a better chance of getting everything in on time.

My plan is that 2010 will be the last year I purchase vegetable seeds, barring unforeseen circumstances or an impulse to grow something I don't already have. My herb gardens will be a work in progress for several years, so I assume I'll still be buying seeds for that.

As much as I love the prospect of being a self-sustaining gardener, I will miss pouring over seed catalogues in the early spring. Still, to grow all my own saved seeds will be worth it.

2009 Saved Seeds photos & text copyright November 2009 


November 18, 2009

I'm Entering A Give-a-Way...

... and the rules say I need to mention it on my blog. So here it is. Cottage Homestead is giving away a manual hand crank coffee grinder, which I would absolutely love to have. Click here to go see for yourself. :)

And another ... this one is for Coconut Cream Concentrate from Tropical Traditions. For details, check out this blog.

November 17, 2009

Color For The Dining Room

While Dan has been busy under the dining room, I've been busy in it. I don't know if I've mentioned it before, but I am really not too keen on an entire house with ultra-white walls. This is the color most of the interior had been painted, I suppose in order to put it on the market. Painting the dining room before we put down a new hardwood floor made sense to me.

Making the decision to paint was far easier than choosing the colors. Since the dining and living rooms open up to one another, I wanted the colors to coordinate with my furniture. (To see photo swatches of colors, click here and scroll down.)

Finally I went to Lowe's, where I could bring a cushion and compare paint chips under different types of lighting. To show you the ones I chose, I went to the Olympic Paint website (color sampler here) and grabbed a screenshot (which doesn't seem to be totally accurate. The actual paint is a touch more gold.)

It's the trim color I'm not sure ofEven though I chose them because they coordinate with my living room fabrics, I was really undecided about them for the longest time. I was planning to do the lightest one for the dining room walls, the middle one for the living room walls, and the darkest for all trim.

The problem was that they just aren't "my" colors. Color preferences are highly subjective. I am always immediately drawn toward cool colors such as blues, greens, and purples. Occasionally red, never orange, and rarely brown. I like the fabrics in my couch because it contains a lot of burgundy. But I didn't want burgundy walls or trim. These color chips went well with my furniture and I even bought the paint, but I still hesitated.

When Dan got started working on the support for the dining room floor, I knew I couldn't hesitate any longer. I finally decided just to take the plunge and do it. After all, I told myself, it isn't the end of the world if I don't like it and it doesn't have to be permanent forever.

Small crack in the wallI made an interesting discovery while I was doing the prep work before painting. If you read my woodstove alcove series, you may recall that we used 1/2" cement board for the alcove walls. While we were working on that, we discovered that the entire living room wall on the fireplace side was 3/4" cement board. At that time we assumed that the other walls in the living and dining rooms were plaster.

When I pulled the cove molding from the top of the dining room baseboards, I discovered that a crack wasn't simply a crack in the plaster, (photo left), it was a crack in the wall. Looking at the rest of the walls we realized that they were all cement board. In both dining and living rooms. Of course, there used to be a woodburning stove in the dining room as well, but who would have thought that two entire rooms were cement board.

I painted the walls first. Then the trim and built-in corner cabinets.

1st of the two corner built-insThe green outlining is FrogTape. What a life saver, especially for someone like me, who's a naturally messy painter (Head for cover when I've got a paint roller in my hand). We took the doors off the bottom cabinets and I bought new hinges and knobs. The pale green inside the bottom of the cabinet was the room's original color, like the rest of the house.

Even as I'm painting I'm unsure of the colors, especially the trim. We did discuss taking all the trim down, stripping off the paint, and refinishing the wood. To be honest, I'm just not ready for all the work involved in that, there's just too much else to do around here. We do have some ideas for the dining room, something more formal, and DH was willing to go ahead with those. I, on the other hand, am not willing to put all our time, energy, and money into only one room at this point. There's still the kitchen and bathrooms which have to be done, and the sooner the better. For now, I just want the new floor in and the room presentable. I'm thinking of it as "Phase One". Some day we can commence with "Phase Two," but not until other things are accomplished first.

So, even with my uncertainties, I paint on. One of the real tests, was how well it looked with my Blue Willow. (You can click on the photos to enlarge a bit.)

The smaller of the two corner unitsAfter putting a few pieces on the one corner unit, I realized I could work with these colors. The contrast with the blue is pleasing and I plan to pull in the burgundy and green from the couch and rug with draperies and chair cushions.

So I paint on, anxious to get started on the floor. Having a dining room will be a big step toward making our house feel like a home.

Color For The Dining Room photos & text copyright
November 2009 by Leigh at http://www.5acresandadream.com/


November 15, 2009

Beefing Up The Dining Room Floor

I've been saying for awhile now that our next house project is a new hardwood floor to replace the old linoleum in the dining room. Well, it is, but anyone who's done any renovation on an old home knows that there are often a lot of preliminary steps needing to be done before getting to the "real" project. It's been no different with our dining room floor. While to floor in that room is level (amazingly), it did have some give to it in spots. DH wanted to address this by adding additional support before we started nailing down the new flooring.

Our crawlspace is not ideal. It goes from about 3 feet at the back of the house, to barely inches in the front. The oil burning heater and air conditioner (pic here) were installed near the dining room which is about the middle of the house. To do this, they knocked a huge hole in the foundation. A concrete pad was laid and the unit placed on top of that. This meant that the largest of the ductwork was under the dining room, leaving no room to maneuver. To be able to work under there, DH pulled out the heater/AC unit, put a temporary header in the opening, and pulled out all the ductwork. Not only did this give him room to work, but also easy access to the dining room floor.

Where the heater wasNow, I admit that I am not without misgivings about this. Not because of the heater, but because of the AC. Not that we needed it all summer, but it was sure nice to have when we had days on end in the middle 90s. Regardless of that, the ductwork was in very poor shape. Parts of it weren't insulated or the insulation was falling off, so it needs to be replaced anyway.

We aren't the first ones to work on supporting the dining room floor. You can see the beam that was previously added in the photo below. It is supported by concrete blocks.

Old support beam under the dining room.This beam is 4x4 inches, and 8 and 1/2 feet long. The length of the dining room is 13 feet, so this only supported a portion of it and so was minimally helpful.

A problem that needed to be addressed was the bridging. Do you see the X's in the photo above? This is cross diagonal bridging. It's purpose is to prevent swaying of floor joist which cover a long span. While cross bridging is acceptable, the problem is that the bottoms of the X's are nailed into the bottom of the joist. They should be attached on the side of the joist, the same way as they are at the top of the X.

One more thing to be noted is what you can see between the floor joists. It is the underside of our dining room floor...

Bottom side of our dining room floor.We have no subfloor, just tongue and groove floor boards. On the top side is linoleum (photos of that in this post.)

Dan's plan was to start by installing a 14 foot support beam. He made it by putting two 2x6's together. You can see part of it in the very first photo. To support it, he wanted to use three piers of concrete blocks, and three jack posts, of which you can see two below.

Floorjacks at different heightsI had never seen these before. They can be purchased in different lengths, each of which is adjustable. He made his own footings for the piers, repurposing a discarded cardboard tube which was originally used to hold industrial rolled steel.

Footer moldHe strengthened the form with rebar, and then poured concrete into it. The concrete blocks were set on these.

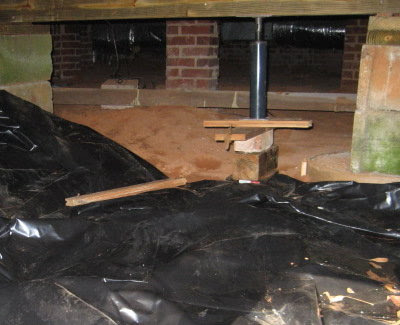
New support beam in placeThe pier on the right is one of the new ones. The footing is on the bottom with concrete blocks supporting the beam. To the left of that is one of the floor jacks. The floor jacks enabled the beam to be raised just enough to slip the concrete blocks in place.

Actually, the concrete block pier you see between the two floor jacks is supporting the floor further back in the photo. What in the world that partially buried concrete block is doing there, we don't have a clue.

You can also see in the above photo that the cross diagonal bridging is gone. Dan replaced it with solid bridging, which is made of sections of a 2x8, cut to fit between each joist. In the photo, it almost looks as though these are placed directly on top of the support beam, but they aren't. It looks that way because of the angle the photo was taken.

Of historical interest, are the type of nails he found in the old bridging.

An old, bent, cutnailThese are cut nails. Unlike modern wire nails which are round, old-fashioned cut nails were made by cutting them from sheet of steel, giving them the squared appearance. The one I'm holding has been bent. They can still be bought today for anywhere from $8 to $12 a pound, and are used in restoration projects for an authentic historical look. An interesting history of nails can be found in this article, "All About Nails", at the Appalachian Blacksmithing Association website.

The last thing to be done was to put down black plastic on the crawlspace floor.

Starting to put the plastic downThis will help control moisture in the crawlspace with it's accompanying problems of mold, fungi, and mildew. It will also help prevent moisture from damaging the structural elements of the house such as the joists and sills, because moisture will eventually break down wood.

As you can see, we've just begun with that step. Still to be addressed ins the hole that was knocked out of the foundation, as well as places where the mortar is loose from the foundation bricks. Much work on that part may have to wait until summer and the return of warmer, dryer weather.

Once DH is satisfied with it, then we can begin with the flooring. Yay! But first, I should show you my own preparations in the dining room. I'll do that next time.

Beefing Up The Dining Room Floor photos & text copyright
November 2009 by Leigh at http://www.5acresandadream.com/


November 13, 2009

"You Can Buy As Many Books As You Want"

Dan and I used to have a private joke. I love books (we both do), and when I could find a good bargain for something we were interested in, I would get it. Then I would show it to him, and he would invariably respond, "Nooooo! Now we have to move it!" This was because he used to drive for a local moving company, which meant not only driving, but also packing boxes, loading and unloading the truck. As you can imagine, moving households that owned a lot of books meant a long, back-breaking day's labor.

The other day, when I was showing him my latest purchases, he put his hand on my shoulder, looked me in the eye, and said, "You can buy as many books as you want." We both laughed because this is our forever home which means we aren't planning to ever move again.

He doesn't have to worry about me going hog wild of course, because I major in frugalness. That means I am careful with what I choose to buy, and I only buy if I can get it on sale or discounted. Since we've moved here, I've added quite a few good books to our home library, and almost all of them are tools to help us fulfill our dream.

It's funny because while I was working on this post, Theresa over at Camp Runamuck asked her readers about their reading lists, so I can offer these as mine. You can click on any book cover for a closer look.

Click here to biggify Nourishing Traditions: The Cookbook that Challenges Politically Correct Nutrition and the Diet Dictocrats by Sally Fallon. I mentioned this book in my recent ginger carrot post. Besides being a cookbook, this book offers a complete dietary model for healthy living. It begins with a discussion of the nutrients and their food sources, and then goes on to a chapter on "Mastering The Basics." These include cultured dairy products, fermented fruits and vegetables, sprouting grains, nuts & seeds, stocks, salad dressings, sauces, marinades, condiments, and about coconut products. Ther rest of the book covers every category of recipe you can imagine, including a chapter on feeding babies. Lots of interesting informational tidbits are to be found in the sidebars.

I don't agree with everything she says, but even so, this has been a mind blowing book for me.

Wild Fermentation: The Flavor, Nutrition, and Craft of Live-Culture Foods by Sandor Ellix Katz. Sandor approaches the subject from a cultural point of view: cultural context, cultural rehabilitation, cultural theory, cultural homogenization, and cultural manipulation. I don't agree with all of his conclusions, but he writes intelligently and makes some good points. Chapters include: Vegetable Ferments, Bean Ferments, Dairy Ferments (and Vegan Alternatives), Breads, Fermented Grain Porridges and Beverages, Wines (Including Mead, Cider, and Ginger Beer), Beers, and Vinegars. Lots of good recipes here.

Sandor also has a website and fermentation forum at http://www.wildfermentation.com/

This book is a keeperThis is another one I mentioned previously, Preserving Food without Freezing or Canning: Traditional Techniques Using Salt, Oil, Sugar, Alcohol, Vinegar, Drying, Cold Storage, and Lactic Fermentation by The Gardeners & Farmers of Terre Vivante. This one was the precursor to the two above.

Besides the chapter on preserving with lactic fermentation, other chapters cover preserving by root cellaring, by drying, in oil, with salt, with sugar, in alcohol, and sweet & sour preserves. A chart at the back of the book indicates which methods are best for which foods.

DH was interested in this one, Smoking Food: A Beginner's Guide , by Chris Dubbs and Dave Heberle. We're nowhere near ready to build our own smoker, but like most things on discount, I've learned to buy it when I find it. The book covers types of smokers, with instructions on how to make your own, various fuels, other equipment, materials, cures, hot vs. cold smoking, and marinades. Then it discusses the how-tos of smoking fish, seafood, butcher meat (i.e. pork and beef), poultry, wild game, making and smoking sausage, and lastly smoking cheese, nuts, and eggs. Appendices discuss troubleshooting, herbs and spices, and tips on handling game (deer, rabbit, bear, squirrel, opossum, woodchuck, etc.)

This is another book that's really broadening my thinking about our little homestead, Small-Scale Grain Raising: An Organic Guide to Growing, Processing, and Using Nutritious Whole Grains for Home Gardeners and Local Farmers, 2nd Edition by Gene Logsdon. His sense of humor makes this fun to read (ever heard of a pancake patch?) For the first time I can actually see myself raising grain. Look forward to some experiments next summer!

Chapters discuss corn, wheat, the sorghums, oats, dry beans, rye, barley, buckwheat, millet, legumes, rice, and feeding grains to animals. One chapter is dedicated to more unusual grains like wild rice, triticale (a wheat/rye cross), spelt, farro, quinoa, and flax. Each chapter contains some good looking recipes as well.

Published in 2009, I don't agree with him that the jury's still out on GMO grains, but he does endorse open pollinated seed in order to save it. Informative charts are sprinkled throughout the book: cooking chart, bushel chart, and crop rotation plans. An illustrated glossary shows and explains the various tools needed form homegrowing grains.

Handy Farm Devices and How to Make Them by Rolfe Cobleigh is a reprint from 1910. It wasn't very expensive and I figured that even if it didn't contain something of use to us here on the homestead, it would be of historical interest at least. I wasn't disappointed, I got both. Devices are discussed by type, which are divided into chapters. For example: Workshop and Tools, In and Around the House, Barns and Stock, Poultry and Bees, Garden and Orchard, Field and Wood, and Gates and Doors. The devices themselves? How about: a potato sorter, a stump puller, a rack for seed corn, a wheelbarrow sheep trough, a fire warning device, an elevated clothes line, a device for extracting beeswax, and a gate to overcome snowdrifts, to name just a few.

This particular reprint is from Skyhorse Publishing, but Dover also reprints it under the title, Old-Time Farm and Garden Devices and How to Make Them .

I mailordered Fuel Cell Projects for the Evil Genius by Gavin D. J. Harper because it is about hydrogen as an energy source. However, it wasn't what we hoped it would be. it Oh, it's a very good book, and I wish I'd had it for DS back when we were homeschooling our way through high school science. In fact, it would be perfect for that because it is geared toward small hydrogen fueled DIY projects, some of which we may still be able to apply practically around the place. Or at least gain a better understanding in order to apply the knowledge on a larger scale.

Chapter 1 is a history of the discovery of hydrogen and the development of fuel cells. Chapter 2 is entitled "the Hydrogen Economy" which explains why hydrogen as an energy source is important to explore. The remaining chapters discuss and provide projects for making and storing hydrogen, different types of fuel cells ( platinum, alkaline, PEM, methanol, microbial, high-temp. and scratch-built. Hydrogen safety, transport, and fuel cell competitions round out the book.

I bought The Amish Cookbook when we were at the Shady Maple Gift Shop on our trip to Pennsylvania. It contains over 1000 recipes from 14 states, and so probably gives a pretty good idea of a typical Amish diet. This is not a health or natural food cookbook, and some of the recipes contain ingredients I don't use such as Jello, shortening, Velveeta cheese, salt petre, to name a few. However, I don't think there is a recipe in there that one couldn't substitute preferred alternative ingredients.

The reason I got it was for the chapter on canning and preserving. When I saw it contained several recipes for canning homemade bologna, I decided to buy it. (Not to mention that I probably would have regretted not getting it once we left the shop.) I've also appreciated the chapter on pickles and relishes, and as of this writing, have realized that it contains cheesemaking recipes as well.

Weaving As An Art Form: A Personal Statement by Theo Moorman, was on sale as a surplus copy from my weaving guild's library sale. I bought it as a source of inspiration, because one of these days (after the dining room floor gets done and I can have my studio back), I will get back to my fiber arts. The title appealed to me, because I am an artist whose medium is fiber, and someday I hope to abandon functional weaving and weave strictly as an artistic statement. The author appealed to me, because Theo Moorman is well known in the weaving world. The introduction appealed to me, for it was there that I read, "..... I seem, in my work as a weaver and designer, only able to gain ground through a mass of experiments, blunders, and muddles." That's me in a nutshell. I have been in the learning and exploratory stage of the various weave structure and techniques for almost ten years, not counting long term breaks to attend to other areas of need and interest. And of course, the content of the book appealed to me, for it discusses the technique for which the author is famous, The Moorman Technique, which simply put, is a type of inlay. So this book is on my reading list, probably not in the near future, but in the future nonetheless.

Where do I get my books? Well, Amazon.com, of course. Also from the numerous Dover catalogues we get. Dover reprints a lot of old books and sells them at reasonable prices, plus they often have sales and specials. Also, I buy a lot of books from my Edward R. Hamilton Bookseller Company catalogues. If you click on their name it will take you to their website, but they do charge an additional 40 cents per book if ordered with a credit card via the website, so I prefer ordering from their catalogue. They have a standard $3.50 shipping no matter how many books are ordered, which is very reasonable.

In addition to the above, I have three more books on order!
From Hamilton:

Home Cheese Making: Recipes for 75 Homemade Cheeses
by Ricki Carroll

Living Off the Grid: A Simple Guide to Creating and Maintaining a Self-Reliant Supply of Energy, Water, Shelter, and More by Dave Black

From Amazon:

The Complete Medicinal Herbal: A Practical Guide to the Healing Properties of Herbs, with More Than 250 Remedies for Common Ailments
by Penelope Ody

Did I also mention that I love books? And until these arrive, I will love going out to look in the mailbox every day. :)