September 29, 2022

Garden Notes: September 2022

Another month has flown by!

Rainfall

  • 4th: 1"
  • 5th: *1.3+"
  • 7th: 0.05"
  • 10th: 1.65"
  • 11th: 2" 
  • 30th: 0.35" (Ian)
  • Total: 6.35+ inches
* The plus (+) is because it started raining on the 4th, but the next morning I found the rain gauge down on the ground. The 1.3 inches happened after that, but I have no idea how much we got overnight.

Temperature

  • nighttime range: 47-74°F (8-23°C)
  • daytime range: 67-91°F (19-33°C)
Planting
  • winter wheat
  • Daikons
  • Carrots
    • Cosmic Purple
    • Purple Dragon
  • Turnips
    • Purple Top
    • Tokinashi
  • Kale
    • Siberian
    • Tronchuda
  • Lettuce, Jericho
  • Collards
  • Beets, Ruby Queen
  • Broccoli, Waltham 29
  • Chinese cabbage
  • Salsify
  • Garlic
  • Multiplier onions
  • Parsnips, Harris Model
  • Cabbage, Nero Di Toscana
  • Mizuna
  • Mustard, Japanese Giant Red

I think that's the most ambitious fall garden I've ever planted, but it seems prudent in these times to do so. It's in later than the regional planting guides suggest because I was tied up in the kitchen for all of August. But the soil is still warm for germination, and we hopefully have time before first frost. 

How long a fall garden lasts will depend on what kind of winter we have. Winter here can go either way: mild or cold. Last winter was cold, so most of my fall garden died off. If we have a mild winter, I'll be able to harvest greens and root crops all winter long. 

Picking and Eating

We got our first picking of green beans earlier in the month.

Cornfield pole beans

Late, I know, but the plan was to plant them when the corn was about six inches tall. Then the corn didn't germinate well. After two unsuccessful plantings of corn, I finally planted a few pole bean seeds under the porch trellis. We won't get a lot, but fresh steamed green beans with a little butter and salt is a real treat.

Also harvesting by the handful . . .

Late summer okra, tomatoes, and peppers, both bell and sweet banana type.

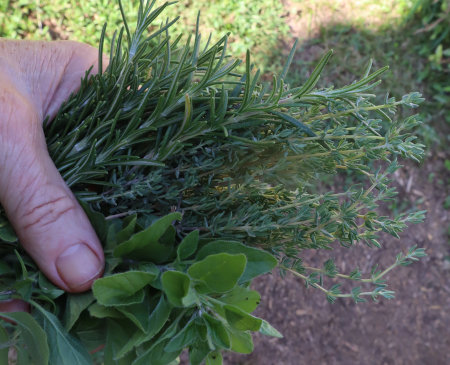
Herbs: rosemary, thyme, and oregano

September salad: cherry tomatoes, daikon leaves, turnip thinnings,
hard boiled egg, and farmers cheese with my ricotta/kefir dressing.

Of fruit, 

Late figs, which is unusual for September. They were slow to ripen but sweet.

Fall picking of red raspberries (with more on the canes).

This is the first time I got an autumn crop of red raspberries. I added them to the spring raspberries in the freezer for jelly, but only after juicing some and trying the juice in popsicles.

Raspberry-banana popsicle. A really good flavor combination.

Sadly, I missed most of the muscadines.

Foraged, wild muscadines

I knew when they first started ripening, and then we had that heavy deluge. The next time I checked on them most of them had been knocked off the vines and there was nothing left but hundreds of empty skins all over the ground. Disappointing, because production isn't consistent from year to year. The few I got were put into the freezer for a mixed fruit jelly in the future.

First Japanese persimmon

We have about two dozen persimmons on the persimmon tree. A first! This was the first to ripen. It was mild and sweet. I'm not sure what to do with all of them. Anyone have some recipes?
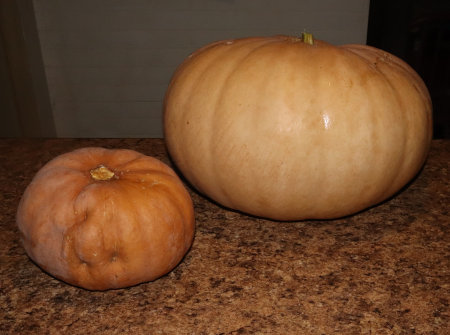
The first of the winter squash are ready to harvest.

Sweet potato squash. The dimpled one is odd, isn't it? I'm not
sure how well it will keep, so it's a candidate for preserving.

Dan's first cushaw.

This year Dan decided to do some gardening. He's usually busy with projects, but the projects are getting smaller as we get things accomplished, so he picked a spot and planted sunflowers, corn, and cushaw winter squash. I've already mentioned that the corn was a fail, but the sunflowers and cushaw did well, and that's the first one. To celebrate his success, it became a "pumpkin" pie!

I don't usually top pie with whipped cream, but since
this was a special pie it deserved a special topping!

It was really good. And actually, few folks would have known it wasn't actual pumpkin by the texture and taste.

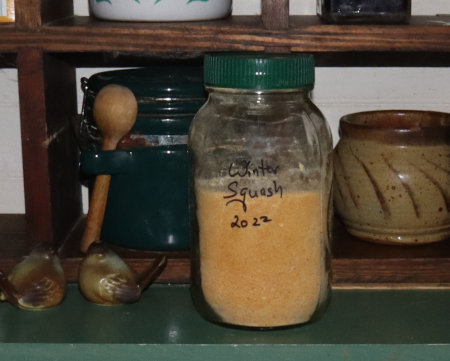
That cushaw yielded 8 pints of puree, of which one pint was used to make the pie. The remaining six pints were dehydrated to make powder.
Preserving

Most of the winter squash will go into the pantry for feeding us, chickens, and goats. Sometimes, I freeze pints of puree. Occasionally, I can chunks. This year I'm learning about making fruit and vegetable powders (like tomatoes and pear sauce), so I wanted to try winter squash powder. I made it the same way I made the dried pear sauce: cooked it, pureed it, spread it onto parchment paper, dried until crisp in my dehydrator, and then powdered it in my blender

Powdered mixture of cushaw and sweet potato squash.

Drying time was much quicker than for the pear sauce, because winter squash don't contain the sugar pears do. I think the powder will be lovely for making pumpkin pancakes, pumpkin muffins, pumpkin bread, etc. Next, I want to add pumpkin pie spices to the puree before dehydrating and make pumpkin spice powder. Sounds like that would make good Christmas gifts, doesn't it?

[To rehydrate for puree, 2 cups hot water and 1/2 cup powder. Start with some of the water and stir in powder. Let sit for about 10 minutes and stir again. May adjust by adding either more hot water or more squash powder.]

Extra cherry tomatoes (those we don't eat) have been going into the freezer. Then Nancy, from Little Homestead in Boise, made a comment on my "Experiments in Ketchup Making" post and mentioned preserving cherry tomatoes in olive oil. I thought that was a great idea! Something new to try! I remembered that Preserving Food Without Freezing or Canning has a chapter on preserving in oil, where I found a recipe on page 98.

Cherry tomatoes, multiplier onions, rosemary, thyme, and oregano.

It calls for cherry tomatoes, small onions or shallots, and fresh herbs. These are layered in scalded pint jars leaving 1.5 inches headspace. Course salt is sprinkled over the tomatoes, and a tablespoon or two of apple cider vinegar or lemon juice is added (I used my pear vinegar). Then the jar is filled with extra virgin olive oil and stored in a cool place (50-59°F / 10-15°C).

Cherry tomatoes preserved in olive oil.

It's ready to eat in two or three months and keeps for up to a year. 

I made two pints to see how it turns out. This promises to be great addition to our winter green salads. The bonus is that the olive oil is flavored too, and so good for cooking or salad dressing.

Parting Shot

Buckwheat cover crop in the lower garden for soil building.

I think that covers it for September. Are you still with me? Good, because now it's your turn. What's happening in your September garden?

September 26, 2022

Preparedness Month Project

About two years ago, we upgraded our pantry (some of the photos below are from that post). We added insulation to the walls, installed energy efficient windows, and I rearranged the shelves in what I hoped was a good set-up. But, you know how it is; living with an idea sometimes isn't as good as it seemed. So, I spent some time this month (September is Preparedness Month, after all!) figuring out how to improve the pantry.  

My original set-up: one corner

This corner was the first problem. I thought I could work with L-shaped shelving, but it was more hassle than it was worth. The opposite corner was okay, so I left that side as is.

Original set-up, opposite corner

I cleared off the problem shelves, gave them a dusting, and set them up like library aisles. Then I used another shelving unit to add another shelf on top.

New shelf arrangement

The other side of the room was the same but a foot shorter because the pantry door isn't centered in the room. I have a five foot wall on one side of the door and a four foot wall on the other.

Original set-up on the other side of the room.

Original set-up, the other corner on that side.

If I rearranged the ell to make an aisle between the shelf units, there wouldn't be enough room to use the grain grinder on that side of the island. What to do? After a lot of thinking and measuring, my solution was to move the island cabinet to the four-foot wall instead of the table. That made enough room to turn the shelf, plus I can still get to the grinder. 

New arrangement. (The lean is due to the camera lens!)

However, I liked having the island for the Berkey water filter. And the countertop was handy to set down an armload of jars before shelving them.

Original set-up

So, I found something that takes up less space. 

New arrangement.

The Berkey is still easily accessible and I have a small surface for setting things down. Plus, I can get around the island to get to everything, and the cart shelves are perfect for things I use often, like my fermentation and cheese making accoutrements.

I think this room arrangement makes better use of available floor space. And it helps with another problem too, i.e. a place for empty canning jars. I've tried various ideas for jar storage, but none seem to work very well. With this arrangement, there's room between the wall shelves and the cabinet for boxes of jars. Empty boxes can go on top of the shelf units.

In addition to a set-up that I'll hopefully be happier with, this exercise gave me an opportunity to check dates and seals on canned and vacuum packed dry goods, dust jars, rotate, and reorganize. When I'm busy canning for a string of days, I tend to just pop the new jars into any empty space on the shelves just to get them out of the way. I like it better when everything has its designated space: fruits, veggies, soups, meats, jams and jellies, pickles, etc. 

How about you? Do you have particular challenges with your food storage? How have you tried to solve them? How do you manage empty jars? How do you keep things organized? What's worked? What hasn't? I'm open to ideas!

September 22, 2022

Experiments in Ketchup Making

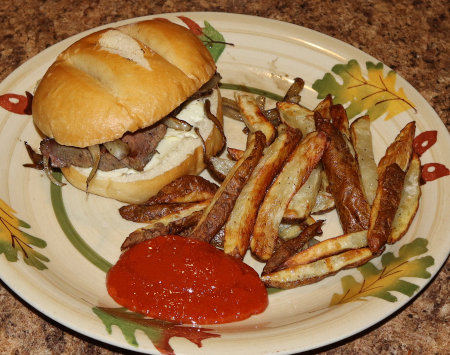
Chevon and grilled onion sandwich with oven fried potatoes, and homemade ketchup.

We don't eat a lot of ketchup. In fact, I'm the only one who eats it and that's just once a week on my grilled Sunday hamburger. But with all our extra cherry tomatoes, I wanted to give ketchup making a try. I'm calling this an experiment because there is still a little tweaking I want to do. I'm putting all my notes here, so I'll remember what I did, what I want to do differently, and why.

The recipe I used was based on a video by Living Traditions Homestead. What intrigued me was that she used whole tomatoes. She cored them, chopped them, and cooked them with with the other ingredients before running them through her Vitamix blender. What could be easier than that?

I had questions though, because I'd need to use frozen cherry tomatoes instead of large fresh ones. It seems like freezing them toughens the skins, plus, cherry tomatoes are seedier than regular size tomatoes. Would it work as well? I was willing to give it a try and see what I got.

The ingredients in the following recipe are based on the recipe in the video, but adjusted for the amount of tomatoes that I had (fresh plus thawed).

Ketchup

8½ lb  defrosted cherry tomatoes, drained 
1 cup chopped onion
1 cup vinegar (I used my pear vinegar)
3/4 cup sugar (originally 2/3 cup but increased after taste tasting)
1½ tbsp canning salt 
3 cloves chopped garlic
1/4 tsp black pepper
1/2 tsp celery seed
1/2 tsp mustard seed

I simmered it all together for several hours and then allowed it to cool. Then I blended batches of it in my new blender.

First batch before blending.

The skins blended quickly but the teeny tiny seeds took some time. The process might have been quick with regular tomatoes and regular tomato seeds, but the miniature seeds were more of a challenge (and I was impatient).

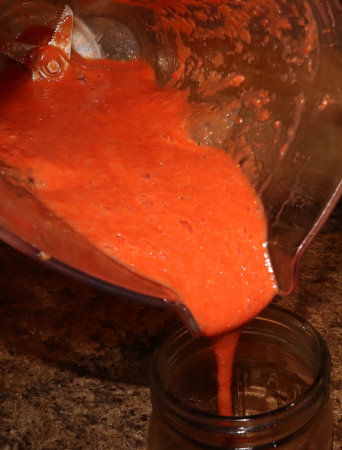
After blending. Smaller batches did a much better job on the seeds.

We sampled it that night for dinner with French fries. Our cherry tomatoes are more acidic than our slicing tomatoes, so one thing we agreed on was that it needed more sweetener (notated in my recipe above). Dan didn't mind the remaining seeds, but I didn't like them. So, before I canned the ketchup I removed the seeds with a fine sieve and spatula.

A lot of people make their ketchup this way. I found it quicker
 and less messy than using my hand juicer (especially clean up).

To can: hot back jars leaving 1/4" 1/2" headspace (I had too many failed seals with 1/4" and had to re-do those). Water bath process for 15 minutes for both pints and half-pints. My yield was 6 pints.

Noteworthy

About a week later, I put a picking of cherry tomatoes into the dehydrator for making tomato powder.

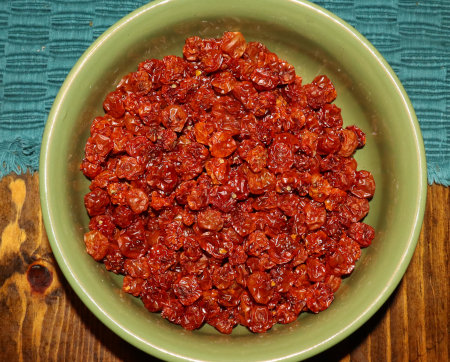
Dried cherry tomatoes.

Tomato powder. Do you see any seeds?

The dried seeds powdered right along with the skins and pulp. Hmm. Did cooking the whole tomatoes soften the seeds so that they didn't blend well? Or did drying them make them brittle enough to powder well? That lead to another experiment. What would happen to the seeds if I blended raw cherry tomatoes?
 
Fresh cherry tomatoes in the blender

After blending. Looks thick and creamy, doesn't it?

The real test was looking for seeds!

If any little seed fragments are there, I can live with it! Plus!!!
It's about thick enough to be sauce; just needs a little seasoning.

I'm guessing that the raw and dried seeds were firm enough to be pulverized in the blender, but the cooked down tomato seeds were too soft and slippery for some of them. Based on several videos that I watched, I don't think that's strictly true of larger tomatoes with larger seeds, but it seems to be true of the tiny, seedy, Matt's Wild Cherry Tomatoes.

Umm, so, why have I been spending hours and hours every summer juicing tomatoes, and days and days cooking down the juice to make sauce? NO MORE! This is completely changing the way I will make my pizza sauce next year! And all because I wasn't satisfied with the way my ketchup turned out. 

September 18, 2022

More Poultry Tales

It's been awhile since I mentioned our poultry. But the ducklings, chicks, and poults have all grown a lot, and I have to tell you what happened with Mama Hen and the chicks. So, here's a long overdue poultry update.

Our turkeys. We're still not sure whether they're male or female.

In my last chick and turkey post, I showed you our turkey yard into which we moved Mama Hen, her three chicks, and the three turkey poults. We kept them separated at first, but once they got used to each other, Dan removed the little barrier fence and gave them all run of the entire turkey yard. This worked pretty well for awhile, and then Dan decided that the turkeys were big enough to stretch their legs in the barn yard. Once they were allowed out there, they decided that they wanted to join the chickens and ducks in the large poultry yard. It became their mission in life! It didn't take long before they found their way into the coop and started roosting there. 

Once the turkeys left the little yard, Mama Hen went missing. Evening came and when we took headcounts before securing everyone for the night, the two remaining baby chicks were alone and Mama Hen was gone. This was worrisome because the chicks were still quite little and we'd already lost one to a skunk. But where was Mama Hen? Dan searched the yard and I did a headcount in the coop. Sure enough, she was roosting in the coop. We would have put her back with the chicks, except we can't tell the Speckled Sussex apart, so we didn't know which one. Instead we put the chicks by themselves into the dog carrier for the night. The next morning, Dan moved them into the chicken tractor and they've been there ever since. One of the Sussex hens came to inspect the chicks the next morning. Was that Mama Hen? There was no sign of recognition on the chicks part, so we didn't know. Nor do we have a clue as to why she abandoned them so early.

How well does a mixed flock of chickens, ducks, and turkeys get along? Amazingly well! I know human opinion is that they must be kept separated, but the birds themselves chose this in spite of our efforts to give every species their own space. And why not? Every ecosystem on earth grows toward a diverse population of species. Our poultry are only doing what's instinctive. 

To add to that, I have to mention that the turkeys are absolutely lost without the chickens. They go there they go and do what they do. They become worried when they can't find them. They pace and call until a chicken comes into sight and then they calm down again.

Schooster, our amazing Speckled Sussex rooster.
I think the key to to our poultry yard success is our rooster. We've had fairly good roosters in the past, but they usually tend to be territorial and even intolerant of anyone that isn't part of their preferred circle. Admittedly, our chickens were pretty intolerant of the Muscovys when we only had the two females. That changed when we got a drake, and especially after our Muscovy ducks went broody and hatched ducklings. The chickens quickly learned to respect their space. When the turkeys moved into the poultry yard, every bird took it in stride. Every bird seems to know their place.

Every bird also listens to Schooster. He's just as alarmist as the next rooster, but every bird knows what his cries mean and heeds him. One day he let out a warning and every bird ran for cover: chickens, ducks, and turkeys. It didn't sound any different to us than some of the other squawks he makes, but Dan started scanning the trees and skies, and sure enough. A large broad shouldered hawk was in a tree overhead. It flew off when Dan spotted it.

To close out my update, here are a few short video clips I took. I'm not a very good videographer, but it's fun to do, so maybe I'll add that to my list of things I'm interested in learning about.


September 14, 2022

Dried Pear Sauce

Fruit and vegetable powders are very popular amongst folks who dry a lot of food. That intrigued me, so dehydrated pear sauce was the first thing I made using my new blender. I started with a quart of pear sauce that I didn't can.


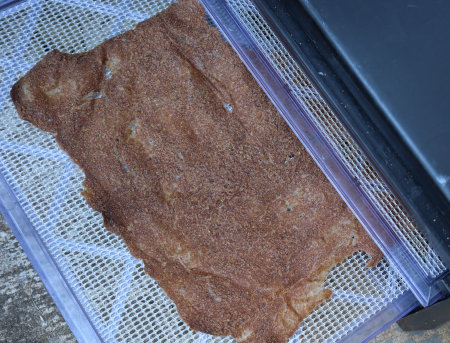
I don't have fruit leather trays for my dehydrator, so I used waxed paper and spread it with a spoon. I tried to keep the thickness under a quarter inch.


After about a day in my dehydrator, the texture was similar to fruit leather.


It was pliable, and this is how people make fruit roll-ups. To powder it, however, I needed it drier. It was sticking to the wax paper, so I peeled it off and returned it for another day in the dehydrator.


It never got truly crisp, but it got dry enough to break into smaller pieces.


It only took a few seconds in the blender, using the tamper to push the pieces on top toward the blades.


One quart of pear sauce yielded about a pint dried. It isn't like a true powder, it's moister than that and a little sticky. More like brown sugar but not.

Lastly, I vacuum sealed the jar with my little hand pump to protect it from pantry moths and humidity. (I don't trust ants either!)

I'm thinking this would be a fantastic thing for hikers and campers. It could be sealed in small-serving mylar bags to carry. For myself, I will probably rehydrate some just to see what it's like, but since I have plenty of pear sauce canned for serving right out of the jar, I'll mostly use the powder for baking. It can be added directly to baked-good batters without reconstituting. I foresee myself using it in cakes, muffins, cookies, pancakes, etc. I like pieces of dried fruit for our granola and oatmeal, or for baking like my Better Than Fig Newton Bars and Fruit Cake Cookies.

Dehydrating versus canning. Which is better?

I think where we fall in this debate depends on our preserving, cooking, and eating habits. Canning lends itself well to large quantities of an item and is usually the first way I preserve the harvest. Drying (and freezing) work well for small quantities that aren't enough to can. Both dehydrating and canning take time and a power source, although I'm pretty sure that my dehydrator uses less electricity than my stove, even though it takes longer. When necessary, I've canned on a wood cookstove and over a campfire. My dehydrator requires electricity, and while solar dehydrators do exist, I read they don't work well in humid climates like mine.

Dried foods definitely use fewer jars for the same fresh quantities and need less storage space, which are both pluses. Also, they can be stored in mylar bags, making them easier to transport than heavy, bulky jars. On the other hand, dried foods require some planning ahead to prepare, while canned goods are basically ready to use. Dried foods need to be protected from potential pest and moisture damage. Canned goods have the potential for a broken seal and spoilage. When properly stored, both have a good shelf life (see Grandpappy's "Five Different Shelf Life Studies" for some surprising information). 

No matter our habits and preferences, I think having both canned and dried on hand increases food security and versatility. Now, I have two forms of dried fruits and veggies - pieces and powder. And that means even more options.

Okay, you home food preservers out there, your turn. Favorite methods? What are they and why? Any ideas or tips to share with the rest of us? Anything new you've discovered? We want to know!

Dried Pear Sauce © September 2022

September 10, 2022

Our Agrarian Year: Shift to Autumn

September, October, and November are the autumn months of our agrarian year. Almost as if on cue, we've experienced an overall temperature shift from sweaty hot days to mild and comfortable. I've started wearing a light jacket when I go out to do morning milking. The days are noticeably shorter, and the sound of the wind in the leaves has changed. Oddly, we haven't seen many migrating birds yet. 

We made the decision last month to make the masonry stove next summer's main project, when we won't feel rushed by coming winter. It's a big project and we have to get it right. Incorporated into that is finishing the front bedroom, because originally, it shared the fireplace with the living room. It's one of the two remaining unfinished rooms in the house. 

The other unfinished room is the sunroom, which I hoped to turn into my studio before it became a storage room as we worked on the rest of the house. An idea that's been on our master plan for a long time, is to attach a greenhouse onto this sunny, southeast facing room. Dan really wants to finish the house (gee, it's only been 13 years!) and building a greenhouse is a much more suitable project for fall and winter. 

Seasonal Chores:

  • Clean out
    • gutters
    • chimneys
    • wood stoves
  • Limb trimming
  • Continue harvesting and preserving the remains of the garden
  • Finish fall and winter planting (as early as possible)
    • Pasture
    • Garden
    • Seed starts
  • Get the livestock down to winter numbers
  • Winterize anything that needs it

Projects:

  • Mill lumber for garden beds and our greenhouse project
  • Develop specific plans for the greenhouse
  • Start to build said greenhouse

I know the project list seems really short, but like spring, autumn is a time where seasonal needs take priority.

September 6, 2022

Power Blender

Something that's been on my wish list for decades is a Vitamix Blender. They are very expensive, however, and all things considered, never seem to make it to the top of my financial priority list. Last week, I was researching ketchup recipes and ran across a video that caught my attention because the gal cooked all her ingredients together and then blended it—including the tomato peels and seeds!—with her Vitamix. The result was a beautifully thick ketchup with less cooking time. Considering all the hours and days I've spent cranking my Roma Juicer to make tomato sauce, I had to give Vitamix another peek. 

Well, they're still expensive, but when I found a refurbished one for around $300 on Amazon, I was tempted. So, I put it on my mental back burner while I went to work on pears. By the time I took my next break, I decided to do a search on Vitamix type blenders. I spent hours reading and analyzing reviews and comparisons. Here's what I ended up with.

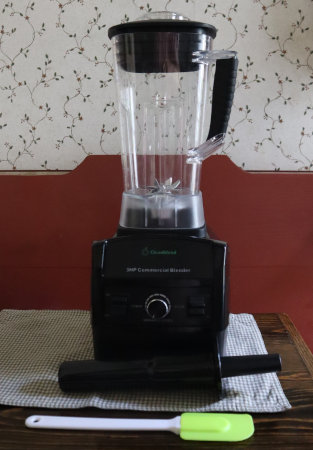
Cleanblend Commercial Blender

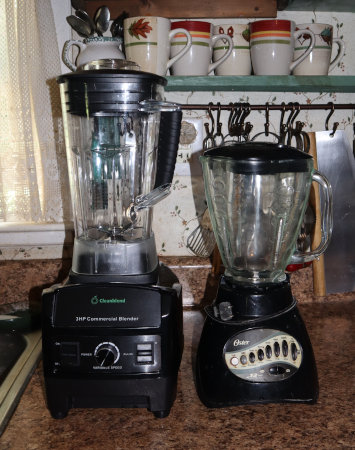
Side by side with my old Oster blender.

At a glance, it looks exactly like the a Vitamix, except for the labeling. 

To compare, both are big and heavy, both have variable speeds (unless you get a Vitamix with preset speeds), both have a pulse function, both have 64-ounce BPA-free Tritan containers, both have stainless steel blades, both come with a tamper, both are self-cleaning, and both preform the same functions: blend, chop, grind, emulsify, and will make nut butters, ice cream, and hot soup. To contrast, the Cleanblend boasts 1800 watts of power (3 horsepower), while the Vitamix lists 1440 watts (2 horsepower). 

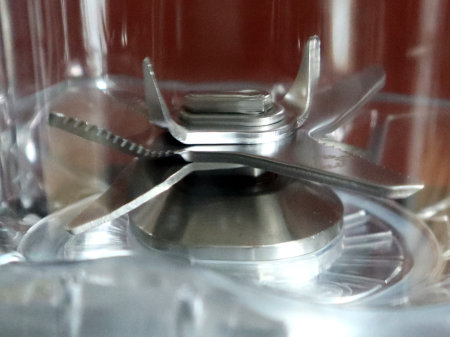
Also, the blending blades are different. 

Vitamix blades

Cleanblend blades (top view)

(side view)

Another difference is the warranty. Vitamix now offers a free 7-year warranty (formerly it was 10 years), while Cleanblend offers a 5-year free warranty. Both companies offer an extension to 10 years for $75. So, even adding the 10-year warranty to the Cleanblend, it still comes in cheaper than a Vitamix.

Prices? I got my Cleanblend (currently on sale at Amazon) with free shipping for about $200 including tax. Vitamix blenders start at $350 and range up to $800, depending on the model and accessories. Taxes, if applicable, will be on top of that. Vitamix does have more models and accessories to offer. But I think the clincher, for me, was the smoothie tests done at eater.com. They compared smoothies made with seven high performance blenders, and the Cleanblend really did the best job. You can see the photos at this link.

I've just started using it and will show you how well it works in upcoming blog posts. One thing I really like is that the blade unit is incorporated into the blender jar. That's key to its convenient self-cleaning, but also, means there's no gasket to deal with. That was something I don't like about the Oster; the gasket gets grungy quickly and periodically needs replacing. These power blenders are much nicer in that regard. 

I have to add that I was somewhat hesitant about buying another electric gadget. The world's energy future looks very insecure, with rising costs and discussions about energy rationing. That paints a very bleak picture, where the promised dark winter seems inevitable. Perhaps that's another good reason for the buying the less expensive Cleanblend rather than the Vitamix. On a prepper note, I do have a hand-crank blender, which you can see in this blog post. It has nowhere near the power of my old Oster, let along my new Cleanblend. But considering the way things are, I'm glad I've got it. There's a sense of comfort in being prepared. As with all of the tools and equipment we use, Dan and I have sought manual or off-grid alternatives and learned how to use them. 

Until then, I'm going to take full advantage of my new Cleanblend! I'm excited about the possibility of not only ketchup and tomato sauce, but powdering dried eggs, herbs, fruits, and vegetables. Remember my hopniss flour? I was hoping for something like cornstarch or arrowroot powder, but the best my Oster could do was gritty, which wasn't good for gravy. I'd also like to try making mayonnaise. And who knows what else! More soon.

September 2, 2022

Yam Berries

Chinese yam bulbils

Several years ago I bought some Chinese Mountain Yam tubers to plant. Chinese yams are an edible perennial that produce both edible tubers and also edible aerial bulbils, sometimes called yam berries. Then I hesitated to plant them because I read they can be invasive. They are the reason I decided to convert my hoop house to place for growing perennials. I chose one of the bordered raised beds and planted the tubers. They are a vine, so the hoop house has been a good place for them. This is the first year they've produced a significant amount of the yam berries.

Dioscorea polystachya (formerly Dioscorea batatas).
They are also called air potatoes or cinnamon vine.

There are other species of dioscorea, but not all of them are edible. According to the Plants for a Future website:

"Edible species of Dioscorea have opposite leaves whilst poisonous species have alternate leaves"

And according to David the Good in his video, "Yamberries on the Chinese Yam," the variety I planted is not the invasive one. Even so, there seems to be a lot of contradictory information around the internet on them. 

The other day, I picked all the yam berries and had enough to try for dinner.

My harvest, washed and ready for cooking.

You can see how tiny they are!

They really do look like miniature potatoes, so the name "air potatoes" makes sense. "Cinnamon vine" apparently refers to the smell of their flowers (which I wasn't watching for and so didn't notice!)

To cook, I tossed them with a little olive oil, salt, and pepper. Then I oven roasted at 425°F (220°C) for about 12 minutes.

Oven roasted yam berries

They were quite good. They're starchy, but not quite like true potatoes. Dan said they reminded him of hopniss. One of these days when I have a few more plants, I'll harvest some of the root and give that a try.

It's fun experimenting with perennial foods. They require care to establish, but once established, they are less work to maintain than annual food crops. While production varies from year to year, they are a reliable source of food whenever annuals do poorly. Plus, most of them are quite attractive and easy to work into an edible landscape. 

One disadvantage is that they aren't familiar foods. They require learning how to grow, harvest, and cook, not to mention acquiring a taste for them. We're all raised on particular foods, and those become the personal standard for our diet. We find them easily in the grocery stores and in the seed catalogues. They are our personal comfort foods of childhood.  
 
We ate this year's yam berry crop, but next year I'll experiment with some food combinations. I think they'd be good with cowpeas or beans, and in soup. 

Is anyone else growing edible perennials? 

Yam Berries © September 2022