July 30, 2009

Planting A Privacy Hedge

About the only thing I wish was different about this place is that I wish we were a little farther off the road. In addition to the house and front yard, both cleared areas have road frontage. It's not a main road to the next town, but there are several housing developments on it. One problem with that is the noise and traffic. Oh, sometimes it's quite, but other times it's not.

The other problem is that I don't like the sense that everything we do can be viewed by either our neighbors or by passers-by. Please don't get me wrong, our neighbors are very nice, and the passers-by are usually driving too fast to take much notice, but I'm a very private person. That may be because I'm a social klutz, or perhaps it's because I'm contemplative by nature. Either way I don't like being in the limelight and I don't like the feeling of being on display.

The remedy for both these problems, I felt, was to plant a privacy hedge. I figured it would be several years before we would be able to plant it. When I saw an ad in the paper for bargain priced 4-foot, 3-gallon trees Leyland Cypress trees, I was ecstatic. They are evergreen, lovely to look at, and grow both quickly and thickly. We went and bought as many as our little Chevy S-10 would hold.

We decided to plant the hedge along the roadside edge of the field north of the house. First we had to wait a few days for the utility companies to come out and mark where we couldn't dig. And because we don't want the electric company to come out and top them all in the future, we planted them just inside the power line.

Hedge of little Leyland Cypress treesWe had about 175 feet to cover. Planting trees six feet apart doesn't cover the full length, but it's a good start and I feel better about it already. These are supposed to grow at a rate of 3 - 4 feet per year, which means that in a few years I'll have the privacy I'm wanting.

Although these guys don't meet my self-imposed requirement that everything we plant be edible, medicinal, or for natural dyeing, they were the right thing at the right price at the right time. Hopefully they will do well.

Planting A Privacy Hedge is copyright July 2009


July 28, 2009

Garden Update

Speaking of gardens, this year's is coming along well, though not without some problems.

On the bright side, I have lots of tomatoes, though none are turning red yet.

I bought eight plants. I couldn't find an heirloom variety at the time, so I bought a hybrid called Celebrity. I don't can tomatoes, but I do can sauce, so I usually prefer to plant paste tomatoes. I was too late starting my garden to find those, so I chose these, which are producing beautifully.

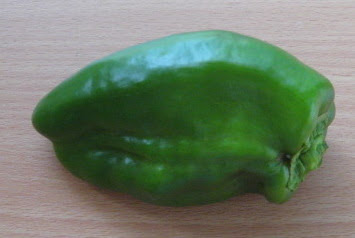
My lone green pepper plant is small, but producing large peppers. It droops during the heat of the day, but bounces back by the next morning. I'm still seeing blossom end rot on the peppers, even though I'm spraying with a calcium solution once a week. I'm also spraying this on the tomatoes, with (thankfully) no signs of problems there.

I've got green beans coming along with tons more green bean flowers. The bottom leaves have been looking a bit yellow. Probably nitrogen deficiency, so I sprayed the leaves with a fish emulsion solution.

Baby cukes are making an appearance.

And at about three feet tall, the corn is starting to flower.

My okra seems to be taking its time. I wonder if it isn't getting too much shade from the pecan tree next to the garden. Some plants, like the cucumbers and squash like a little shade. Other plants don't do as well without full sun.

Shamefully I have to confess that I'm not sure what this is. I planted various squashes without writing down what they were. I assumed I'd remember! Big mistake. I know myself well enough to know that I rarely remember things like this because I'm too busy filling my brain with other things. Anyway, it is butternut squash, acorn squash, or straightneck yellow summer squash. Happily, it's doing well and sporting its first flower.

My sunflowers are getting tall and ready to bloom.

My pumpkin plants however, which started off with a bang are having problems.

Besides the yellow leaves, I've been battling powdery mildew. When it first appeared, I started spraying it with a baking soda solution, which is one of the treatments recommended in The Organic Gardener's Handbook of Natural Insect and Disease Control (a great resource.) When it got worse, I switched to a copper based solution. I also started spraying my other cucurbits with it prophylactically. So far, so good!

Last week I started fall planting. So far only carrots and a row of broccoli. They haven't come up yet so there's nothing to show you there. More planting to follow soon.

Garden Update copyright July 2009 by Leigh 


July 26, 2009

Next Year's Garden

Dan has staked out next year's garden.

This time next year this will be a garden
He wants a production garden, and we finally settled on a place to put it. It will be south of the house, in the part of the overgrown clearing closest to the road. You can see the back of our white carport under the trees in the above photo.

We staked out an 80 x 60 rectangle, size based on the "Eat 'N Store Garden" in Dick Raymond's Joy of Gardening. This was the first gardening book Dan read, and it is the first reference he will reach for, even though now we have more gardening books than we'll ever look at.

The spot where we put this year's garden is too small to produce a year's supply of all the vegetables we'll eat. However, all the work we put into it won't go to waste. The plan is to develop it into an herb garden. I'd also like to plant a shade tree there, as it is in line with where the house catches the heat of the late afternoon summer sun.

The plan for the big garden is to brush hog it, have it plowed, till it, and then plant a green manure crop. I'd better have another soil test done before I plant even that however.

If we get the ground prepared early enough, I'll first plant buckwheat, which will be tilled in this fall. After that I can plant annual rye, which will be tilled under in the spring. Two green manure crops before planting should benefit the soil greatly.

This will be a bigger garden than we've ever had before and it's taken some time to decide where to put it. We've had a mental list of all the things we want on our homestead: vegetable gardens, herb gardens, orchard, greenhouse, chickens, goats, bees, sheep, root cellar, etc; but until now the vision has been vague. This summer's garden was a "something is better than nothing" affair, with the idea that we'd find a more permanent spot next year. Choosing where to put the production garden helps us define where we need to put up fencing, where the compost needs to be, where to plant (or not plant) fruit trees, perennials, etc. It feels as though things are finally starting to come together.

Next Year's Garden © 26 July 2009 

July 24, 2009

Corn Relish

I made corn relish this week. I wish I could tell you that I made it with corn from my own garden, but having only been planted in June, my corn just now topping knee high.

DH however, brought home 3+ dozen ears of sweet corn from Indiana. After eating it twice a day for about a week and giving some away, we still had plenty. At that point I decided to try a batch of corn relish, just to see if we like it because I'll have to do something with mine soon enough.

I couldn't find a recipe that matched what I have on hand, so I combined about four corn relish recipes to make my own. Mostly I was concerned about the proportions of vegetables to sugar, vinegar, and water. Happily the result is pretty tasty and DH said, "make more."
Corn Relish
10 cups vegetables:
1 chopped green bell pepper
1 chopped red bell pepper
1 chopped onion
Corn, cooked & cut off the cob; enough to make up the difference for 10 cups
1 cup sugar
1 & 3/4 cup cider vinegar
2 tsp salt
2 tsp dry mustard
1 tsp turmeric
2 tbsp unbleached flour

Mix all ingredients except the flour and bring to a simmer. Blend flour with 1/4 cup of the hot pot liquor and add to vegetables. Simmer 5 minutes, stirring constantly. Fill sterile pint jars leaving 1/4 inch headspace. Secure lids and water bath process for 15 minutes. Makes 5+ (almost 6) pints.

The one ingredient that did come from my garden was the green bell pepper. One of these days, all the ingredients will. :)


Corn Relish copyright July 2009 by Leigh 

July 22, 2009

Removing The Chimney - Phase 3

Once we finished taking the chimney down from the top (click here for that) and through the attic floor (and click here to see that), it was time to move inside. First thing to come down was the mantle ....

Then the chimney breast ...

And then it was time to tear into the wall....


Until we got to this point....

This is where we are at the moment. The grate that you see is actually for the fireplace in the bedroom. You can also see the black plastic I hung behind that. If you click on the photo below, you can get a closer look....

Removing the fireplace created a little alcove, which will accommodate the stove. The chimney pipe will run up through the old masonry chimney opening. However, the concrete slab is uneven, which won't do for a woodburning stove. So we need to re-do the hearth, and figure out how we want to finish off the wall and ceiling. So we're in a planning phase at the moment. Once we decide on all that, we'll be back at it, and I'll have more photos for you then. [ UPDATE: Click here, to see what we decided and how we're doing it.]


July 21, 2009

Removing The Chimney - Phase 2

The first phase (click here to see that) in removing the chimney required Dan to be on the roof and me on the ground. To disassemble the next section Dan worked in the attic, handed the bricks up to me, and I sat on the roof and slid them down the chute.

We started working on it just below the roof line....

The chimney is a double, because it was made to accommodate two fireplaces.

The process was the same, taking it apart brick by brick with a cold chisel and mallet.

Much of it didn't even need that. As I mentioned earlier, the mortar had pretty much disintegrated to sand, so many of the bricks could be lifted out with ease.

We took it down as far below the living room ceiling as Dan could reach.

It is interesting to see the chimney construction near the bottom. The bricks were stair stepped to curve, so that one side goes to the living room fireplace, the other to the bedroom fireplace.

Lastly, Dan put a temporary cover over the opening, until we can get the new flashing and chimney pipe in place.

All that's left from this day's work is to stack the bricks up to the side.

The next step will removing the chimney breast inside the house. Click here to go on to that.


July 20, 2009

Removing The Chimney - Phase 1

Once we came to grips with the condition of the fireplace, we forged ahead with the project. Here's the chimney we're taking down....

DH disassembled it brick by brick with a cold chisel and a mallet.....

To get the bricks off the roof, he made a slide. This was a real "make it do" item, made from leftover sheets of vinyl siding and some 2 x 2's we had lying around.


I stood below, took pictures, and piled the bricks to the side.

In some spots, the mortar was so soft that the bricks could be removed by hand....

He took it down to just below the roof.

All that's visually left from the ground is the slide and the lightening rod which you can see lying on the roof. The bricks are here.....

The next step will be to do the same to the section that's in the attic. Click here to see that.

Removing The Chimney - Phase 1 is copyright 20 July 2009 


July 19, 2009

Bad News About The Fireplace

A fireplace was one of the things on our "must have" list when we started looking for a place. Even before we closed on this house, we knew from the inspection report that the fireplace's chimney needed to be lined. We planned to make an appointment with a chimney specialist shortly after we moved in.

Photo taken before we moved in.The initial appointment was to have it cleaned, inspected, and get an estimate to have it lined. Our plan was not to use it as a fireplace, but to install a woodburning heat stove. We bought a Woodstock Fireview Soapstone stove on clearance, and intended to place it in front of the fireplace and to use the fireplace chimney for it.

Before our appointment with the chimney service, DH went up into the attic. It didn't take a rocket scientist to see that the chimney was beyond repair. The mortar between the bricks in the attic had disintegrated to sand. He could see daylight between some of the bricks. The chimney would need to be rebuilt.

Decision making time. Rebuilding the entire fireplace and chimney was really outside of our budget. The other alternative was to tear the entire thing down, install chimney pipe through the old chimney opening, and finish it off that way.

The plan is to start from the top and take the chimney down brick by brick. I've read that this is a really dusty, dirty job. This is a double fireplace (in the living room and our bedroom), so I covered both of them with heavy duty plastic.

The plan at the moment is to leave the chimney breast in the bedroom as a nonfunctional facade. We may end up taking it out sometime in the future, but for now, removing one is enough.

I've taken lots of photos of this adventure, and will show them to you over the next several days. For the first phase, click here.

Bad News About The Fireplace copyright July 2009 


July 17, 2009

Cardboard Mulch

Back in the comments of this post, Heather mentioned mulching with flattened cardboard. Great idea! I'd already freecycled most of our moving boxes, but I decided to mulch with the rest of them.

The perfect place was the front of the house, where I'd cleared out a bunch of overgrown nandina and what looked like privet. I'd tossed some zinnia seeds into the ground and really wanted to keep the bushy stuff from coming back. And I'd like to kill the grass there because I'd like to plant either blueberry or cherry bushes there in the fall.

I used the cardboard as a base.....

... and covered it with the mulch we made with the rented chipper.

This didn't look very finished, so DH used RR ties to border the beds.

Neither one of us is especially fond of RR ties as borders, but there is a big stack of them in the back, and free is better than anything we would have to buy.

Unfortunately there is a lot of this around the place....

The remains of bygone black plastic mulch. The problem with black plastic is that it doesn't decompose, it deteriorates. I'll probably be picking up bits and pieces of the stuff till doomsday.

I had a very bad experience with black plastic mulch once, and if you have the time, I'll tell you the story.

It was when we lived in Texas, and bought a beautifully landscaped home in an established neighborhood. I loved the trees and especially the backyard shade garden with it's winding gravel walkway. The tall, solid fence made it a cozy, private retreat.

When I went to do my own plantings, I discovered that there was black plastic buried everywhere. Evidently the previous owners had landscaped the entire yard, putting down black plastic mulch and then top soil over that. Oh well. I just poked through it to plant what I wanted.

Everything was fine until we got one of those Texas gully-washers. It rained and it poured. The water ran down from the homes and yards behind us, through our yard, and into the street. The kids and I were staying high and dry by playing Super Mario Brothers on the Nintendo, when my daughter went into the kitchen to get a drink. Suddenly she yelled, "Mama! Mama! There's water all over the kitchen!" I ran in to see, and discovered that one corner of the kitchen was covered with about three inches of water.

I looked out the window and could see a river of water racing by the side of the house toward the street. I realized that the fence at the side of the house must be damming up what was coming down the hill and causing the flooding in the kitchen.

My kids were little then, DD was in 2nd grade and DS in preschool. Their dad wasn't around much in those days and we were alone that night. I knew it was up to me to do something so I said,

"OK. Mama's going to go outside and see if she can't make the flooding stop. I'll be outside but I'll be close by. Don't be scared, I'll be back as soon as I can!"

I waded into knee deep water in the back yard and worked on digging out under the fence in the pouring rain. I went back into the house to see if that had helped. It hadn't. Both kids were crying but were working hard to try and mop up the water. They said they were okay so I went out into the front yard and tried to dig a channel to move the water faster. Eventually the rain stopped and the water subsided. I was drenched, sore, and exhausted.

The next day when we were out surveying the damage, the next door neighbor told us that the previous owners hadn't had any flooding problems until they landscaped the yard (!) I realized that the black plastic acted as a barrier and prevented the ground from absorbing the water. In a heavy rain, the water would rise from that point and flood the yard and even the house. It took a lot of work to correct the problem. Fortunately, someone in our Sunday school class was a geological engineer and was able to offer sound advice and help!

Later on we found out that the home had a cracked foundation and I always wondered if the landscaping was a contributing factor. It certainly explained why the previous owners couldn't see the place and eventually foreclosed. Unfortunately we bought it from the government and they don't have to disclose anything so we were stuck. That, however, is another story.


July 16, 2009

My Soil Test Results

My soil test results are in, and they aren't as bad as I was afraid they might be.

Click to enlargeClick to enlarge

With a pH of 5.2, my soil is acidic, which I knew. An application of dolomitic limestone is recommended at 87 pounds per 1000 sq² of garden. My little garden is 26 by 38 feet, which is, hmm let's see, 1014 sq feet. That means I can use that 87 pounds without further calculations. The only problem is that it should have been worked into the soil 6 to 8 weeks before planting. We weren't even here 6 to 8 weeks before I planted. I'll just have to add this to my garden "to do" list for this fall.

Other recommendations are for synthetic fertilizers, which I rarely use. Primarily phosphorous (P) is low; potassium (K), calcium (Ca), and Magnesium (Mg) are in the medium range; and my zinc (Zn), manganese (Mn), and boron (B) are sufficient. I'm not sure what to make of the copper (Cu) results.

After a little poking around on the internet, I learned that organic sources of phosphorous are bone meal (applied to manufacturers instructions), or rock phosphate (2-4 #/100 ft²). Of course good compost would help tremendously, but at this point our compost production is pretty slow.

When I first blogged about having my soil tested, a couple of you wondered about testing in your own states. It us usually the cooperative extension service that does this, and I found a complete listing of state cooperative extension services courtesy of HomesteadGarden.com. Click here to find your state and whom to contact. Then let me know how it goes!

In other garden news, my pumpkins have started to flower ...

1st pumpkin blossom


July 15, 2009

1st Fruits

I picked this yesterday...

My 1st garden produce.Prematurely because of this....

Sadly blemished.I believe this is blossom end rot. I've seen it on tomatoes but never on bell peppers. It's considered to be the result of calcium deficiency, and occurs during hot, dry weather, or during a quick growth spurt because of excess nitrogen. It effects tomatoes and peppers.

This was the only pepper on the plant effected thus, fortunately. I have "Enz-Rot" spray from Gardens Alive! which I will use tomorrow. Fortunately, most of the pepper was salvageable.

Yes, it was as tasty as it looks!Homemade pizza with homegrown bell pepper.

In other garden news, I found our first cucumber blossom ....

Bright yellow cuke flowerThe tomatoes are doing well ....

I'm very happy with how the tomatoes are lookingAnd the zinnias have started to bloom.

I love their rainbow colorsI'm a happy camper. :)

1st Fruits copyright 15 July 2009 by Leigh at http://www.5acresandadream.com/