December 30, 2009

2009: Year In Review

Kate over at Living The Frugal Life recently did a "Year In Review" post which I thought was interesting and a good idea (her's is here). It occurred to me that I should do the same, sort of a looking back and taking stock of what we've accomplished. So here it is:

January - February

January marked the beginning of our 4th year in the Upstate. In 2005 we had moved twice because of family problems and had finally landed here, with no place to go. At this point we'd been living in a second story apartment for almost three years. During that time we'd been looking for a homestead of our own, had one long drug out disappointment over ten acres, and were still looking.

March

I would check the real estate listings online every day and spotted this place the day it came on the market. Within a week we'd made an appointment to see the place and made an offer. After a brief bidding war, we lost to another buyer.

April

We were contacted by our real estate agent, were we still interested in the place? Original party had backed out. Were we interested? Of course! We already had loan approval so the formalities were a breeze. On April 30th we signed on the dotted line and received the keys.

May

Most of May was spent cleaning the place. It was really messy and dirty. On May 4th I started this blog and then took readers on a tour of our new home. (Floor plan with links to each room here.) By the third week in May we were tired of the hour and a half round trip drive every day and Dan said, "It's time to move in." Which we did.

June

After the house was livable we started cleaning up the yard. I discovered all sorts of wonderful things, including grapes and a fig tree. I also got my garden started.

July

We were making plans and setting priorities when our insurance company interrupted things with their own must do list. This was the month we tore down the chimney and planted a privacy hedge.

August

August was a month of mixed emotions. Our son got married :) but Catzee disappeared :( . We had the two big old oak trees next to the house trimmed. The branches which overhung the house became this year's firewood. We also had the roof replaced, and started preparations for next year's production garden. We were harvesting from the summer garden. August was the month the figs and blueberries came in. It was also when I bought a chest freezer.

September

This month we started working on the new hearth. We also started replacing the original knob and tube wiring in the house. For our outside project we started putting up a fence for goats. I harvested wild muscadines and started planning my herb gardens.

October

October's big house project was doing the woodstove alcove and installing the woodburning heat stove. We managed just in time for our first cold snap of the year. I started my fall garden and learned about fermentation as a useful process, both for seed saving and for food preservation. Foraging in October was for rose hips.

November

November was a house project month. We finished the indoor rewiring, added needed support to the dining room floor, painted the dining room, removed the old dining room floor, and put down the new hardwood flooring. Whew.

December

First Dan rewired the back porch and added a light outside the back door. Then we sanded and stained both the dining room and living room floors. Out of doors we planted our fruit and nut trees. The second half of the month, we decided to take a break and celebrate our first Christmas in our new home!

2009 Year In Review all text copyright December 2009 

December 28, 2009

More Problems With The Dining Room Floor

The week before Christmas we put the first coat of polyurethane on the living room floor. I wanted to do the living room first, because I wanted to put up our Christmas tree. DH agreed.

He hand sanded the floor lightly with 220 grit sandpaper, and we applied an oil based urethane. Like the dining room, the living room had some of the uneven splotchiness of stain I mentioned in this post. We were pleased then, that even the low luster of the satin stain seemed to improve the appearance tremendously. That was a relief.

The day after Christmas, we decided to apply the first coat of polyurethane to the dining room floor (so I could keep the tree up a few more days). As with the living room, we hand sanded it with 220 grit sandpaper. I was quite dismayed however, that with even a light hand sanding, spots of stain were removed to leave patches of bare wood....

Problem spots in stained dining room floorThis hadn't happened in the living room!

What to do. As a weaver and knitter, I'm often faced with errors in my weaving and knitting. These mistakes can sometimes be passed off as "design elements," but sometimes they glare at you unrelentingly, taunting you as an obvious blemish (you other weavers and knitters know what I'm talking about!). The question then becomes, "can I live with it?" Sometimes I say, "yes," and I keep on keeping on. Sometimes the answer is "no," and then I have to unweave or rip out until I can correct the error. A floor wasn't so easy to deal with because leaving it wasn't an option.

So, what options did we have?

We could:
~ apply a second coat of stain over the entire floor
~ sand it all off and start over (not!)
~ try to fix the bare wood spots

In the end, DH and I took small artists brushes and applied stain to the bare wood, blending as we went along. It didn't turn out too badly and only put us a little behind in our schedule.

We're not sure as to the cause and it's odd that it occurred only on the dining room floor. We used Cabot stain, but we would not use that brand again. The next day we applied the first coat of polyurethane in the dining room and are much relieved that it looks okay.

The plan is to get a second coat of polyurethane down on each of the floors. Admittedly it's a little slow drying this time of year, but we've been able to keep the floors within the recommended temperature range. I have to say that I will really be glad to finish this project and put it all behind us.

More Problems With The Dining Room Floor photos & text copyright December 2009 by Leigh at http://my5acredream.blogspot.com/

Related Posts:
Dining Room Floor: Sanding & Staining

December 26, 2009

Pecans Revisited

I have to admit that I was doubtful about getting a pecan crop this fall. It didn't seem as though the squirrels were the least bit interested in sharing them. Even so, I managed to gather over six pounds. In thinking about Christmas baking, I set about cracking them open to see what I could get.....

I actually got some pecans this year.
Admittedly, they weren't all "good" ones, but I got three cups worth for my immediate use.

One thing I did was to bake a pecan pie for Christmas dinner....

My very 1st pecan pie
I have to admit that this is a break from Christmas tradition, which calls for pumpkin and lemon meringue pies for Christmas dessert. I still baked the pumpkin one, but the pecan replaced the lemon (for which I'm the biggest fan). I probably wouldn't have baked this one, except that I found some organic corn syrup in the clearance bins of one of the grocery stores I shop at. So I decided to give it a try. I'm so glad I did because it was so good!

The other thing I needed pecans for was for a Christmas cookie favorite, chocolate layer cookies...

Chocolate Layer cookies
Actually I use pecan meal for this, and the pecans form the crunchy top layer. Yummy!

Recipes? Well, for the pecan pie crust, I used my trusty No Fail pie crust recipe . But for the filling, I used the recipe for the pecan pie from here. I did roast the pecans as the recipe calls for, but I used the directions for soaking them first from the Nourishing Gourmet, here,and then roasted them on cookie sheets on top of the woodstove.

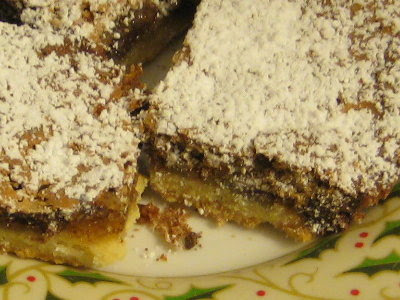
Yummy bar cookies
The chocolate layer cookies (2 photos up) is a recipe I adapted myself, so I can share that one with you.

Chocolate Layer Cookies

Bottom Layer:

½ C butter
¼ C sugar
1 egg
½ tsp vanilla
1 ¼ C unbleached flour
1/8 tsp salt

Cream butter and sugar. Beat in egg and vanilla. Combine flour and salt and add in 3 parts to creamed mixture. Pat dough into the bottom of a greased 9 x 12 inch pan. Bake about 15 minutes. at 350°

In the meantime, prepare the following:

2 eggs, beaten
1 ½ C brown sugar
1 ½ C chocolate chips
1, 6 oz pecan meal (can make this in the blender)
2 tbsp unbleached flour
½ tsp baking soda
½ tsp salt
1 tsp vanilla

Mix well and pour over bottom layer removing from oven. Bake another 25 minutes. When cool, sprinkle with powdered sugar and slice into bars.

December 23, 2009

Merry Christmas!

We finally got our tree up last night.

The best part is that it is our own, from our own land.


Warm holiday wishes to all my readers.

Comment?

Photos of Merry Christmas! copyright December 2009 by Leigh at http://my5acredream.blogspot.com/

December 21, 2009

Summer Garden 2009: A Review

I know it probably seems a little late in the year to be doing a summary of my summer garden. But in fact, I was able to keep on harvesting right up to December 1st, following our 2nd frost of the year.

Even though my garden was late and a little haphazard, it occurred to me early on to keep records. I figured dates and amounts would help for future gardens, as well as notes of the problems and pests I might encounter. However, I'm terrible at keeping track of my records. I have 5 notebooks of weaving, spinning, and knitting notes and inspirations, but I can never find one when I need it! So I started a garden journal blog and have been able to keep records and notes to myself. It's been handy for "to do" lists and wish lists, planting dates and gardening links I want to remember. You can take a gander at it here. Not interesting reading, but it's been useful to me and I always know where to find it.

I've kept track of weekly and monthly totals including rainfall and amounts planted, harvested, and preserved. Just the other day I finally got the last of the summer garden details in, so now I can go back and analyze, in time for planning next year's garden.

In general, I harvested:

-16 and 1/4 pints of blueberries from one bush
-77 cucumbers weighing 15 lbs 12.2 oz (that was 4 hills)
-Over 5 and 1/2 pounds of green beans from 75 feet worth of rows
-Almost 5 pounds of okra from a 21 foot row
-16 yellow summer squash totaling 5 and 1/2 pounds (another 4 hills)
-7 small butternut squashes from 2 hills worth
-Almost 52 pounds of tomatoes (that was 177 count) from 8 plants
-Over 12 pounds of figs
-Only 23 ears of sweet corn from a 31 foot row of triads of plants
-And my one little green pepper plant gave me 17 peppers

I preserved:

-1 acorn squash in cold storage
-7 pints dehydrated blueberries
-7 butternut squash in cold storage
-1 pint cut off the cob and 5 ears frozen of sweet corn
- Cucumbers - 7 pints bread & butter pickles and 7 pints dill pickles
-Of figs, 4 pints jam, 5 pints canned, and 1 qt dehydrated
-3 quarts canned green beans and 1.25 quarts dehydrated
-3 cups chopped, frozen green peppers
-8 pints, frozen okra
-5 pints spaghetti sauce made and canned from my tomatoes

Biggest disappointment:

My winter squashes. Especially the pumpkins which produced flowers prolifically but produced only two small pumpkins, both lost to worms. I did manage to get the seeds from one of them. I got butternut squashes, but they were small, probably due to poor soil. I have 7 of them in cold storage (an unheated back room). I ended up with only one tiny acorn squash (which was tasty in chicken stew).

Biggest problems:

Were powdery mildew and worms in my cukes and squashes. I need to take precautions for these things next year. I also had bean beetles and squash bugs, but was able to keep these pretty much under control with Pyola spray from GardensAlive!

Seeds saved:

-Table Queen acorn squash
-Clemson spineless okra
-National pickling cucumber
-Waltham butternut squash
-Small sugar pumpkin
-Casaba melon (from a melon given us by a neighbor)
-Gray mammoth sunflower

With all of this information tucked away, I'm ready to start on next summer's garden plans. Considering that the soil is better prepared, I should have better yields. Plus I plan to continue to keep garden records and improve upon them as well.

For the full blown version of my 2009 summer garden review, click here. I've been keeping track of my fall garden as well, and will post those results once I finish harvesting from it.


Summer Garden 2009: A Review
copyright December 2009 by Leigh at http://my5acredream.blogspot.com/

December 19, 2009

Dining Room Floor: Sanding & Staining

It took a couple of weeks to get to this point (last post on this project here), but we've finally been able to start the process of finishing the hardwood floors.

Heavy duty rented floor sanderWe rented a floor sander for this job. We sanded the dining room floor first...

Living room floor getting sanded... and then the living room. We debated about whether to go ahead and do the living room at the same time, or wait until a later date. I was afraid that we'd lose momentum if we waited on the living room floor. Plus, I'm tired of all the dust! Dust from tearing down the chimney, dust from tearing down the fireplace, dust from putting in the new hearth, dust from building the woodstove alcove, and now dust from doing the dining room floor. I want my house back!

View of both living and dining room floorsBoth floors are oak, but you can see the difference in their natural colors with the old finish off the living room floor.
Hand sanding with an orbital sanderThere was a lot of hand sanding too. This included the edges by the walls where the floor sander couldn't get, and also rough spots left by that same floor sander when it stops and starts.

Brushing down the stainFinally staining. I chose a color similar to what the living room originally was.

I will admit that we aren't entirely happy with the way the stain turned out. We did a lot of research beforehand, both on types of stains as well as techniques for putting it down. The big concern is getting it down evenly. To accomplish this we feathered the edges, but we still ended up with areas that aren't evenly blended. Of course I googled this problem and discovered that it is unfortunately all too common. Not only amongst DIYers, but quite a few professional jobs turned out the same. The type and brand of stain didn't matter, they can all do it . And there's nothing to be done after the fact unless one has the energy to sand the whole finish off again and start over. Many advised that putting on the finish helped the overall appearance, though I can't see how. Fortunately the high traffic areas (hallway and doorways) look the best. Most of the rest of it will be covered with furniture and an area rug or two.

Stained floorsNext will be two coats of the polyurethane finish on both floors. We are going to use a satin finish because, 1 - we like it better, and 2 - glossier finishes are more reflective and tend to make imperfections more prominent. After that we can finish the thresholds, trim, and other finishing touches.

The light at the end of the tunnel is being able to have functional dining and living rooms. That means the spare room and my studio can be cleared out of furniture and unpacked boxes, so they will also be usable. It also means I can get the rest of my dishes, kitchen tools, and what-nots unpacked. As you can imagine, I'm really looking forward to that day.

Rascal's wet kitty paw print
[I've had to close comments on this post, sorry. Some flooring company in London keeps leaving spam and I'm tired of having delete it.]

December 17, 2009

Colors of December

Several months ago, Sue posted a "Colors of Late October" on her blog, Life Looms Large. The next month, she challenged other bloggers to join in. I wasn't prepared for a photo post then, but this month I am. Here are my "Colors of December."

Sweet Gum seedlings behind the goat(less) shed

Close-up of the same.

A red bellied woodpecker in the pine trees.

Nandina aka "Heavenly Bamboo"

In the woods behind our house.

Little pine trees in the field behind the garden

My rabbiteye blueberry bush.

Neighbors bushes along the property line.

For more Colors of December including a list of challenge participants, check out Sue's blog here.

Care to comment?

Colors of December photos & text (what little there is of it) copyright December 2009 by Leigh at http://my5acredream.blogspot.com/


December 16, 2009

A Win & A Dilemma

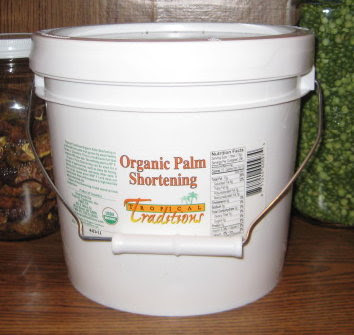
I won another giveaway! Can you believe it? I was so surprised. I rarely win one, let alone two. What did I win this time? A one gallon tub of Tropical Traditions Organic Palm Shortening from Just Making Noise.

Looky what I won!If you remember my blueberry pie recipe, then you know how much I love organic palm shortening. What I didn't tell you, was that I've had a hard time finding it locally. What I didn't know, was that there was another brand. When I saw this giveaway on Marilyn's blog, I just had to enter. I was delighted to win.

Of course I had to taste test it immediately.For that used my grandmother's ginger cookie recipe, which is a holiday favorite at my house. I've had problems with this recipe because it calls for shortening, which I had stopped using some time ago (hydrogentated kind). Butter or margarine just don't do the same in the recipe, and I've missed the taste of those cookies. If this shortening could pass this test, I would be sold, lock, stock and barrel.

My favorite cookies
Gramma Wilson's Ginger Cookies

3/4 C shortening, melted & cooled (TT's Organic Palm, of course)
1 C sugar (I use raw cane if I've got it)
1/4 C molasses (I use blackstrap)
1 egg
2 tsp baking soda
1/2 tsp salt
2 C flour (I used half unbleached, half whole wheat)
1/2 tsp cloves
1/2 tsp ginger
1 tsp cinnamon

Mix well and chill thoroughly. Form into 1 inch balls and roll in granulated sugar. Bake on greased cookie sheet at 375 degrees F for 8 - 10 minutes. Do not overbake. Makes 4 dozen.

Results? Well, I almost hate to admit it but they were better than Gramma used to make!!!

So what's the dilemma? Well, when I discovered that Tropical Traditions had dried, unsweetened coconut on sale (and organic to boot), I immediately ordered some for my Christmas baking. Unsweetened coconut isn't easy to find. I had a special offer, so I received a free copy of this book........

Virgin Coconut Oil: How It Has Changed People's Lives, and How It Can Change Yours! by Brian and Marianita Jader Shilhavy. (You can get a free copy too, more on that in a minute.) You can click on the image for a closer look.

The coconut is absolutely yummy and the book is very interesting. It starts by telling Brian and Marianita Shilhavy's story and then explains what virgin coconut oil is, as well as it's health benefits. There are specific chapters that deal with the effect of virgin coconut oil on obesity (did you know that pig farmers won't feed it to their pigs because they don't gain weight on it?), thyroid health, skin health, candida yeast infections, and cholesterol levels. There's more, including a recipe section. Both personal testimonies and references document the claims made in this book.

Of course, after reading it I wanted to try coconut oil too. It seems that the typical oils and fats we consume are largely responsible for declining health in industrialized nations. Others have written about this (great articles here), so I won't go into that here. Needless to say, I've been looking for replacements for the fats I use in cooking. The organic palm shortening is one resource, but I've been looking for a cooking oil as well. Extra virgin olive oil does well for some things, but not for others. Is coconut oil the answer?

On the one hand, I'm excited to find a healthy oil (with a phenomenally long shelf life.) On the other hand, I realize that unless I can grow my own palm and coconut trees, tropical oils don't fit into the scheme of a self-sustaining North American homestead. One the other hand, I buy and use olive oil, which falls under the perimeters of the same problem (though I may have found an olive tree cultivar which will grow in my hardiness zone.)

The logical answer to the dietary fat dilemma would seem to be home rendered lard from a pasture fed hog given no antibiotics nor growth hormones. Not something I can buy in the store, but possibly something we can do in the future. In the meantime, I am going to purchase healthy fats and oils from reputable sources, because a self-sustaining lifestyle also requires good health!

OK. I mentioned you can get a free copy of Virgin Coconut Oil.

As a giveaway winner, Tropical Traditions extended the opportunity to my blog readers to get a free copy of that book. Anyone placing a first time order, can use my ID number 5682731 in the "Referred by a friend" box during checkout, and they will include the book with your order.

In addition to oils and coconut, they carry a variety of organic foods, skin care products, pet products, books, health appliances, and supplements. You can click here for more coupons and current sales. You can also click here, for tons of recipes. (I never dreamed there were so many things you can do with coconut, and not all of them sweet, either. )

OK. Enough of sounding like a commercial. The other thing I'm pleased about is the cool tub that both the coconut and the shortening come in. They have lids and handles! The bucket in itself is a prize. I'm thinking food storage. I'm thinking blueberry picking. I'm thinking fig picking. And rose hips. I'm thinking gardening bucket. I'm a happy camper. :)


A Win & A Dilemma photos & text copyright 

December 14, 2009

Around The Homestead

Random updates, follow-ups, ideas, and observations since my last "Around The Homestead".

4 The woodstove is doing a fairly good job of heating most of the house (approximately 1500 sq. ft). The kitchen warms up with cooking, but remains cool if not chilly otherwise. The addition can be downright cold, so we've taken to leaving the door to it shut. This makes it perfect for cold storage, and also helps keep the kitchen warmer. We use a space heater to heat up the bathroom back there for showers.

4 I've also started shutting the doors to my studio at night. It takes it awhile to heat up in the morning, but this definitely contributes to keeping the house warmer all night. Fortunately my studio has a lot of windows which get the morning sun, which help warm it up on a sunny day.

4 We haven't had a lot of sunny days. What we have had has been almost 12 inches of rain over the past 6 weeks. Our daytime highs are usually in the 40s, lows in the 20s unless it rains overnight, then the lows stay in the 30s. So, no solar warmth in the studio. I do use the space heater in here if I'm working at the computer for any length of time.

4 I am wondering if this is the reason my computer monitor is acting up. It doesn't want to work when I first boot up the computer, nor if it's been sitting dormant for awhile during the day. It either flashes or goes dark. Eventually it warms up and behaves. It's only a couple of years old, so I'm hoping it's the cold that is causing the problem.

4 Thanks in part to the cold weather, we've come up with a new plan for the addition. We are considering making Dan's office a food storage, and giving him some space in a master suite we're planning. His new office space would be borrowed from our 5-foot wide hallway, which would mean walling the back portion of the hall off (which would mean I'd have to do something with the linen closet). We would use the spare room for our bedroom, the hall bath would become the master bath, and that would make him a happy camper. I've been meaning to blog about those plans, but just haven't gotten around to it yet!

4 Dan put up two birdbaths in the area I cleared right outside our kitchen window. One of them he made with cement leftover from the woodstove alcove (photo of his creation here). I added two bird feeders and a suet feeder. We get tons of birds! Spotted so far:
  • American robins
  • cardinals
  • cedar waxwings
  • Carolina chickadees
  • white breasted nuthatches
  • Carolina wrens
  • mourning doves
  • blue jays
  • white throated sparrows
  • common grackles
  • rufous sided towhees
  • tufted titmice
  • blue birds
  • mockingbirds
  • downy woodpeckers
  • red-bellied woodpeckers
  • purple finches
  • brown thrashers
  • yellow rumped warblers
  • house finches
  • and an unidentified sparrow.
4 We also have red-shouldered hawks and red-tailed hawks which circle overhead frequently, though they've never visited our feeders (fortunately for the birds who do). DH did see one try to pick a squirrel out of a tree in the back yard.

4 We have lots of squirrels. Lots of fat squirrels. And chipmunks.

4 I was walking in the woods the other day and came upon a red shouldered hawk feeding. I had my camera in my pocket and hoped to sneak the camera out to get a picture. It was so busy that at it didn't notice me at first, but that didn't last long. It flew off before I could get the camera out. It was eating what looked like the remains of a grackle, but all that was left was a pile of black feathers. This explains the piles of feathers I find around the place from time to time.

4 I've been reading about small scale grain growing and wondering how feasible it would be for us to try that next year. Corn sounds especially do-able on a small scale by hand.

4 Speaking of grain, I'm pleased to tell you that we're making progress on the goat fence! We are currently working on corner bracing.

4 I have decided to wait on getting Shetland sheep. The reason? A gal in my weavers' guild has Shetlands and I've learned a lot chatting with her. My problem at the moment is the large number of blackberry and wild rose bushes in the area we're fencing. She told me I'd be forever having to rescue them from getting caught in the thorns, especially as their fleece grew out. So. Goats first. Sheep later. :(

4 And speaking of goats and squirrels, DH discovered a pair of flying squirrels in the goat shed, making cozy during the cold weather. He was just as surprised to see them as they were to see him. Rascal knew they were there though, and now we know why he was meowing at the shed ceiling when we were working on the fence the other day.

4 We finished up the last of the electrical re-wiring projects. The overhead lights inside the house have been finished for awhile, but we still needed a light in the enclosed back porch/ laundry room/ summer kitchen, and a light outside the back door. Both are done and very welcome now that the sun goes down so early.

4 Besides the fruit and almond trees, we planted two more Leyland Cypresses, which finishes out the row along the field.

4 This week we plan to sand the dining room floor. We'd hoped to have it all done by now, but between Dan's work schedule and needing to plant all the new trees, we are just now getting to it.

4 Consequently I have no Christmas decorations up. One reason is because my china hutch won't be available for my Christmas Village until I can finally put it in the dining room. The other reason is because we've decided to do the dining and living room floors at the same time, so, no Christmas tree. Yes, doing both rooms together makes a bigger job, but I'm afraid our momentum and enthusiasm will fade away if we try to make these two separate projects.

4 Indoor painting projects include the living room ceiling, walls, etc, and trim and doors in the bedroom. Photos one of these days.

4 Outdoor sanding and priming of the siding isn't making much progress with all the rain. I have finished the front of the house though, so at least our house doesn't look like the neighborhood eyesore anymore.

4 I have found a good source for local, pasture raised, grass fed meats from animals given no hormones nor antibiotics. I can buy combination boxes of beef, pork, and chicken, delivered right to my door. Buying in bulk like this is more economical than buying individual packages of similar meats from the grocery or health food stores, and makes me very glad I invested in a chest freezer earlier this year.

4 I've decided not to give my Rose Hip Jelly for Christmas gifts after all. It appears to have a, well, an, er, um, *ahem* "medicinal" effect. Perfect for constipation, but not for toast!

4 Some days everything seems quite overwhelming. There's so much to do; much more than our dwindling savings can accomplish. We are careful to budget and prioritize, but the more we get to know our old house, the more its needs become apparent. If I dwell on it all too long I get discouraged and question whether or not this place and this lifestyle are really the best choice for us. I wonder if we've bitten off more than we can chew.

At times like that I consider the alternatives. I remember how I felt during those 3 and 1/2 years of apartment dwelling before we found this place: I was frustrated with our indoor lifestyle and restless like a caged animal. If it hadn't been for my fiber arts, I think I would have gone into a tail spin. That reminds me to take stock of all the blessings we have living here. I also remember that there are freedoms to a self-sustaining lifestyle that make all the work worth it.

Whew, that was a lot to catch up on. The question now is,

.... did I forget anything?

Around The Homestead
is copyright December 2009 by Leigh at http://my5acredream.blogspot.com/
December 12, 2009

Almonds & Elderberries, Plan B

The almond tree and elderberry bushes I ordered arrived earlier this week. Like the fruit trees, there was a rain delay before we could plant them. Thursday was cold and blustery but sunny, so we took advantage and set out to plant them. The almond tree was to go in the spot we prepared in October for it and the fruit trees. The elderberry bushes were to go in the garden side zigs of the zig zag fence.

The first thing we wanted to plant was the almond tree. But as Dan dug the hole, he found that by the time the hole was deep enough to plant the tree, he'd hit water.


No. Good. Nut and fruit trees need well drained soil and will not tolerate standing water. Planting the almond here could kill it.

We'd already seen the potential for this when we got all that rain from Ida. We'd built up the soil where we wanted to plant the trees, so that after the next heavy rain the water drained better. However, we now realized that surface drainage wasn't helping subsurface standing water. Granted we have clay soil, which holds water, but also we've had a lot of rain: 6 inches in November and over 5 inches during the first two weeks of December. The good news is that our drought is officially over.

We needed a Plan B for our little almond tree. After a little discussion, we decided to plant it where I had wanted to put a ginkgo tree, in last summer's garden.


This is a semi-dwarf, self-fertile All-In-One Almond tree, and this is a good spot for it.

I had pretty much decided against the ginkgo after Dan and I visited a local nursery that carried them. We had a good discussion about shade trees with the manager there, and learned that in our part of the country, ginkgoes grow slowly and actually don't do well. Since then, Dan and I have been discussing possibilities for this spot as well as shading the house from the hot, setting summer sun. A true shade tree would take a long time to grow, so we have been considering trellises and a vine on that side of the house. (Maybe now I can plant hops!). Because of all this, it was easy to decide where to put the almond tree.

The spots for the elder bushes are on higher ground, so they went in as planned.


These are common North American Elders, Sambucus canadensis. The zigs and zags of the fence give me eight spots to plant shrubs and bushes on the garden side, and these two are the first. For the rest of them, I'm considering two more blueberry bushes (types for fresh eating, for which my rabbiteye is not), two raspberry bushes, and maybe two rugosa rose bushes. Hopefully I can get all those in by spring!

We were still concerned about the lowest apple tree we planted, considering the water problem we discovered. Even though it is up the slope from where we planned to put the almond, we wondered if it was still too low for the underground water to drain completely.


We dug a trench for drainage and it did get a little water seeping into it. This trench will be filled with stone like a French drain and covered with soil.

The big question is what to do long term. Best possibility might be to put a cistern at that bottom corner of the garden. That way we could channel all the water coming down the hill into it for future use.

As much as we wish we could have followed through with our original plan, all this rain before planting has been a blessing. If it hadn't been for that, we wouldn't have known about this drainage "problem." At least we found out about it beforehand and can change our plans accordingly.


Almonds & Elderberries, Plan B photos & text copyright 


December 10, 2009

Tips For Staying Warm(er) With Wood Heat

Everyone who heats with wood knows what a comforting warmth it provides, as well as a sense of security that one can stay warm even if the lights go out. On the downside, we also know that the farther one gets from the heater, the cooler the house gets. Of course, many of us use fans to circulate the heat, but we still have to deal with chillier areas in our homes. So, here are some tips on how to dress for increased comfort.

Wear wool. I'm talking about real sheep's fur here, nothing synthetic. The individual fibers of sheep's wool aren't smooth, but covered with microscopic scales. In addition, they are crimpy. These two factors enable wool fibers to trap air, which in turn traps warmth. Wool is also hygroscopic, which means it absorbs water, up to 1/3 it's weight without feeling wet. In return, it gives off heat, so that even when wet, wool has the amazing capacity to keep you warm. If you have cold feet, 100% wool socks are a must and can make a big difference!

Wool's too itchy, you say? Either try next-to-the-skin soft Merino wool, or use wool sweaters, vests, etc., in layers as outerwear.

Allergic to wool? Well, maybe. Oftentimes the allergies folks have to wool is actually an allergy to the powerful scouring chemicals used by industry to prepare the fiber for commercial use. Before you give up on it completely, try some hand-scoured handspun and see if that doesn't make a difference. If it's still a problem, switch to alpaca, which is hypoallergenic.

Even warmer than sheep's wool are alpaca, angora (bunny fur), cashmere (from goats), or qiviut (musk ox). These can be worn 100% (expensive unless you find it in a thrift store), or in wool blends for wonderful warmth. Avoid blends with polys, acrylics, cottons, or silk however, as these decrease the warmth value. Other possible natural wool fibers for warmth are mohair (from angora goats) or camel. If these wools can keep animals from freezing to death, then they can certainly help keep humans warm as well.

Wear cotton flannel. Some fabrics have the feeling of instant warmth to them. Flannel is one. How many of you have flannel sheets on your beds? (Show of hands.) Flannel night clothes, shirts, and dresses are warmer than plain cotton or polyester blends, especially next to the skin.

Try down, as in goose down, the undercoat of feathers that keep birds warm in freezing weather. Again, the real thing works so much better than synthetic filler. The advertisers may try to tell you different but t'ain't so! I have two down jackets and both of them keep me toasty warm when I have to go outside for chores.

Avoid silk and linen, especially loose blouses and flowing garments. These are cooling fabrics, perfect for hot summery days, but chilly to put on and wear during the winter as they do not retain warmth. This is (I have lots of silk purchased from thrift stores, very cheap! It enables me to buy only natural fibers, which is one of my personal "musts.")

Wear undershirts. I'm not talking about t-shirts here, I'm talking about the sleeveless kind we little girls used to have to wear before we were old enough to wear bras. I believe they use them as summer tops these days. Or you can find them in the men's department as "a-shirts". A snug-fitting stretchy one can be worn under anything to add warmth without adding bulk. It's amazing how much difference can be made by keeping your chest and trunk warm.

Wear vests. These should be wool (knit, crocheted, woven, or felted) or down. A vest keeps your trunk warm like an undershirt does, but obviously it's worn over shirts. I use all three layers (undershirt, shirt, and vest) plus a sweater to keep warm when it's really cold.

Hats and caps. When you go outside, keep your head warm too because it really makes a difference in your overall comfort. Natural animal fibers will keep you warmest. Some folks just wear earmuffs, which keep your ears warm, but not the top of your head. You'll feel warmer with a cap over those earmuffs.

Use shawls. Now, I'm not a shawl wearer. I prefer sweaters. However, when I need to wear my winter dress coat, I love a large black shawl in a fancy yarn to wear over it. Dress coats really aren't very warm and that shawl really makes a difference and hopefully looks stylish to boot.

Ladies, wear longish skirts. Think I'm nuts? Well, besides being more comfortable than jeans (which I do wear too), skirts and dresses can be worn over sweat pants, warm-ups, or leggings, and provide oh, so much more warmth than jeans or pants alone. If I want another layer, I put on a cotton slip too (but not flannel, which grabs the skirt fabric). When I need to go out, I simply pull on my knee high boots over my warm ups. My hemline falls below the top of the boots, so no one is the wiser. [Hint: to keep your leggings from pushing up when you pull on your boots, tuck the bottoms of them inside your socks.]

Of course, these tips are for everyone, not just those of us with wood heat. I think a lot of folks are keeping thermostats set lower these days and looking to dress more warmly instead. The choices of fabrics and garments can a big difference in one's comfort level. And comfort is pretty important to most of us.

December 8, 2009

Fruit Trees Planted

After some debate about whether to plant our new fruit trees or to heel them in for awhile, we went ahead and planted them. The dilemma was because of the weather and mud. As every gardener knows, one doesn't work in the garden when it's muddy, because it compacts the soil too much. This was the concern for the trees because we've had a lot of rain over the past several weeks with more in the forecast. Finally Dan called a local nursery who told him to get them in, so we did.

4 little fruit trees, all in a rowAlmost too small to see, but there are four little fruit trees planted there. The two pears are on the left, and the two apples on the right. We planted the two dwarf peaches in the front yard...

And 2 more hereI'm hoping that eventually they will provide shade for my studio (the two windows on the right), because it gets rather warm in there on summer afternoons. Plus they'll be pretty to look at when they get big enough to bloom in the spring.

I feel profoundly thankful for these trees, not to mention excited at the anticipation of having our own fruit. I definitely plan to baby these trees for the next couple of years.

Fruit Trees Planted photos & text copyright 

December 6, 2009

Ginger Beer & More: Taste Test Results

I'm pleased to report that the much anticipated time has finally come to sample my experiments in lacto-fermention: sauerkraut, ginger carrots, and ginger beer. I'll start with the ginger beer because that is the one that seemed to be of most interest to my readers.

1st glass of my homemade ginger beer.Ginger Beer

After patiently (ha!) waiting the required two weeks for my ginger beer to ferment, I discovered a PROBLEM! I didn't tighten down the screw-caps on the bottles! Result? No fizz! It had all escaped the bottle! :(

I was extremely disappointed with myself for this, but Dan, ever my best friend and faithful encourager, pointed out that even so, the flavor was actually quite good. Plus it had a nice natural color and wasn't too sweet. It would have been perfect if it had been carbonated!

So. Another batch will soon be in the making. This time though, I think I will increase the amount of ginger and switch to lemons as the recipe calls for, instead of limes. I will probably only add one lemon instead of two as I would like to enhance the ginger flavor and downplay the citrus, though it does make it tasty.


1st batch of homemade sauerkrautSauerkraut

A 5-star yum! Even Dan likes it, and he doesn't care for cabbage. This is so delicious that we're eating it almost every day. This recipe is definitely a keeper and oh so easy. I need to keep it on hand all the time.

I recently started another batch from a recipe from Nourishing Traditions, page 92. It appealed to me because it uses caraway seeds for flavoring. Dan isn't so crazy about caraway as I am though, so he may not care for it as well.


Spoonful of fermented ginger carrots.Ginger Carrots

Too salty. I don't have enough experience lacto-fermenting, nor with this particular recipe, to know what went wrong, or if it's supposed to taste like this. One thing I've learned is that fermenting foods is like making yeast bread; the results are not 100% guaranteed. And like learning to make bread, I think learning to ferment will take practice and experimentation.

Never one to call anything a waste if I can help it, I started using it as a condiment for salting things like this potato soup...

Potato soup, not homemade, but tasty.
Very tasty! It adds a pleasantly salty tang to soups, stews, anything.

Well, one out of three isn't so bad and more experiments are on the way. Another batch of ginger beer for sure, and more with different types of vegetables as well. My turnips care getting to the harvest stage and I would love to ferment at least some of these, as well as adding some different ingredients to my sauerkrauts in the future. One thing is for certain, this is a tasty and nutritious way to preserve the harvest.

Ginger Beer & More: Taste Test Results In photos & text copyright