April 30, 2012

Most Annoying Goat Award

I have a couple of goats that I've thought would be surefire candidates for a "Most Annoying Goat" award if there was one. Well now there is.


I am awarding it to .......... Surprise........

Don't let the face fool you

Surprise is one of those critters who refuses to acknowledge the routine. She'll holler and shove and push, and generally get in the way during feeding time, unless she spots the gate open and then zoom, out she goes. Most of our gates have slide bolt latches, except for one which is chained. Every morning she tries to see if she can undo that chain. She has a 6th sense when it comes to anything I don't want her to do, or to get into. That is the very thing she immediately hones in on and goes for. For example, the goats haven't been allowed into the back pasture (the one we're working on improving) because of this...

Plastic covered straw pile

Under the plastic is dirty straw and discarded hay from cleaning out the barn. I plan to scatter it over the pasture seed we'll plant after we get our soil test results. Any time Surprise is in the back field, she makes a beeline to this pile and pulls the plastic off. The more brick and rocks I have holding it down, the more determined she is to do it. The chickens then proceed to scatter straw all over the place, which I do not want.

The other day the boys were grazing in the front, so I wanted to let the girls in the back. To keep Surprise from pulling the plastic off, I decided to try a goat deterrent.

My goat deterrent

Somewhat satisfied, I opened the gate and let the girls in.

Jasmine & Surprise check out the odd pile

Jasmine's already losing interest but Surprise is taking a closer look.

A squirt with the hose is always the deciding factor.

They go off and I do too. I know better than to be gone too long however and return to find this...

Sneaking around to the other side to try to get at that plastic!

She had snuck around to the other side to see if she could get at the plastic without me noticing. Needless to say she had no success and gave up. Score one for me. Finally!

Do you have a most annoying goat?

Click to read more or join in

April 27, 2012

New Book For The Homestead Library

Acquiring this book was one of those "one thing leads to another," events. It started with the Kinder Goat Group message board, which led me to purchase Pat Coleby's Natural Goat Care. In reading it, I learned she is an advocate of remineralizing one's soil, and she frequently referenced a man named Neal Kinsey in that regard. While visiting her publisher's website I discovered that he also had written a book, Hands-On Agronomy: Understanding Soil Fertility & Fertilizer (co-written with Charles Walters). While doing a little online book price comparison, I discovered that Mr. Kinsey also has a soil testing service. I immediately ordered the book and a soil test. (I'll share about that after I get the results).

The timing for this purchase was absolutely providential. One of our 2012 goals is pasture improvement and I was puzzling over how to substitute organic fertilizers for the chemicals recommended by the state cooperative extension service. A Kinsey soil test will tell me how to do that, and not just for nitrogen, phosphorous, potassium, and pH, but also for the various other minerals that are necessary as well.

Right off the bat I can tell you two things about this book. Firstly is that it is truly written for the layman. Secondly, is that I don't immediately understand everything he is saying. Not because it isn't written well, but because this is an area in which I have little knowledge and experience. For me, it's not a read and think "oh yeah, I get that." It's material that I have to read carefully and ponder because it digs deeper (hmm, is that a pun?) than any organic gardening book I've read so far. Perhaps I could say that it gets to the root of soil and hence plant health (yeah, I know :) more so than any other book I've read. In addition, it's written with examples for many soil types and problems, some of which don't apply to me.

Even though I don't have a full grasp on the material yet, there are two themes that are sticking in my head.
  1. feed the soil and let the soil feed the plant
  2. soil nutrients must be in balance 
Feeding the plant focuses on a specific deficiency. When my broccoli leaves turned purple, I sprinkled the soil with bone meal to correct the problem. I assumed my soil is deficient in phosphorous, so that's what I addressed. I say assumed, because I could have a phosphate deficiency, but I could also have adequate phosphorous that simply can't be utilized by the plant. Phosphorous availability is effected by pH, the clay in the soil, the time and method of application, aeration, compaction, and moisture. Also, it is effected by the amounts of the other soil nutrients. That's where nutrient balance comes in. Too much phosphorous could render my soil just as unproductive as not enough. The bottom line is that if I do what it takes to make my soil healthy, it follows that what I grow will be healthy as well.

If what I grow is healthy, then everything that eats it will be healthier too. Rather than having to supplement my goat feed with vitamins and a mineral mix, they should be able to get most of the minerals they need directly from what they eat. The same is true for us too. That's why this is so important to me.

While I wait for my Kinsey soil test results, I'm giving the book a first go through. When my results arrive, I will be able to re-read with those in hand, and walk away with what applies to me and our soil. Even though we are anxious to get that pasture established, we want to do it right. Hopefully I'll have an update on that soon.

April 25, 2012

Kris, 4 Months Old

Yesterday Kris turned four months old. Have I mentioned that he was born on Christmas Eve? Hence his name, as in Kris Kringle. :)


Life is pretty tough around here for a puppy these days. There are many lessons to be learned. These include learning to not get under foot, not to nip, and not to grab at hands, pants, and goat legs. The hardest lesson of all is learning play, versus not play. As a pup, he's all about play. He doesn't understand that there are 17 other critters around here expecting to be fed and tended to. On the other hand, neither do any of them. :)


He's friendly and affectionate, smart but with a stubborn streak. To get a good photo I have be on the other side of the fence. Otherwise he's trying to crawl into my pocket. :)

It would be considerably easier on the humans if he liked to play fetch. Oh, he'll play, but only if it's two, no more than three tosses of the ball or stick, and only if it's not more than 6 to 10 feet. Fetch is a wonderful way to exercise a dog and wear out a puppy, but he'd rather play tug or wrestle. This is okay during designated play times, but not okay when the goats are the object.


The other thing I'd like to teach him is about barking. Barking at the goats and chickens is not okay, barking at things that don't belong here is okay. The neighbor's dog (the one that climbed the fence to wreak havoc in our pasture) barks nonstop when it's outside. Even when it's people are in the yard.


Kris is catching on to the homestead routine pretty well. My only issue with him is that the other day I caught him with an egg. He had it between his front paws and was beginning to put the bitey on it. I got it before it broke, but I wonder if he hasn't found them before and eaten them. I have a couple of hens that insist on laying in or near the hay rack in the goat shed, rather than in their nesting boxes. Too bad chickens aren't as easy to train! At least I can deter him by closing the gate to that stall.

What I can't deter is how quickly he's growing. Sometimes it seems as though somebody swaps our Kris for a bigger dog during the night. I confess that was something I never considered when I got him. I just knew he was the dog for us.

April 23, 2012

Kitchen Remodel: Progress on the Cabinetry

Once we finally finished the floor, we were ready to get started on this part of the kitchen ....

My kitchen remodel, ready to put in the sink cabinets
Bare kitchen wall like a bare painter's canvas

The sink will go under the window, so the first step was installing the base cabinets. We started with the corner cabinet.

1st cabinet in place

This is the one Dan shortened so we could fit every thing across the 11.5 foot wall. Next was the sink cabinet, but first, something had to be done with the air duct opening in the floor.

Close-up of air duct hole in kitchen floor

In the original kitchen, this opening was hidden under the sink cabinet, which had a section of the toe kick cut out to allow heated or cooled air into the room. Trouble was, it blew up into the cabinet via the cutout for the water pipes instead. In the winter, I would open the door under the sink and it would be toasty warm under there, but the kitchen would be chilly. To actually get the air moved out into the room, we first added a 90° elbow over the opening .....

90° elbow duct covering the vent hole

Of course, in typical old house "this can't go right the first time" upgrading fashion, the elbow is a modern 10 inches in width, while our old ductwork is 12 inches. Dan just centered the elbow over the hole and covered the gaps. Then he created a "duct" on the bottom of the cabinet.

Built in air duct

Then we set it in place....

Sink cabinet in place

This solution worked beautifully and the air does indeed come out as it's supposed to. A vent cover will eventually finish off the opening.

Lastly, the drawer cabinet....

Kitchen base cabinets all in place

Next, the wall. I had leftover wallpaper after papering the dining nook, but there wasn't much and it was too expensive to purchase another roll. Consequently I had to make every square inch count. Since this wall will contain a combination of cabinets and shelves, I figured why wallpaper behind where the cabinets and fridge will be. Once everything is in place, who's going to know except me, Dan, and you?

Wallpapering in progress

Once the wallpaper was up, it was time for the countertop....

Countertop installed

This is an inexpensive stock laminate countertop; nothing fancy. It was originally a standard 10 foot length, so we had to cut it to fit. The back splash was molded in, but we had to add the end splash on the right, and an end cap on the left. Notice that the vent cover is in place too.

Next, we put in the sink and did the plumbing!

April 20, 2012

Compost Worm Countdown, ...........1

They're here!

Eisenia fetida, Red Wigglers

Now here's an odd thing. I'm always delighted when I'm working in the soil and find an earthworm. If I find one somewhere other than the garden, I'll often take it there. Somehow though, photos of worms are creepy. Why live are okay and photos not, I don't know!

These are Red Worms, Eisenia fetida, also called Red Wigglers. They are a type of composting worm and differ from earthworms. The common earthworm's scientific name is Lumbricus terrestris.

Earthworms are burrowers. They like to live deeper in the ground and that's where they do their "composting"; good for the soil, but not good for collecting. They are also usually found one at a time, by themselves. Composting worms live closer to the surface, preferring to munch their way through rich organic matter. This makes their castings easy to collect. These are better adapted to "group" living conditions, which probably explains why they multiply so fast ( I read up to double in 90 days). Besides the Red Wigglers, another common variety of composting worms is European Nightcrawlers, Eisenia hortensis.

Compost worm bed with lid

In Compost Worm Countdown,.....2......, I showed you how I divided the worm bed in half. I have a large sheet of damp cardboard covering their half, on the right. For the lid, we bought two sheets of corrugated vinyl roofing. Right now they're just set on top and weighted down with rocks. Soon they'll be attached to a frame. They are light weight, opaque, and easy to manage. My only concern will be the temperature inside the bed. It gets some morning sun and I worry that it might get too hot, so it's something to keep an eye on .

Now I'll just have to wait and see how they do. Hopefully my new "livestock" will be happy in their new home.

More resources:
http://www.redwormcomposting.com/quick-facts-about-worm-composting/
http://whatcom.wsu.edu/ag/compost/Redwormsedit.htm

April 18, 2012

Kudzu For Hay

single kudzu leaf
Kudzu leaf (click to biggify)
Kudzu, Pueraria lobata, "the vine that ate the south." We've got it. It's various nicknames are well deserved:

Mile-a-minute vine
Foot-a-night vine
Porch Vine
Telephone Vine
Wonder vine

Now considered an invasive species, the government once offered farmers $8 an acre to plant the stuff for erosion control. That was in the 1930s. By 1946 some 3 million acres had been planted in kudzu. The government finally stopped advocating it's use in 1953 and in 1972, the USDA declared kudzu a weed. In 1997 Congress placed it on the Federal Noxious Weed list. It currently covers an estimated 7 million acres in the southeastern U.S., literally swallowing up everything in it's path.

Is it useful? Folks would like to think so. It's used for making baskets, jewelry, paper, lamp shades, sculptures, candles, soap, as a dye plant (and in resist dyeing), and there are recipes galore for it. It's considered a survival food. It is used medicinally in Asia. It's being researched as a potential biofuel. It's also used for forage, silage, and hay.

My goats do like it and goats have been used successfully to control it. Unfortunately most of ours grows in as yet unfenced areas; mostly in the woods where it creeps closer and closer to the back field. When we first got here, we had a pecan tree almost completely engulfed in it. We cut the kudzu back and saved the tree, but it's impossible to kill because the roots grow over 9 feet deep as underground vines.

This year, I decided to experiment and dry some of the vines for hay.

wheelbarrow load of kudzu vines
Filling the wheelbarrow with kudzu vines

We try to harvest and dry as much of our own hay as possible. Initially I lamented that our hay (tall fescue mostly) was so weedy. I was amazed then, when the goats hollered impatiently for it and even fought over the choicest bits. I've since learned how nutritious "weeds" are for goats, more so than grass actually. Now I try to incorporate as many dried herbs and other plants as possible into our homegrown hay cuttings.

Grass, vetch, & weed clippings
from the edge of the wheat field

We aren't really set up with a proper hay field yet. That's the goal for the back field (not much progress since this last post about it, Pasture Improvement Phase 1). Still, it's nice to offer our goats our own hay. In fact it was only a couple months ago that we had to buy some.

I'm curious about how well the goats will like kudzu as hay. It is supposed to be exceptionally nutritious, with as much protein as alfalfa. It's not as easy to harvest however, because it is often found on steep slopes, rough terrain and wrapped around everything in it's path. In 1949, when folks still had high hopes for kudzu, a patent was granted to John L. Gettys of Camden, South Carolina for the invention of a kudzu hay gatherer.

Click to enlarge for a closer look

While this probably didn't make him his fortune, kudzu hay is available even now in some areas. I'm not sure how they cut and bale it nowadays and have never seen it for sale. I've been thinking about it though because our neighbor has an entire field taken over by the stuff. If it were ours, I might look into that.

Still, as a hand harvested hay additive, it may be a good way to help keep it somewhat under control. And who knows? Perhaps as is often the case for those of us with lesser green thumbs, the thing one wants the most is the thing that dies first. Maybe by simply wanting it, it will stop growing for me!

OK, not a very good joke, so maybe I'll just end with that. :)

April 16, 2012

Floor? ................ Done!

The kitchen floor is finished.

New kitchen plank floor

We put down three coats of high traffic oil based semi-gloss polyurethane. I'm really pleased with the results.

One area of concern had been the wood cookstove hearth. There was originally a serious dip in the floor here (see Our Dippy Kitchen Floor.)


Since this was the best spot for the wood cookstove, the dip needed to be fixed so we could level the stove. In addition, this a high traffic area, so we needed the cement floor protector to be flush with the floor so it wouldn't be tripped over. As you can see, it turned out well. The floor is pretty near flush with the hearth. It's only off about 1/16th of an inch in the corners, and 1/8th of an inch on the side. We didn't expect that the floor would be perfectly flat and level. And it's not. But it's a whole lot better than it was before.

Now we can start to put the kitchen back together again! I am soooooooooooo ready for that.

Next: Progress on the Cabinetry

Related Posts:
Old Kitchen Floor: Problems & Preps
More on the Floor (Kitchen Floor That Is)
New Kitchen Floor
New Kitchen Floor: A Scary Decision
New Kitchen Floor: Applying the Poly

April 13, 2012

The Garden in Early April

frost fringed thyme
Garden thyme wearing yesterday morning's frost

Mild winters have their pros and cons. On the plus side is not needing so much wood to heat the house. On the down side, more overwintering insect pests survive. This past winter being mild, meant fresh greens, root crops, and broccoli all winter long. Unfortunately not only did those garden goodies keep growing, so did the weeds.

fall planted parsnips
Parsnips bed

Almost everything I planted last fall has bolted, except the parsnips, alliums, and lettuce (thankfully, we're loving lettuce and broccoli salads.) That means it's time to harvest whatever's left and clean things up a bit. Some plants I'll let grow for seed, what I can I'll store, the rest will be fed to the goats.

This is the biggest my garlic has ever grown.
Fall planted garlic

The exception is the garlic, which I'll harvest when the tops begin to die back. I've never had garlic do this well and as you can imagine, I'm really pleased. We use a lot of garlic so I've gradually been increasing it. Hopefully this fall I can plant a whole bed's worth!

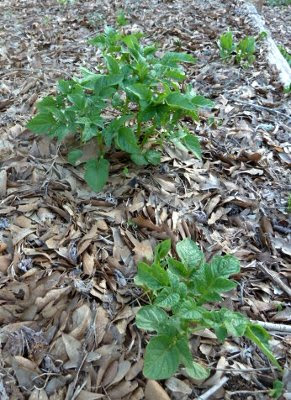
Volunteer potatoes under a leaf mulch
Volunteer Red Pontiac potatoes

After my piddly potato harvest last year, I'm amazed at how many volunteers I have. It would appear I'm not all that great at harvesting potatoes as I thought. Pictured above are volunteer Red Pontiacs. Dan likes these but I couldn't find them locally as seed potatoes. Instead, I planted 10 pounds of Red Norlands. I hope the potatoes do well this year. I've missed them as a staple in our diet.

Spring planted peas and turnips

My spring planted peas and turnips are making a showing. Not many of the turnips came up, which is a little disappointing because these are a new variety for us, Golden Ball. If I can get enough for a taste and more seeds, I'll be happy.

Vardaman sweet potato slips

Sweet potato slips are the only thing I got an early start on. Things were/are just too disorganized with our kitchen remodel for me to get to starting any seeds. Fortunately we have a long growing season, so everything can be directly sown.

As you can see from the first photo, we are not past danger of frost yet. According to NOAA's frost/ freeze data, I have a 50% chance of frost on April 15, a 10% chance on May 5. As most gardeners know, the trick is to not be in too big a hurry! I usually start my spring planting the latter half of this month. I am so looking forward to that.

April 11, 2012

Compost Worm Countdown, ......... 2 ..........

"Remember ...Bedding is your friend!!"
Tom Stewart, Worms-a-crawling Farm

I've gradually been working on the next step in my compost worm preparations, bedding. I say gradually, because we have a pretty good size worm bed frame. I'm thinking big, though I now understand why a lot of folks start with smaller plastic totes. :)

Composting worms do not burrow into the ground like earthworms, they like it closer to the surface, where there is plenty of decomposing organic matter. That means they need a dark, moist, protective environment to live in. Bedding provides that and here's what I've learned about it so far....

Shredded cardboard & newspaper for worm bedding

Shredded cardboard always seems to be the most highly recommended, as well as paper. These must be the non-glossy type and the colored inks must be soy based (thankfully common nowadays). Egg cartons (which I don't have) and leftover rolls from toilet paper (which I do have) or paper towels (have on occasion) are good too. Initially I found shredding the cardboard to be time consuming. I tried scissors and a box cutter, but eventually figured out that if I wet down the cardboard first, it was much easier to tear. This is good, because being able to use cardboard, junk mail, and scrap paper for the worms, is one of the reasons I wanted them. There's never a shortage of these items, so this is the perfect "no waste" way to dispose of them.

Barn muckings from last year, slow to completely decompose over winter.

Partially rotted manure or plant matter is good too, as long as it's not fresh. Manure, straw, and hay from cleaning out the goat shed and chicken coop are the basis for my compost piles, which I turn as I remember, and sift as needed. I use the finished sifted compost for the garden, and can add the larger partially decomposed matter can be added to the worm bed as needed.

The problem with fresh manure or green plants, is that they generate heat as they begin to decompose, which is how we know our compost piles are working. Worms prefer temperatures more like we do. Plus, the worms need the microbes found in decomposing matter. This is what they actually eat, not the matter itself.

Last autumn's leaf rakings. 

Autumn leaves are good too, though their down side is that they don't absorb and hold moisture by themselves; better to mix with cardboard. Most of my leaves end up as winter mulch for garden beds, but I did have one pile that is decomposing, which is good.

The bedding needs to be wetted down to keep it damp, not soggy, just damp. Non-chlorinated water only.

Lastly, some food....

Kitchen compost bucket

Most of our kitchen and garden scraps get fed to either the chickens or the goats. Exceptions are anything that's rotting or moldy. Other than that, about the only thing we have left is coffee grounds, tea brewings (bagged or loose), the occasional forgotten item in the refrigerator, and onion and garlic skins.  Those last items (onion and garlic waste) are a no-no for worms however, because of the volatile oils they contain. The other thing that cannot be used, is non-manure waste from animals (bones, fat, dairy products, etc.)

The bedding needs to be prepared at least several days to a week before adding the worms. This gives the bed a chance to begin to establish the microorganisms that the worms eat.

Bedding mixed & damp.

Since my bed frame is large, it finally occurred to me to put a divider in it to start. This will give me time to fill the other side with more bedding by the time the worms need it. Actually, this is similar to Tom's method of harvesting casts.

Now it just has to sit and age a bit. I'll keep an eye on it to make sure it doesn't dry out. Still on my to-do list, is a cover for the bed. Even just mixing this up attracted a curious robin. After that I'll be ready for my worms!

Want more info? Try these:

http://en.wikipedia.org/wiki/Vermicompost
http://triplegwormfarm.com/
http://www.happydranch.com/articles/index.html
http://www.redwormcomposting.com/

Related Posts:
Compost Worm Countdown, 3...............
Compost Worm Countdown, ................1

April 9, 2012

New Kitchen Floor: Applying the Poly

The instructions on the can said to wait at least 4 hours in between coats. The instructions on the can said that if coats were applied within 12 hours of one another, no sanding was required. Our goal was to make a day of it and get three coats down. Enter reality.

Applying the 1st coat of polyurethane finish.

We started right after breakfast. By sunset, the first coat still wasn't dry. It had rained the night before and turned colder, so admittedly that wasn't in our favor. Neither is the fact that the only functioning bathroom in the house, is off the kitchen. Fortunately there was another way the bathroom could be accessed...

How we got to the bathroom

... through the pantry window.

So, one coat down and two to go. At least. The first coat dried a little rough, so sanding will be necessary no matter how long the drying time. Accidental kitty foot prints don't help either.....

Is this anything like leaving your handprint in newly poured concrete?
NOT

You'd think that by now we'd know better than to have very high expectations for the time frame of our projects. At least we know from experience that this too shall pass.

Next: Done!

April 6, 2012

New Kitchen Floor: A Scary Decision

In my last kitchen remodel post I showed you the newly installed floor. Dan had to go out over the road right after we got it down, so the next steps had to wait, the next steps being staining and then applying a polyurethane finish.

Color of course, is a subjective preference. In my mind's eye, my new kitchen had dark floors. The original ceramic tile (besides missing grout and being badly cracked, photo click here) was light in color and showed every spill and speck of dirt. The hardwood underneath was dark, but in very bad shape (photos & problems here.) The new pine plank floor, in it's natural state was light, and looked clean and bright on the floor. Problem was, neither Dan nor I liked it that way. To stain it darker though, is one of those decisions we were hesitant about. Paint is one thing, it's color can be changed if it doesn't work out. Stain cannot.

Still, my kitchen wanted those darker floors. This is odd for me because I'm all about light, though I admit the solid white kitchen we started with (photos here) annoyed me, because I'm all about color too. The problem is that a dark surface absorbs light, especially a dark non-reflective surface. Dark is also said to give the illusion of smaller, while white expands, but good grief my kitchen is really small no matter what. No sense trying to pretend it's not. What I noticed in the hundreds of model kitchen photos I looked at, was that the "success" of dark cabinets and floors, was based on their finish. Those with a flat finish appeared dark and close and I didn't like them. Those with a glossier finish worked for me, because they reflected light, brightening up the kitchen tremendously, while still giving the "look" I was going for.

So here's the stain job, a view from the back door ....


We were really happy with it when we were done. I love how it "aged" the floor, giving it the rustic old farmhouse look we were going for.


I did not get any photos of the process, because it took the two of us working in a coordinated and timely manner. Dan applied the stain and I wiped up the excess. Since we managed this floor is warm weather, it didn't take all that long to dry, unlike the dining/living room floors, which took forever to dry in December!

Next step, applying the polyurethane (click here to go to that post). Doing the floor seems like a turning point. The last of the old will be gone, and the rest of the new can now commence.

April 2, 2012

Dry Spell (A Goat Post)


Neither Dan nor I are milk drinkers. We do however, love yogurt. A favorite quick breakfast at our house is a bowl of cold cereal with yogurt instead of milk. We like cheese too (mozzarella making I'm pretty confident with, hard cheese on the other hand.... ) We like having cream for coffee, butter, or whipping. The rest I cook with (especially baking), and feed to the chickens, Kris, and Riley when he's in the mood. I'm also thinking future pig feed.

In the goat world, does are typically dried up two months before their kidding due dates. This is to give their bodies a chance to put their reserves into the needs of the growing kid(s) inside them. It means though, that when they are dry, so is the milk jug. Even after kidding, if they suckle their own or their milk is bottle fed back to their kids, there is no milk for the goatherd.

I couldn't imagine not having yogurt however, so I froze about a dozen half-gallons for our dry spell. For yogurt, this is working okay, sort of. I recall having successfully frozen half-gallon cartons of homogenized, pasteurized, organic (cows') milk in the past, but my raw goats milk separates. Not just into cream and milk again, but into a top white layer and a bottom clear, whey like layer. I shake it well before making yogurt, but the result is that the bottom of the yogurt jar is more grainy in texture. Kris and Riley didn't mind, so of course no waste. On the other hand, it takes up a lot of room in the freezer, and there is the occasional misfortune of breaking a half-gallon glass jar. I don't think I'll freeze milk again this summer.

One plus for Kinders, is that they are aseasonal breeders. All (at least I think all) the dairy breeds of goats are seasonal breeders. They go into heat when the days get shorter, and kid in the spring. Other breeds like Pygmies, can be bred at other times of the year. Kinders inherit this quality, so it is possible to have both spring and fall kiddings. That means a year round milk supply.

Another possibility, is that of "milking through." Some does can produce an uninterrupted supply of milk for up to two years, if not re-bred. Production might decrease some when she's in heat, but can usually be brought back up again. This in fact, is a technique that some dairy breeders practice. Though it means fewer kids, it is less stress for the doe in the long run and can increase her productive life. It also means a year round supply of milk.

I just read recently, that for breeds that frequently birth multiples, like Kinders, carrying the weight of quads or quints year after year takes it's toll on the doe's body. Eventually she can end up with hind leg weakness. This seems another good reason to alternate a doe's kidding years and milk her through in the year's she isn't bred.

During our dry spell as we have to rely on the milk I froze for this time of year, I'm mulling the possibilities over. For not being milk drinkers, it's amazing how much we rely on our goats' milk. Not only for us, but I find my chickens' eggs have stronger shells when they drink it regularly. Plus raw goat milk is good for our growing puppy.

For another take on milking through, the following is a link to an article in Dairy Goat Journal: