May 27, 2023

Garden Notes: May 2023

Rainfall 

  • 7th-8th: 0.55"
  • 14th: 0.07" 
  • 16th-17th: 1.05"
  • 18th: 0.37"
  • 20th: 0.2"
  • 27th: 0.75"
  • 28th: 0.35"
  • Total: 3.35 inches

Temperature
  • range of nighttime lows: 39 to 64°F (4 to 18°C)
  • range of daytime highs: 65 to 86°F (18 to 30°C)

Weather Notes

The second week of May saw our seasonal weather shift. We got our coldest temperatures the first week of the month, and the wind blew from northerly directions. Then, the wind started coming from the south and the temperature pattern changed. We've had some hot days, but mostly, it's been glorious.

Planted
  • watermelon (Orange Glo)
  • sweet potato slips (mostly purples)
  • okra (Clemson Spineless)
  • grain sorghum (mixed seed)
  • cherry tomatoes (Matt's Wild and Tiny Tim)
  • summer squash (Tatume)
  • winter squash (Sweet Potato)
  • pole beans (Cornfield)
  • peanuts
  • bell pepper transplants (Giant Marconi and Red Bell)

Growing

Potatoes in the African keyhole garden
Also pictured - yarrow and butterfly weed.

Potato flowers

On the front porch trellis, I have yam berry vines growing.

Buckwheat and corn

Where's the corn, you ask?

Finally outgrowing the buckwheat! Can you see it?

Tomatoes are flowering, but no tomatoes yet.

Harvesting & Eating

Peas, cherries, and the last of the asparagus and strawberries

Pea, asparagus, lettuce, and peanut salad

Cherry pie

The pie used up the bulk of my cherry harvest, but it's such a treat that it was worth it. The remaining pickings will be frozen to add to jelly or wine.

Lambs quarter

Years ago, when I first started harvesting lambs quarter for eating and canning, I followed the advice to harvest it when it was under one foot tall. I cut down the stalks and picked off all the leaves. I've since figured out a quicker and easier way, one that gives me a longer harvest too.

Instead of cutting down the entire plant, I just harvest the clusters of leaves that grow at the end of the stalk and branches.

I cut them at the base of the leaves.

When harvested like that, all that's required is to wash and cook them. No tough stems to discard, and the plants will grow new clusters of leaves that can be picked no matter how big the plant gets. I find I can harvest this way until they flower and go to seed. 

Canning lambs quarter, a favorite cooked green.

Oregano drying

Daikon radish over a foot long! Even though it's large, it's
still sweet and makes an excellent addition in our salads.

Chopped peas & asparagus, grated daikon, feta cheese, & hard boiled egg.

Kimchi

Not Harvesting

At least not harvesting much of.

Multiplier onions and garlic.

I've gotten a very poor harvest of these. I'm guessing it's because our winter was so cold that most of them didn't make it. Some years are like that.

There you have it. May has been a busy month in the garden. How about you?

Garden Notes: May 2023 © May 2023

May 23, 2023

Trying a New Technique for Making Sauerkraut

The best sauerkraut is said to be made in its own juices. The cabbage is shredded and pounded enough to bruise the juice out of it. The requires extremely fresh cabbage, which I don't often have, since cabbage moths make cabbage growing a real challenge for me. Cabbage is an inexpensive vegetable, so I don't mind buying it to make sauerkraut. The trade-off is that it's usually too old to pound out the juices. So, most often, I make sauerkraut by mixing and adding brine

Recently, I ran across a video with a different method for making sauerkraut. It's a four-part series with the first video here. Instead of shredding the cabbage and adding the brine, the cut cabbage was salted first and allowed to sit overnight. Salt pulls moisture from food (through osmosis, I reckon) and so helps the cabbage make it's own juice. I decided to give it a try.

The first step is shredding the cabbage.

After shredding, the cabbage was sprinkled with salt and mixed in. The video didn't mention an amount, so I used the same amount of salt as my old recipe, 2 tablespoons for a medium head of cabbage. I covered it with a clean dishcloth and let it sit on the counter overnight.

I use Himalayan pink salt for the minerals.

The next morning the cabbage shreds looked wet and I found that the salt had indeed pulled some juice from the cabbage.


The next step is pounding. In the video, the gal dumped her shredded cabbage into a 5-gallon bucket and stomped it like grapes. I opted to used my pounder.


That squished out more juice. Not enough to cover the cabbage, but the video said in that case, cover it with a light brine. The video used fresh dill and slices of horseradish for flavoring, but I used juniper berries and celery seeds.


After covering the crock contents with more brine, I submerged the cabbage shreds by covering them with a saucer and weighting it with a pint jar half filled with water. 

Then the crock is covered with a clean cloth an allowed to ferment.

I find that three days is good for our taste buds. Then I transferred it to a half-gallon jar with a lid to store in the fridge. 

Then the taste test. We both love sauerkraut and really liked this one. I especially like to use it as a relish on a good hamburger.

Bacon cheeseburger with sauerkraut.

One other really good tidbit I picked up from the video series is that sauerkraut can be frozen without destroying the probiotics. Canning will kill them, but I usually make it one cabbage at a time and refrigerate it after it's soured to the tartness we like. It does keep getting more sour, even in the fridge, so freezing sounds like a good way to go.

Conclusion? This method is a keeper! I'll have to try it with my other fermented vegetables as well.

May 19, 2023

Rethinking Pasture Rotation

About five years ago, I subdivided our goat pastures for grazing rotation. If you aren't familiar with the concept, I'm going to direct you to the research series I did at the time. It has lots of pictures and information:

The gist of it requires subdividing grazing areas into smaller paddocks, typically with electric fence.  Then it's a matter of monitoring how much the animals are allowed to eat, rotating them frequently, and resting the forage until it's regrown adequately.

Up front, I will say that it definitely works! But as with all ideas and methods, the concept is simpler than the reality. The purpose of this post is to record the challenges that our reality presented us, and how their sum total has resulted in taking a step back to regroup. 

Weather

Plants require moisture and warmth to grow. When  the temperatures are mild and we get good rainfall, we get good forage growth in the pasture. When our winters are too cold, or are summers too dry, we get very little growth. If we have an especially hot, droughty summer, much of the good forage dies out, leaving the weedy stuff to take over again.

Goats

Most of the successful systems are rotating meat animals. They are kept outdoors and simply moved from paddock to paddock. With dairy animals, like my goats, I have to be able to get them back to the barn at least twice a day. And when we have coyotes around, I have to be able to secure them in the barn at night. This means I have to add a corridor and gating system to my paddock plan. We were able to do this (photos here), so it's definitely doable. What I'm noting here, is that it adds a layer of complexity to pasture rotation.

Another consideration is that goats are more challenging to contain with electric fencing. While they can definitely be trained to respect it, some of them (bucks mostly) are willing to muster up the courage and run through the fence anyway. Apparently, the annoying zap is worth getting to the choice grazing goodies on the other side. 

The does can learn to do this too, especially if they ever discover that the fence is off. And once they learn this trick, it's difficult to retrain them.

Keeping the fences charged

Electric fence energizers can be powered in three ways: plug into grid electricity (AC), with a 12-volt battery (DC), or with a built-in solar panel and battery. We'd have to run a crazy amount of extension cords to simply plug it in, so we've tried solar charged and 12-volt batteries. Both have their drawbacks.

Solar energizers with the built-in solar panels:

  • Both the panel and battery are small, and so slow to recharge.
  • They require consistently good sun to be consistently charged. Cloudy days or even a little shade compromises the charge and therefore the jolt that reminds the goats to stay back.
  • Have an energizer lifespan of only a couple of years. So they will have to be discarded and replaced. This is not a selling point.
12-volt battery:

  • Requires battery monitoring, maintenance, and recharging.
  • You need a way to recharge them, plus extra batteries for when the one is recharging. 
  • Recharging can either be done with an AC powered or solar charger.
  • The batteries are heavy, so either strong muscles or a way to transport the battery is needed.
  • An AC-powered charger requires a source of electricity (typically the grid).
  • A solar panel and solar charge controller require sun.
  • Lifespan is 2 to 5 years

I know the current craze is for everything to be battery powered. But I have to say, that I have become a bit weary of having to feed and tend rechargeable batteries. We aren't off the grid, but we have a lot of stuff powered by rechargeable batteries, from 12-volt lead-acid and sealed batteries, to power tools, to AAs and AAAs for our clocks and flashlights. Besides being a chore to keep them all charged, the battery shelf life stinks. The little AAs and AAAs quickly quit holding a good charge, and the power tools. Sheesh. Forget replacement batteries for tools, because they have been replaced with a different model by the time you need to buy one. Plus, rechargeables aren't cheap. And while I agree with wanting to get away from fossil fuels, batteries require non-renewable resources to make. 

In addition, electric fences should be walked at least daily to remove grasses and branches that touch and short out the wires.

So, those are the challenges, and since we're down to only one 12-volt deep cycle battery for the fences, I want to rethink our options. These include replacing the 12-volt batteries ($$$!) or building more permanent fences (more $$$!). 

This is the stuff that's figured out by personal experience. Concepts, information, and theories are a good introduction to an idea, but as will all things, what works well for one person, may not work at all for another. There is no one-size-fits-all solution. It's a matter of understanding one's personal goals, routine, and regional challenges. It's a matter of deciding what one can live with. There is no perfect answer. Rather, which requirements best suit our personal circumstances? 

As you can see, I have more questions than answers! Well, I do have some answers, but this post is long enough. For the time being, I want to step back and think it through again. When we figure it out, I'll let you know. 

May 15, 2023

Garden Swale: How It's Doing

Photo from Feb. 2022. Swale after a three inch rain. Making of pictures here.

About a year and a half ago, we dug a garden swale. The purpose of a swale is to collect and store rain runoff. It's dug wide and deep for that purpose. The stored water slowly seeps into the ground and hydrates underground. This is important because during a drought, even a good rain may not saturate the ground deeply. So, a three inch rain may only get the top three or four inches of soil wet. I learned this by digging around in the soil with a shovel after a rain.

A good swale combined with good rains will gradually make a difference in the soil moisture level. According to permaculturist Bill Mollison, it takes several years, but it eventually the deep soil will remain hydrated, even during droughty spells. This will only be our second summer with our garden swale, so I don't think we'll see it's full benefit yet, but I'm hopeful.

What I really want to show you, though, is the swale berm. The topsoil we removed went for a hugelkultur experiment (more about that in this post.) The subsoil became a berm on the downhill side of the swale. I didn't want it to become overgrown with weeds, so I pulled out my garden seeds and planted a mix of old herb, flower, and cool weather greens, along with clover and a winter bulb forage mix. A year and a half later, it's still thriving.

This is what I see when I first walk to the garden. Swale on the right.

Looking back from the other end of the swale. Berm on the left.

The chicory and clover are predominant, but there are a few other interesting things here and there.

California poppies

Red clover

Dianthus

Bachelor Button

Coreopsis

Collard flowers

Radish flowers

Summer's very first chicory flower.

Comfrey, which is growing under a pear
tree at the base of the berm rather than in it.

A couple of weeks ago, I planted black turtle beans in the bare spots, because I don't like to leave bare soil anywhere.

Something has been munching on my black turtle beans.

What amazes me is how well everything has done considering that the berm is mostly clay subsoil. Being raised, it does tend to dry out fairly quickly during our hot dry spells in summer. What has survived and thrived, has done it without help from me: no watering, no compost, no mulch, just a little chop and drop. Amazing, isn't it? I'm thrilled that it's thriving.

May 11, 2023

Homestead Turkey on the Menu

The addition of heritage breed turkeys on the homestead has given us a new source of eggs and meat. So many people told me how they prefer turkey to chicken eggs, that I was quite curious about them.

We first tried them as scrambled eggs. The biggest difference was in how creamy scrambled turkey eggs are. Delicious. I thought they would be excellent for French toast.

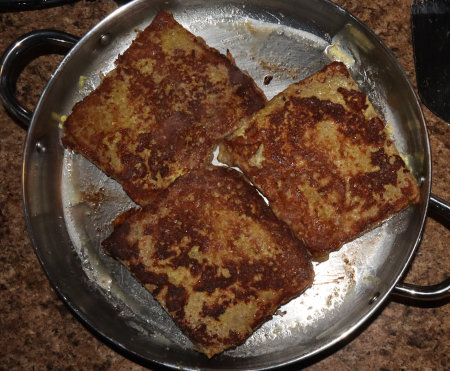
I make cinnamon bread in my bread maker just for French toast. It's 
50/50 homegrown whole wheat to white flour, with 2 tsp. cinnamon.

We weren't disappointed!

Of our three female turkeys, we planned to keep two and so Dan dispatched one. I asked him if he wanted me to freeze it for later or roast it now. He wanted to try it now. 


Our heritage breed chickens don't produce much breast meat, so we were pleasantly surprised at how much we got from our 10-month-old turkey hen. Though it wasn't Thanksgiving, I couldn't resist making a traditional Thanksgiving style meal!

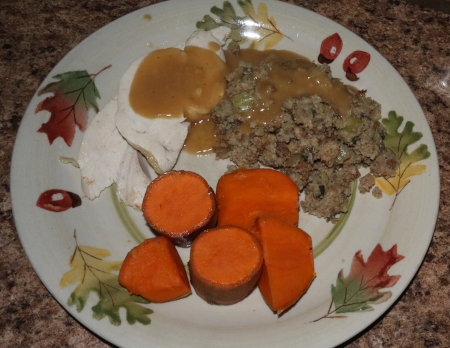
Lots to be thankful for here: homegrown turkey and sweet potatoes,
with cornbread stuffing made from homegrown corn and sage.

It was tender and flavorful. Dressed weight was ten pounds. That's a generous amount for a company meal, and lots of meals for just the two of us.

Our two remaining hens both appear to be broody. Jenny B disappeared in the bushes a couple of weeks ago and Dan discovered that she had three eggs in a nest. We didn't like that she was brooding outside the chicken yard, but birds have minds of their own and the humans' opinion doesn't count. Unfortunately, something got them, leaving only scattered egg shells. She recently disappeared again, and I found her in the pasture hedgerow. We'll count eggs when she's on her daily visit to the poultry yard. 


Jenny J also started setting, but she chose the chicken coop. We feel like she's safer there, but there are still problems. For one, the chickens won't leave her alone. They continually peck her on the head, trying to make her to get up so they can lay their eggs in her nest. Why they want to lay their eggs in somebody else's nest is beyond me, but that's chickens for you. 

The other problem is that one of our Muscovys has gone broody too. That in itself isn't a problem, but when Jenny J gets off the nest to get food and water, Mom Muscovy steals her eggs! Seriously! The two nesting spots are near one another, and Mom rolls some of Jenny J's eggs over to her nest. Dan puts them back, but she isn't too happy about that. 

UPDATE: This morning, Mom Muscovy was out getting feed and water, so Dan went to check the eggs in her nest. Turns out Jenny J's nest was empty of eggs, so she had moved over to Mom's nest! Mom came in and was in a dither over that! For us humans, it was a "what did you think was gonna happen?" moment, but birds don't think like humans. 😂 Dan reckons there are at least five duck eggs in that nest, plus Jenny's three.

Mixed nests could create another problem because of the variance of incubation days. Muscovy incubation is 32 days, turkeys is 28 days, and chickens is 21. The concern is that the mama will leave the nest with the early hatchlings and abandon the eggs that need more time. We did have a Buff Orpington chicken raise some ducklings once, but I think it's better if each species raises their own babies, if there's a mother willing to do it. Keeping it all sorted out, however, is an ongoing chore. 

Never a dull moment.

May 8, 2023

Sewing Room: Electrical Outlets & Baseboards

You may recall from my last post, that electrical wiring in this room was an add-on, i.e. added after the room was built. Dan contemplated two options for the wiring: either drill holes through the studs and run the wiring behind the walls, or run it along the top of the baseboard and cover it with trim. Then he looked into how log home builders install wiring. In a log home, electrical wiring is run though holes which are drilled lengthwise in the logs. Dan adapted that idea using ready-made tongue-and-groove boards.

First, a hole was cut out for the electrical outlet box.

View from the bottom. The wiring fit perfectly in the board's groove!

Front wall before

After

Besides being the perfect width for a baseboard, the tongue-and-groove planks are much cheaper than the same size plain board. I'll just have to get a primer that will cover the knots.

2nd wall before

After: two sections of baseboard installed, new electrical outlets, and wiring safely hidden.

I now have electricity in my soon-to-be (at least I hope it's soon) sewing room! Then, due to the return of beautiful weather, we were back outdoors again. Hopefully, we'll finish the trimwork the next time it rains. After that, I can start painting.

Next, Sewing Room: Lots of Progress