October 29, 2018

Sweet Potato Harvest - The Nancy Halls

While Dan's been working on the pantry roof, I've been harvesting sweet potatoes. The mornings getting chillier and chillier and I need to get them dug before first frost. I planted two kinds this year, Vardamans and Nancy Halls. I started with the Nancy Halls.


Nancy Hall sweet potatoes are an heirloom variety and this is my first year to grow them. I planted two rows, which quickly grew to look like one huge bed. The first step was to pull the vines and feed those to the goats. Then I raked back the mulch, 


and the hunt is on.


This variety sprawls both above ground and below. I found the largest sweets directly under the vines, but underground runners went everywhere. I found lots of medium and small ones well beyond the rows where they were planted, even down in the subsoil. That meant they were more time consuming to find and dig than my bush-type Vardamans.

The Nancy Halls aren't a familiar bright sweet potato orange but are more mellow in color.


Curious marbled interior

The real question was, how would they taste? I haven't found all varieties of sweet potatoes to be equally delicious, so I was curious about this rare old variety.

The first taste test was oven baked sweet potato fries.

Nancy Hall oven fries made with olive oil, salt, pepper, and garlic powder.

We had these with burgers and thought them quite good. The next night I served them baked.

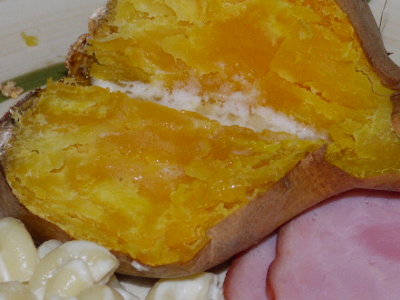
Baked Nancy Hall with butter and served with ham and Pasta Cheesy.

The kitchen smelled like a bakery while they were in the oven! They are a pretty golden yellow color when baked and have a dry flaky texture. The flavor was excellent!

Last test - sweet potato pie!


I like sweet potato pie better than pumpkin (or cushaw), so this was an important test. I had trouble, though, because the flesh was so dry that it was hard to process for pie filling. For that I use baked or steamed sweet potatoes and run them through my Foley food mill. But the Nancy Halls weren't creamy enough to process well, and without changing the recipe the filling was too thick to stir. I added milk to give it a more pourable consistency. After all that I thought the pie was just okay. 

Even so, the verdict is that these are a keeper, and I'll keep a couple of nice ones to sprout next year. They make plentiful vines to feed the goats and are excellent baked. For pies, I'll continue to use my Vardamans.

October 26, 2018

House Project Phase 1: Back Gable End

Dan lost no time getting started on his new house project. His first step was to put up new siding on the back gable end of the house.

First the old vinyl siding was taken off

Our siding comes in 4-foot by 8-foot sheets with a barn board texture. Trying to get them up the ladder and hold them in place for nailing was not exactly an easy proposition!


The nice thing about the barn board pattern is that the sheets can be cut lengthwise and put back together with a little filler to cover the seam. You can't even tell it's been cut once it's up there.


You can see our solar attic fan in the photo above. The panel is in the upper right. That fan has really helped keep our home cooler in the hot weather.


Dan would really like to re-do that little back door overhang and extend it out a little farther. I'm glad he decided to just finish the project at hand. It is so easy to get off on tangent projects that are relevant but can also wait until another time


There are still a few things to do to finish this off: squirt some goop under the flashing in the above photo, prime and paint the siding, buy or make a vent cover for the fan, and figure out what to with this...


I think he wants to get the new roof on first though. That will be next.

October 23, 2018

Dr. Schultz's Super Tonic

"Let food be thy medicine" is attributed to Hippocrates, or at least it used to be. With the current social trend to question and criticize everything, who knows? Either way, it points to a different philosophy of heath and medicine than is common today.

So who is Dr. Schultz and what is his Super Tonic? I'm glad you asked. Dr. Richard Schultz is an herbalist and former student of Dr. John Christopher. He developed a food-based cold fighter and immune booster which he called Super Tonic. I found out about it from a friend who loaned me a video. That was about fifteen years ago and we've been making and taking it ever since. We recently needed a new batch, so I thought I'd take you a few pictures and tell you about it.

The ingredients can easily be homegrown or found in the produce section of most grocery stores. All are fresh, and preferably organic. I use equal parts by weight, but there's no need to be exact. For a one gallon jar I used about a quarter pound of each.
  • Garlic (not necessary to peel)
  • Hot peppers (the hotter the better such as habaneros)
  • Ginger root
  • Horseradish root (sometimes hard to find)
  • Onion (hottest you can get such as white)
  • Apple cider vinegar, raw, organic

Chop all ingredients. You can do it by hand or with a food processor, the only precaution is to wear gloves when handling the hot peppers, because they burn! Put it all in a glass jar and cover with the vinegar. I let it settle and add more if needed, the proportions I'm looking for are 3/4 settled herb and 1/4 vinegar on top. Exactness not required.


Place in a cool dark place for a minimum of two weeks; longer is better. Give the whole whole thing a daily shake to mix it up. When you need it, strain it into dark glass bottles, but save the veggies for squeezing.


I use my wine press to extract as much of the herbal vinegar as I can.


From this batch I squeezed out more than two extra cups of tonic.

Store in a cool dark place.

There is no specific dosage, but it's recommended to start small, such as half a teaspoon in a small glass of water or juice (tomato is good). It can be used as the vinegar in oil and vinegar salad dressing, to season greens, etc. All the ingredients are common foods, so it's impossible to overdose. It mostly boils down to taste preference and how much health support you want.

Why are these ingredients so good for you, and how to they help fight winter colds and sinus problems, plus boost health and immunity? I'm glad you asked that too.

Garlic - antiviral, antimicrobial, antioxidant, antibacterial, expectorant

Hot peppers - anti-inflammatory, antioxidant, decongestant, antibacterial, analgesic, stimulant

Ginger - antioxidant, anti-inflammatory, antibacterial, stimulant, digestive, analgesic

Horseradish - antibiotic, decongestant (especially sinuses), expectorant, stimulant

Onion - similar to garlic, anti-inflammatory, anti-allergenic, decongestant

Apple cider vinegar - antioxidant, antibacterial, antiseptic, antiviral, and ant-fungal, preservative

All that healthful benefit from common foods. You can understand why we keep in on hand.

Dr. Schultz's Super Tonic © October 2018 

October 20, 2018

Project Next

The barn is done, so what is Dan going to tackle next? He wants to fix the leak in the pantry roof. You may recall that we discovered it last spring ("Leaky Roof") and tarped it until a better time to fix it. Now is that better time.

The tarped leaky side of the pantry roof.

Our pantry, utility room, and second bathroom were added onto the house long before we bought the place. That part of the house was not reroofed when we first moved in, so it needs it. We decided to replace the shingles with the same metal we used on the barn.

Photo taken from the hay loft.

And two from the ladder.


Dan has decided that while he's at it, he might as well put new siding on that gable end of the house. We bought enough siding awhile ago to finish the house, so we have it. We also already have the metal panels for the roof. From the above photo you can see that the whole thing will take some fancy finagling because of how the pantry was added on.

Hopefully the project will be straightforward and without unexpected surprises, but you know how that goes.

Project Next © October 2018 by Leigh

October 16, 2018

Barn! Done!

I think some days Dan thought we'd never get to this point. But it finally did, and the barn is done!


Before I give you the tour, however, I'd like to show you a photo of the original building that stood in that spot.

Photo from January 2010. Original goat shed behind on left.

You can see that the new barn pretty much fills the same footprint, with the carport slab becoming the floor for the milking and feed storage room.

Now, on to the tour. Hyperlinks will take you to other blog posts with more information. This is the milking room side.


Several of you asked me to report how the rainwater catchment tanks worked. As you can see, very well! The problem is that we're not happy with the experimental filtering system Dan tried. It catches the debris, but the water isn't as clear as we like. It will have to be changed but that's a topic for another blog post. As a side note, the tanks are a favorite shady napping spot for our best rat catcher.

Meowy

Moving around the corner toward the back we're greeted by the girls.


The overhang gives them a nice loafing area. It's also a place to feed the little girls so their mothers can eat in peace.


I slip a hog panel behind the barn doors until everyone is finished eating.

Here's a view of the entire back of the barn.


This area is completely fenced in to make a t-shaped corral. Gates on the other end make pasture rotation easier.


Continuing around to the other side...


Note the long windows at the top. Those are for the hay loft.

Inside.


The timber posts and beams were home-milled. The hay feeder is directly under a hay chute in the hay loft.

Hay loft ladder

Hay loft with hay chute. Windows in the earlier photo are on the right.

The does are fed along the milking room wall.

Feeders

From the milking room...

Every doe knows her spot & comes willingly when it's time to eat. Each
is kept from helping herself to her neighbor's feed by a clip to her collar.

This set-up makes it easy to bring the milking does to the stanchion for milking, and then back again.

Daisy on the milking stand.

The white cabinet in the background was originally in our kitchen before we remodeled. (If you're interested in kitchen remodels, I have before and after shots of ours here.) I'm glad we saved the cabinet because it's perfect for storing my goat supplies. Also for filling feeders.

Trash cans hold feed, minerals, etc.

To the left of the cabinet is a rack for holding the bucks' feeding pans.

The calendar helps me keep track of pasture rotation.

On the right is a handy shelf for supplies I want to keep at the ready.


One of my favorite features in the skylight.


This wasn't a part of the original plan, but came about because we had purchased metal roofing panels for a new carport roof. When the carport proved to need extensive repair, we decided to use the panels for the milking room roof instead. However! The panels were 16 feet long and we needed 18 feet. We filled in the difference with translucent poly-panels.

When it's dark out, a solar shed light works very well.


On the opposite wall is my workbench and shelves for pasture seed.


The last wall holds a flashlight by the front door, broom, whisk broom, dust pan and step ladder.


The shelves contain extra feeders and various odds and ends that don't have a home yet. 

In the center of the room next to the milking stand is my drying rack.


I lined the shelves with layers of fiberglass window screening. Between the layers I dry chopped greens and herbs for the goats. They get a handful or so on their morning feed ration for extra vitamins and minerals.

 
My home grown vitamin and mineral mix. Details here.

This is stored in one of the trash cans near the cabinet with the other feeds.

And last but not least, the finishing touch, hung just yesterday.

A barn warming gift from my good friend
Goatldi, who blogs at New Life on the Farm.


It graces the corner of the milking room.

This is definitely the biggest project we've ever done. A barn has been under discussion for years, and I can't even remember how many plans we drew up and how many ideas we tossed around. I lived with a lot of make-do arrangements, and it was from those that many of the ideas came for this one. It's a wonderful feeling to finally check this project off the to-do list.

Thank you so much for taking my tour! I hope you enjoyed it!

Barn! Done! © October 2018 by Leigh  

October 13, 2018

Fall is Finally Here

I'm not one who thinks much of what the calendar says when it comes to seasons. Every year we have the calendar proclaiming the first day of autumn to be around the 20th to 22nd of September, but if we're still in the 90s (low 30s) and I'm in a t-shirt getting all sticky and sweaty from working outside, then I don't if the calendar says it's October 9th. It's still summer! Autumn to me is when it's time to pull out my barn sweater and put an afghan on the bed. It's crisp mornings and crunchy leaves under my feet when I go out first thing to do the chores. It's color in the trees as the leaves turn. Until then it's still summer.

Finally, Hurricane Michael pushed summer out of the way this week and let autumn in.

Love this rain gauge 'cuz I can read it from the window!
It was a gift to Dan & me from Mike at Living Prepared.


Rainfall day two.

What a difference! All the critters feel it. Time to make that end-of-summer check list and start getting things ready for winter.

How is it in your neck of the woods? Do you feel the change of season? Are you ready for the next one?

Fall is Finally Here © October 2018 by