January 31, 2022

Book Giveaway!

This week, I'm teaming up with Permies.com to giveaway four paperback copies of my How To Bake Without Baking Powder.

Between now and Friday, you can enter to win your very own copy. The "rules" are simple:

  1. Sign-in or sign-up for Permies.com
  2. Sign up for their Daily-ish email.
  3. Head on over to Permies cooking forum with your questions, answers, and ideas on the concept of baking without baking powder. All new posts in the forum count as one entry. More posts means more entries! (And a secret: quality counts. An interesting question or informative post counts more towards winning than a "me too" or "I agree" post.)
Permies will announce the winners sometime on Saturday. Watch the Daily-ish for the announcement.

So, come on over to Permies! I'd love to chat with you about the many alternatives for baking without baking powder.

Book Giveaway! © January 2022 

January 29, 2022

Planting Pawpaws & Persimmons

One of the winter projects on my list is working on my forest garden. I have a fairly good list of what I'm planting—for which a blog post is in the making—but I specifically wanted to mention the pawpaws, because they and the persimmons are the only trees I'm planting from seed. Everything else is saplings. 

The seeds were sent to me by fellow homesteaders (thank you Dino and Terri!) who have pawpaws on their place. Because the seeds lose 20% viability within three days, they sent me whole fruits.


Within the fruit, the seeds are in sacs, which must be removed. For good germination, they must be kept from drying out and need a damp cold place for 70-100 days. This winter, they would have gotten that in the ground, but I never know what kind of winters we'll get. So, I put them in a damp paper towel in a baggie in the fridge. Last week, I got them out to plant.


I got about 22 seeds from the fruits, so I chose two places to plant them. They love shade, so one spot was at the far end of my forest garden.


The other place was at the bottom of our property. 


This is the one area where few pines have dropped, so it's a very nice spot to visit.

In addition to the pawpaws, they sent me some persimmons!


These, I planted whole throughout our entire woods. Each fruit contains several seeds, so we'll see what happens!

Earlier this year, I started transplanting pecan saplings into our woods, but these are the first trees I've planted from seed. It will take years to reap the results, but even so, getting them planted feels like an priceless investment. 

January 25, 2022

Experiments in Preserving Milk Kefir Grains

Every year I seem to hit a bit of a dry spell in terms of milk. This year I hoped to change that by breeding Sky for a fall kidding. While that was a success, she was never trained to the milk stand and is absolutely terrified of it. So it's been slow to get her used to being milked. I think in part, this is because she's an older doe. My experience with the younger ones is that they may not like it at first, but they adapt pretty quickly because, well, food. Sky is much more leery. 

One of the reasons I want year around milk is for our kefir. It's an important part of our diet, and also, kefir grains are alive and need to be nurtured. That means a regular supply of milk. When we have no homegrown supply of milk, I have to buy it, just to keep my kefir grains alive. This year, I decided to experiment in preserving milk kefir grains. If I can do that, I won't have to worry about buying milk. 

My first experiment was to dehydrate some grains. Kefir multiplies, so extra grains are pretty easy to come by.

The first step was to wash freshly harvested grians.

Here's what they look like after a thorough rinsing.

Then I spread them out to dry. The humidity is fairly low in our
house because of wood heat, so the conditions were good for this.

Most directions say to coat the dried grains with powdered milk.
This, I didn't have, so I wrapped them in a baggy & then in a paper bag.

Once we have milk again in the spring, I'll see how well they kept! Folks who've done this tell me they'll keep frozen for 4 to 6 months.

For my next experiment, I decided to try freezing some in milk.


I froze the jar, then lidded it, and am storing it in the freezer in a paper bag.

I'm still keeping some going with boughten milk, so I'll still have have some in case my experiments fail. Hopefully, I'll have success!

I'm curious if any of you have preserved kefir grains and how well it worked. Any tips would be welcome.

January 21, 2022

Swale Project: Making a Start

One of our winter projects is planning and starting to dig swales. Earlier this month I shared with you my permaculture swale notes and showed you our preliminary swale plan. We decided the first swale should be the one above the garden, because keeping garden soil from drying out a top priority. Dan started by mowing it, and then we used our transit level to find and mark the contour. 

Starting at the fence in the background, the
contour gently curves toward the rainwater tank.

People usually use heavy equipment to form swales, but this is a relatively short distance (about 40 feet) so we can dig it by hand. It will be a slower go that way, but we don't really have equipment for swale digging!

After the swale was marked, Dan used the tractor's
scraper blade to scrape away grasses and weeds.

To loosen the soil, he then made a few passes with his subsoiler.

Then we got out the shovels and started digging.

Progress is very much weather dependent, and autumn was a great time to start. Not too hot, and the soil had enough moisture to make digging fairly easy. The goal is to finish before the spring rains. We've been pacing ourselves, planning to spread out the digging over several months.

December was mild and mostly dry. We made fair progress, setting aside some of the topsoil for another project (more on that later). It finally rained mid-month, and we were very curious about what was going on in the swale!

How the partially dug swale looked after about a third of an inch of rain.

It was exciting to see it filling with water! It also gave us an idea of how level our swale bottom is. We're pretty much eyeballing it at this point, with the plan to make corrections after the length of the swale is dug. 

We're digging into the clay subsoil, which is sticky and heavy after rain. That slowed digging, but we managed more progress before it rained again when January arrived. 

This shot was taken January 2nd, after 1.75 inches of rain.

The above photo was taken on the second day of a three-day rain event. We got a total of three inches, and were pleased that the swale held it well, with no blow-outs. It took about two days for all that water to absorb into the ground, which is as it should be. Then digging slowed, because the soil was slow to dry out and sticky. But I was able to make a little more progress before it snowed.

Taken two weeks after the one above. Can you tell there's progress?

The snow has been slow to melt and left the ground sticky, so that's as far as we've gotten at the moment. Digging will resume after the ground dries out a bit again. Once planting weather arrives, I'll plant the berm with perennial herbs and flowers.

Swale Project: Making a Start © January 2022 

January 17, 2022

Definitely Winter

December was mild, but almost on cue, January turned down the temps and turned up the rain. Winter had arrived. In the middle of last week, our customized local ten-day forecast included this little "wow, really?" for Sunday—13 to 19 inches of snow!

I think it will enlarge if you click on it.

Now, I realize that this might be unremarkable for some of you, but here in the Southeastern US, it's almost unheard of. Our annual snow event is typically 2 to 4 inches and usually melts within a day or two. In the 13 winters we've lived here, our homestead snow record stands at 7.5 inches in January 2011, before turning to rain. This snow to rain pattern is typical for us, so our real winter weather hazard is freezing rain and ice as temperatures drop at night. Ice can coat power lines and tree branches, which then crash down on roads and power lines, and knock out electricity.

Of this forecast, we took note, but didn't get too excited because we've had predictions of a foot or more snow before, and haven't found the computer generated prediction models to be terribly accurate. Even so, we made sure we had everything ready for frigid temps, lots of precipitation, and possibly a power outage. I filled a wheelbarrow with kindling while Dan filled the wood boxes. I did a quick pantry check and decided to do my shopping early. Folks were mostly buying up foods they could prepare without electricity: fresh and canned fruit, breads, crackers, snacks, canned and lunch meats. We topped off the straw bedding for the critters and put up the plywood draft blocker.

Most of the year the hay feeder is open on all four sides. In winter, the plywood
blocks drafts from the door and provides a cozy sleeping spot for the girls.

Even though we close the barn doors at night, they aren't airtight and let in cold drafts when the wind blows from the north. Blocking those keeps the barn warmer.

We also decided to cover the hay chute.

View from by the hayfeeder.

We discovered that it acts like a chimney and creates a cold draft!

Seasonal hay chute cover in the hay loft. I prop it open to drop down hay.

The next morning we awoke to 5.5 inches of snow, which was still falling. 

Early morning view from the back door.

I don't know how much rain we got before turning to snow, nor the actual snowfall, since the ground was warm and initially melted it, like it does. 

The protected side of the barn, facing south.

The outdoor temp was 28⁰F (-2⁰C), while it was 34⁰F (1⁰C) in the barn. A sharp frigid wind was blowing out of the northeast. 

A first, snow on the inside of the barn,
even though the barn doors were closed!


The chickens refused to come out and the ducks refused
to go in. You just can't make up a critter's mind for them.

After barn chores, I swept off the solar panels.

Not just snow, the solar panels were coated with ice.

Our panels make electricity as long as conditions are bright, but I'm not sure about the ice. I'll have to watch the charge controller read-out to see. By afternoon the precipitation changed from freezing rain to fluffy falling flakes.

How much snow did we actually get? By the time it stopped snowing, our measurable amount was 7.25 inches. That doesn't beat our homestead record, but that's okay too. The sky brightened enough for the panels to top the batteries off, and two chickens finally made it outside to check it out. The goats just looked at it.

The forecast for the next several days is nighttime temps falling down into the teens, with maybe more snow next weekend. Winter is definitely here.

January 13, 2022

Swale Project: The Plan

I've experimented with small swales in the garden. My first was about five years ago (blog post here), but it was small and so had small effect. Then I started digging hugelkultur swale beds in the garden, since raised beds dried out too quickly (blog post here). Now, thanks to permaculture video lectures by Bill Mollison and Geoff Lawton, we've begun to understand how to incorporate swales into an overall homestead design. The goal is to keep our soil hydrated. This is a challenge because we typically have long, hot dry spells each summer. We collect rainwater for irrigation, but now understand that the best way to collect and store water is in the soil. 

One thing Bill and Geoff stressed is that permaculture focuses on design, rather than techniques. Specifically, permaculture is about energy design: identifying, collecting, retaining, and using energy as many times as possible, for as long as possible. Water is a key energy source. Without it, everything dies. Our design is our plan to collect and store as much water as we can before it flows off the property. Swales are a key element to accomplish this. (See my notes, here.)

Since swales are built on contour, we used a topographical map to visualize a rough idea of where we should start. The topo map is pretty general, and shows our highest elevation at the top of the property, where the house, gardens, and outbuildings are. A series of descending ridges takes us to the bottom of the property, where it's densely wooded. This arrangement is actually opposite of an ideal permaculture property, where the house, gardens, and outbuildings are closer to the property's lower contours and can take advantage of water collected at higher elevations. But it is what it is, and that's our challenge. 

First stage: blue lines are proposed swales, red lines are contour lines.

I'm calling this stage 1 of our new water conservation plan. The proposed swales (in blue) will have the potential to catch most of the runoff from the highest points of the property: roofs, driveway, and parking areas. Stage 2 will be constructing spillways to direct swale overflow and more catchment at lower elevations. More on that after we've had a chance to mark the actual contour of the land. For that, we bought an inexpensive transit level, so we know exactly where to put the swales. Then it's on to digging, and after that, planting. We've made a start on the first one, so I'll have pics to show you soon.

January 9, 2022

Permaculture Notes: Swales

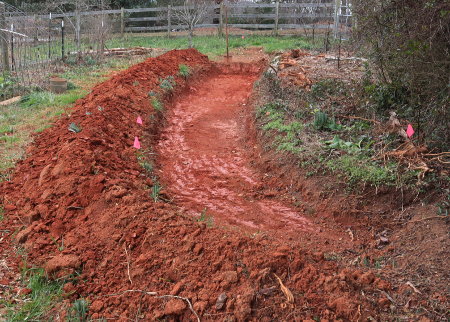
Swale digging is on Dan's and my winter project list. It's a subject we've been studying, so I wanted to organize the notes here as a resource. 

Notes from:

I. Definition - Swales are long, level excavations intended to capture surface water runoff (from rain, roof, road runoff, tank overflow, diversion drains, etc.) and then store it in underlying soils or sediments.

II. Function - to recharge groundwater systems.
A. To intercept and temporarily hold overland water flow.
B. Allow collected water to infiltrate into the downhill soil.
C. Nutrient delivery system, E.g. swales built under or next to a chicken house can deliver nutrients from the manure via water flow to the rest of the system.
D. Full effect will take several years to realize.
E. Can eventually recharge springs and aquifers. 
 
III. Design planning
A. Ideal landscape - 15% of the ground surface covered in water 
1. ponds
2. swales to transport water to the ponds
B. Design the system of swales and ponds for water to move:
1. by the longest path
2. over the longest time
3. with the least amount of friction
4. "The farther you lead water, the more storage you have."
 C. Placement
1. Place first swale at the property's highest elevation possible.
2. Typically 4-6 feet below highest points
D. Begin the plan by marking  the level contours of the property. This will determine the pattern of the ponds and swales.
E. Spillways direct water flow from higher to lower storage features and prevent overflow. 
  
IV. Sizing
A. Varies greatly depending on soil and climate. 
1. wider and shallower in sandy soils
2. narrower and deeper in clay soils
3. up to 6 m (20 ft) wide in deserts 
B. Should allow for slow water movement.
1. The slower the better
2. Should be able to walk the speed of the flow. 
C. Should be large enough to not blow out the spillways.
D. Width
1. Can be anywhere from wheelbarrow width to roadway width 
2. should not exceed crown spread of fringing trees
E. Examples
1. Small, front yard size - 20 inches wide and 8 inches deep 
2. Large, pasture size swales - 4-6 feet wide and 18 inches deep

V. Spacing
A. Swales typically hold moisture 30-40 feet down the slope.
B. Distance between swales can be 3-20 times the swale width depending on rainfall.
1. Large swales can be spaced 12 feet apart with average rainfall exceeding 50 inches.
2. Large swales should be spaced 60 feet apart with average rainfall less than 10 inches.
C. On slopes, use height of trees to judge distance between swales, where berms are level with the height of the treeline below. 

VI. Construction
A. Built on contour, i.e they're level to allow even distribution of water
B. Equipment
1. Depends on size and budget
2. Can be dug by hand with shovels
3. Tractor with turn plow, scrape blade, subsoiler, disc harrow
4. Backhoe or excavator 
C. Ground can be ripped first with subsoiler, for the planned width of swale and berm.
D. Often dug into the subsoil 
E. Material dug from the swale becomes the berm.
1. Berms not compacted or sealed (unlike pond walls)
F. Swale floor can be sloped to encourage water drainage in a particular direction
G. Can be constructed to be backflooded by ponds 
H. Spillways to direct overflow to another swale or pond in a series 
1. lower than berm height
a. Geoff - 50-200 ml
b. Michael - 1/3 lower 
2. can be packed clay, rocks, grass, concrete, anything that won't wash out. 
 
VII. Planting
A. Berm planting 
1. essential for the long term functioning of the swale.
2. Seeded or planted on either side after an initial soaking of rain
a. grasses for grazing
b. perennial shrubs and bushes
c. Trees 
i. Some of the collected water is stored in trees.
ii. Planted in the berm or above the swale (not in the swale) 
iii. Essential in arid climates to shade and reduce evaporation
iv. Roots increase absorption efficiency
v. Leaf drop adds nutrients and organic matter to the swale 
 
B. Swale planting
1. Since the topsoil is removed, the swale itself is not typically fertile
a. soil can be left to accumulate organic matter
b. can be planted with grass
c. can be filled with mulch or gravel
 
VIII. Living Swales (Michael)
A. Living swales are planted swales, not earthwork swales
1. constructed on contour of dense, clump grasses such of vetiver
2. the grasses stop and retain overland water flow, similar to dug swales
3. common in regions with shallow or rocky soils
B. Over time, earthwork swales will fill in with plant and runnoff debris, and the planted berms will create living swales.

~~~

When I started organizing my notes into an outline, I didn't realize how many of them I had. A lot! So this turned into a larger job than I anticipated. Still, to have what I've learned organized and easy to access feels good. 

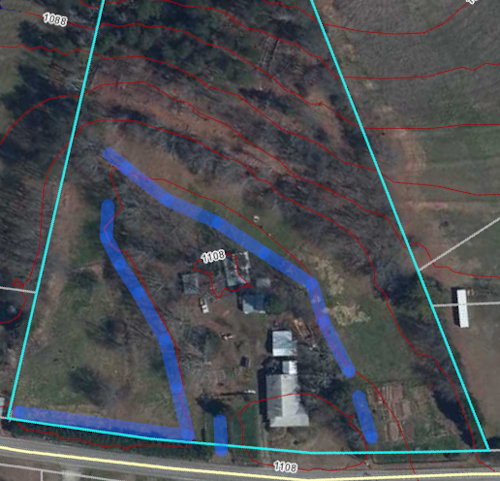
Next time, I'll show you our plan to, hopefully. put this information to good use.

January 5, 2022

Bracken Poisoning in Goats

We don't have many bracken ferns growing in our woods, so I've always welcomed them for the beauty and diversity they provide. I've read they are poisonous to goats, but the goats have completely ignored them for years. So, I never worried about them until this little gal. . .

. . . decided they were munch-worthy. I chased her off a couple of times, and initially, she seemed okay, so I thought she didn't eat much. 

The next morning, she was in extreme stress, crying pitifully and vomiting, which was all very alarming. I've dealt with azalea poisoning in the past, so I had recipes at hand along with some of their ingredients. I didn't have everything, but immediate action was required, so I used what I had.

  • 1 pint distilled water (can use filtered)
  • 6 teabags of black tea (neutralizes the toxins)
  • 2 tbsp chopped, fresh (or 1 tbsp powdered) ginger (soothes nausea)

Simmer for 10 minutes. Cool and then add:

  • 1 teaspoon activated charcoal (neutralizes the toxins)
  • 1 tablespoon milk of magnesia (regulates peristalsis, i.e. keeps the gut working)
  • 1/8 teaspoon powdered rennet (neutralizes the toxins & helps digestion)
The dose for her age and weight was 10 ml by mouth (I used a dosing syringe). The original recipes are here.

Usually, one dose is enough, but she was still in distress an hour later so I gave her a second dose. I also started her on vitamin B complex injections, because any time a goat's digestive system (rumen) is off, they run the risk of developing thiamine deficiency, aka goat polio. I've dealt with that before too, and it's another scary condition to face.

She finally pulled through, but I have to admit I wasn't sure she would. The next day found me hunting down and digging out bracken ferns. I don't ever want to go through that again!

Bracken Poisoning in Goats © January 2022 

January 1, 2022

Our Agrarian Year: Winter Project List

By the beginning of December, the trees have shed their leaves, and shorter days and frost have ushered in the dormant season. The days start later, the pace is slower, and the chores are less pressing. Of the winter season, December is our mildest month, so we get more done outside. January and February are our coldest months, so outdoor work is more iffy. When the weather's bad we work indoors, plan, and enjoy some leisure time. 

Our current winter project list is divided into several sections: seasonal activities, one-time infrastructure projects, and research for future projects. 

Seasonal

  • log milling
  • wood chipping
  • garden maintenance: beds, aisles, mulch, etc.
  • fence maintenance and repair
  • freezer canning
    • frozen tomatoes ➞ tomato sauce
    • frozen figs and berries ➞ jams and jellies
    • frozen goat cream ➞ ghee
Infrastructure

  • swales - planning and digging (getting a start, anyway)
  • forest garden - planting

Research and planning 

We have two large projects that we'd like to work on this summer. Winter is a good time to explore options, formulate specific plans, and calculate costs.
  • Finish the exterior of the house, of which only the sun room is left. We've batted around the idea of attaching a greenhouse there, but have always gotten bogged down by how far we want to go with preliminary steps. When it seems to get too complicated, we set the idea aside and move on to something else. Eventually, though, we need to finish the house! My permaculture design course with Bill Mollison and Geoff Lawton discussed greenhouses (glasshouses) extensively from a permaculture perspective, i.e., not only for growing food, but also as a way to passively heat a house in a temperate climate. So, we're going to take a closer look at doing this the permaculture way and hopefully make a plan.
  • Masonry heater: to replace the wood heater in the living room.  

Leisure

Since the winter season has the fewest chores and the worst weather for outdoor projects, it's a good time for hobbies and self-improvement. For me, that means learning how to use my new camera with an online camera course. I'm just a couple of lessons into it and learning a lot! Lesson notes and homework are posted on my photography blog.

So, what is everyone else doing this winter season? Projects? Planning? Taking it easy? Please share!

Winter Project List © January 2022