Showing posts with label upgrades. Show all posts

October 24, 2011

Electrical Upgrade, Done!

This is one of those projects that was absolutely necessary, took a lot of time to do, cost more than we might have wished, and has largely unseen results. Needless to say, there is something to show you, because we've gone from this....

Our old electric meter used to be
on a telephone pole out by the road.

... and this ...

Power lines as they used to enter the house from overhead.

.... to this ......

New electric meter. Cables come
up to the box from underground.

Dan chose this type so that he can run a line for his welding machine, and eventually we can run electricity to a workshop and barn if we want.

We also upgraded from this...

Old circuit breaker panel located behind the stove.

... to this ....

New circuit breaker panel located in utility room

Besides upgrading all the equipment, power to the house has also been upgraded, from 60 to 200 amps. The immediate effect is that our light bulbs burn brighter.

Dan did most of the work himself. He got the specs from the power company, consulted an electrician, got his permit, installed the new boxes, and then called out the county building inspector. His work passed with flying colors, so all that remained was for the utility company to move the lines.

Burying them....

View of the action from my kitchen window

... was the expensive part, but since the old lines ran through a tangle of tree branches it was either that or cut down the trees. Actually, it's a minor miracle that tearing winds or ice storms hadn't already knocked those lines out at some point, because according to the power company, they are only responsible for the lines up to the meter. The home owner is responsible for everything from the meter on.

So, my yard's a bit torn up but a big job is out of the way. It actually started two years ago, when we discovered that we still had some knob and tube wiring that needed to be replaced. The only thing that's left now, is installing the fixtures, switches, and outlets we will want in the new kitchen.

The irony of all this is that really and truly, we'd like to get off the grid altogether. Why didn't we do that instead? The answer to that isn't simple, except to say that we live in an area where neither solar nor wind are consistent enough to be utilized as an energy source on a regular basis. We've been researching other alternatives, but have no definitive answers yet.

The faithful observant among you may have happened to notice that the house color behind the new meter box was blue instead of white. I'll show you why soon. ;)

November 2, 2009

Let There Be Lights!

It seems like a long time since I've had any progress on the house to report. I have good reasons though. For one, Dan has been working a lot lately, which is good for affording the projects we're up to, but not good for having the time to do them. Plus, we've been taking advantage of good weather for outdoor projects, such as putting in fence posts and preparing next year's garden. Sometimes we figure the house can wait. It's over 80 years and has been like it is for awhile, so what's a couple more weeks or months going to hurt.

Some house projects we've been chipping away at, like replacing the old knob & tube wiring. Actually, Dan pulled out all the K&T last September. He's been rewiring the ceiling lights in each room one at a time. This has meant that I've had no overhead lights in most of the house all this time! It has been a real "make it do or do without" experience.

Anyway, I am very pleased to report that I now have ceiling lights in every room in the house! (Insert thunderous applause here.) And, I have pictures to show you.

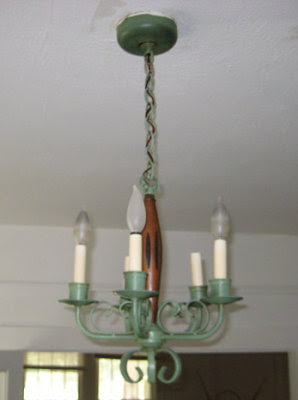
In some ways I would have loved to keep all the old ceiling light fixtures which are original to the house. In other ways, some of them weren't practical, some had frayed wires, and one was just downright ugly.

The original overhead light in the living room looked like this:

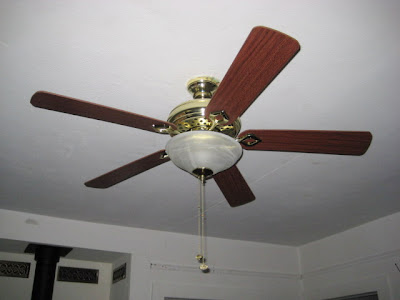
Original living room overhead lightAs much as I liked it, we decided that lights with a ceiling fan was much more practical for our hot summers and also to push heat from our woodstove out of the living room and into the rest of the house (which is working very well.) This is what we replaced it with:

Living room upgraded with fan - light comboThe dining room fixture on the other hand, was downright ugly:

Original dining room lightAfter some debate and a lot of looking around, we decided to go with something more elegant:

New dining room lightThe medallion was affordable and easy to install. The light wasn't what we originally envisioned, but from the selection in our price range, we liked it best and are really happy with the choice.

Overhead light in hall bathWe did something entirely different in the hall bathroom. The old ceiling fixture (pictured on the left) definitely needed to be replaced, but we didn't touch it. For one thing, we still need to finalize plans for this bathroom, which includes adding ventilation and heat. Under consideration for that is a combination ceiling vent/electric heater unit.

For another thing, the placement of the ceiling light isn't optimum for whatever one wants to do at the bathroom mirror. Dan definitely didn't like shaving with only that light. Our solution?

New over sink bathroom lightsTwo old-timey looking wall sconces with functional pull chains, leaving the wall switch for the future ceiling fixture. The only problem with these lights is, now I can hardly wait to replace the mirror/medicine cabinet.

In the hallway, we're did another switch-up.

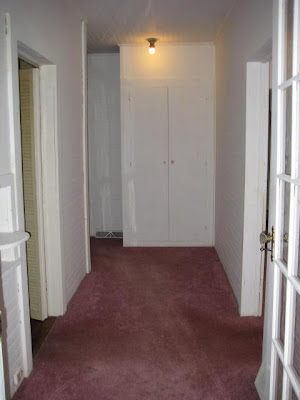
Original overhead hall light.The original hall light is at the bathroom/linen closet end of the hall. There are switches at either end of the hallway which control this light. However, we have an idea for a master suite combining the spare room, hall bath, and a portion of the hallway, so...

New light added at other end of hallway... Dan put a new the light at the opposite end of the hall. The light switch at that end operates it, leaving the switch by the bathroom for a light in the suite. (Which is whole 'nother story.)

No fixture changes were made for the kitchen, bedroom, nor spare room at this time. We will change those when we get to doing those rooms. As you can imagine, I'm just happy to have the overhead lights again.

Let There Be Lights! photos & text copyright November 2009
by Leigh at http://www.5acresandadream.com/


September 11, 2009

The New Hearth - A Detour

One of the things tearing down fireplace revealed, was some of the home's original wiring. Behind that fireplace wall is the wiring for the light switch in our bedroom (see Floor Plan if you need to visualize how these things fit together). It was still knob and tube (K&T).

Some of the wiring had been upgraded over the years. A circuit breaker box had long since replaced the fuse box and much of the wiring had been updated to accommodate modern appliances, the HVAC system, and of course the addition.

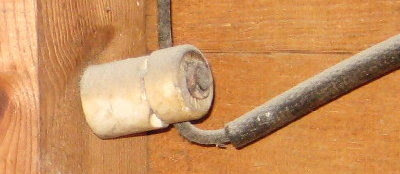
While we were waiting for the mortar on the hearth to cure it seemed a perfect time to replace the old wiring. The ceramic knobs....

A knob, of the knob & tube wiring system.... served to anchor the wiring. The ceramic tubes ...

A tube, of the knob & tube wiring system.... enabled it to pass through joists and studs.

What Dan discovered, was that the upgrades were all done only to the wall outlets. The ceiling fixtures were all still K&T. The wiring for the outlets is all in the crawlspace. The wiring for all the ceiling fixtures is all in the attic.

Replacing the old meant new wires and new junction boxes.

Wiring in the attic - out with the old & in with the new.
Old ceramic switch box.As he puts in the new, he has been removing the old. The holes left by the tubes are convenient to run the new wire through.

He also replaced the switch in our bedroom. The photo on the left is of the original one. Actually, it still works fine, we just wanted a different color switch. It's box is ceramic, as were the wire nuts we found in some of the ceiling fixtures.

At the time of this writing, he's about half done. The worst part was wiring the front porch light, because there wasn't much room in the porch part of the attic to work in. Not to mention that there is no flooring anywhere in the attic, it's all joists and insulation. The rest of it should take another day.

Fortunately, this is a once in a lifetime job. Good thing too, considering all the crawling around in the dusty, hot attic Dan has to do. But this will finish it out, so that all the electrical wiring will be up to code. Obviously, it will be a relief to get it done.

Next up - starting to lay the brick wall - click here.

The New Hearth - A Detour text & photos are copyright
September 2009 by Leigh at http://www.5acresandadream.com/