June 28, 2016

What Happened to Mama Duck & Her Eggs

At the beginning of the month I told you how we discovered that our missing Muscovy duck hadn't been snatched by a predator, but had disappeared to make a nest and set a clutch of eggs. We discovered this when Dan found one of our ducks wrestling a rat snake over an egg in front of the hay hut. (That story here, "No Hope for Ducklings?") Considering the number of eggshells we'd found and that Dan ended up killing three snakes, we didn't know if she had any eggs left.

When we decided we'd better fix the old goat shed roof ("The Old Goat Shed: Roof It Or Lose It") we needed to move the hay hut because it was right in front of the shed. Dan could pull the hay hut away with the tractor, but we didn't know the status of Mama Duck and her nest. We didn't know the target hatch date and didn't want to hurt her or her eggs (if she had any left). Dan thought he could lift one side of the hay hut with the tractor and then take a look to see what was what. If she was still there I could put her and her nest into the dog crate and move it into the chicken coop. I knew from experience that broody mamas don't like to be moved, but I could close the crate door until she got used to being there. Neither of us thought her spot a very good choice, anyway, because of our cats.

We lifted the hay hut up and looked. No Mama Duck. Dan knew approximately where the nest was but could see no eggs. What had happened? Had the snakes gotten them all? He chained the structure to the tractor and pulled it away from the goat shed.

Well, guess what. Her nest was there and it was full of eggs! They were still warm and the worst part was that we had cracked three or four of them. We could see fully developed ducklings inside. And! They were still alive!

What to do, what to do. My first thought was to push them back under the hay hut in hopes Mama Duck would find them. Noise from the tractor had likely scared her off and I just hoped that when she came back she'd go to the hay hut; it was only a dozen or so feet from its original location.

All the rest of the day Mama kept looking for her nest, except she always stopped where the nest used to be. I made a trail of chicken scratch from the old spot to the edge of the hay hut, thinking if she got close to the hut it would look familiar and she would think to look underneath. She didn't. She kept going back to the original location of her nest.

Our nighttime low was scheduled to drop into the 50s, which worried me, because I didn't think the half-hatched ducklings nor the rest of the eggs would survive that. We could put them under the brooder lamp, but eggs need more than heat to develop. They need turning and the correct humidity. Without a proper incubator the chances of success seemed slim. The only other place to put them was here...


I had two broodies, a chicken and a duck, vying for the exact same spot under the nest boxes in the chicken coop. I knew they had some eggs, but if I could put Mama Duck's eggs under them, maybe they had a chance.

All we could do after that was wait. The saddest part was that Mama Duck kept looking for her nest. Every time I went out to the chicken yard or goat shed, she would run up to me and cock her head as if to ask where they were. I tried several times to catch her, telling her I'd take her to them, but she wouldn't let me get that close.

A couple of days later I heard some low chicken clucking. I took a peek under the nest boxes and saw this.


For the next couple of days we could hear peeping, but rarely saw the ducklings. One day Mama Hen was off the nest and I saw this.


Later that day we got a head count.


Four ducklings had survived, and been adopted by Mama Hen!


She warms them, feeds them, and protects them. Mama Hen is one happy chicken!


Several days later she took them outside for the first time. It was amazing that even at a couple days old the ducklings instinctively try to catch flying bugs. The adult Muscovies are very good fly catchers, and the babies did what ducks do.


And Mama Duck? It seems that by the time she got over looking for her nest she'd lost her inclination toward broodiness. She looks at the ducklings with interest but makes no attempt to reclaim them.

For now, Mama Hen has her brood, the other broody duck has the nest to herself, and the ducklings are being taken care of. I suspect it's only a matter of time before the ducklings start to prefer the company of the other ducks. All species seem to know their own kind, indeed, even the breeds within the species often know their own kind. Those truths can be found in the old agrarian sayings which are embedded in our language. Things like "birds of a feather stick together." These aren't strict rules, of course, but generalizations. Most often the generalizations are true. I just hope they stick with Mama Hen long enough for her to be done with her broody.

June 25, 2016

The Old Goat Shed: Roof It Or Lose It

Right about the time the new saw blades came in for the sawmill, we were faced with another decision to make. The tarp on the goat shed was rather in tatters, so Dan took it off. He came in to report that the roof was in worse shape than we remembered and that if we didn't do something about it we'd soon lose the building.

It leaks

Fascia boards have rotted off

The overhang we moved from the old coal barn to use as a goat
loafing area
has always leaked, Dan never could figure out why.

Covering the roof of this building was our very first outdoor homestead project. It was one of two that were built around the same time as our house, about 90 years ago. We wanted to turn half of it into a chicken coop, and the other half into a goat stall. The roof at the time had several layers on it but had started to leak. In discussing options we decided to simply tarp it for the time being. That was six years ago and the roof was long overdue for some help.

Options? We could let it go, which didn't sit well with either of us. We could tarp it again, but to be honest, we are rather tired of looking at tarps all over the place. They are on that outbuilding, cover the hay hut,


and serve as walls on the carport. They're okay for a season or two, but once they start to shred, there are bits and ribbons of poly-whatever they're made of all over the place. The other option was to put a proper roof on it.

More discussion. Should we just re-roof the existing part or do something more? I dug out one of our old goat barn plans to reconsider - Goat Barn Plan #5. That idea was to simply add another half to the shed to create a small gable barn.

I first showed these sketches to you last November, but they
are dated May 2, 2014. One of many ideas for a new goat barn.

Rough idea of the floor plan.

Dan decided to expand it a bit, coming out about five feet on the front and adding about four feet on the milking room side. Here's how it's coming along.

One of the first steps was to raise the attached loafing area roof and add
a ridge beam. A new loafing roof will extend beyond the new roof.

Framing out the new roof with posts where walls will eventually be.

For now, we're just concentrating on the roof. The rest we'll decide on later.

The only glitch we've had was in moving the hay hut. It used to be right in front of the goat shed, but it needed to be moved to work on the building. The problem was that Mama Duck was still under there. This is the same Mama Duck that had snakes getting her eggs ( see "No Hope For Ducklings?"). Since we couldn't actually see the nest, we had no idea whether or not she still had eggs. But the hay hut was in the way so it had to be moved. What happened after that is quite a story. I'll tell you all about it here.


June 23, 2016

More on Homemade Apple Pectin: Testing & Storing

When I made my apple pectin the other day, I had no way of knowing for sure that it would work; that it would turn my mashed figs into jam. I knew from Joy of Cooking that grain alcohol can be used to test the pectin content in various fruit juices, but that's something I don't keep on hand.  I just figured that if it was a fail, I'd boil my pectin down more and try again. I was fortunate to have good success. My jam gelled well. Now, thanks to Dani at Eco Footprint ~ South Africa and Jake at The Homestead Laboratory I've learned is that it doesn't have to be grain alcohol to test for pectin. It can be common rubbing (70% isopropyl) alcohol.

The test is simple. Simply pour a glug of alcohol into a small glass and add about a teaspoon of the liquid pectin. Let it sit for a minute and then try to fish it out with a fork.


The pectin gels in the alcohol. If it doesn't, then the apple juice needs to be cooked down to concentrate the pectin in it. The results didn't surprise me, but I'm glad to know how to test future batches. It will also be handy for testing the natural pectin content of other fruits.

After I made my Spicy Fig Jam (recipe here), I still had quite a bit of pectin left. It is said to keep for about a week in the refrigerator, but I knew I wouldn't be using it up that quickly. Two options for longer term storage are freezing or canning it.

Freezing was certainly tempting, except that I don't have much room in my freezer. Plus, I always seem to lose track of the stuff that's in there. Things on my pantry shelves, however, are always in view and easier to remember and find. I decided to can the rest of my apple pectin.


I filled five half-pint jars. It's processed in a boiling water bath for 15 minutes.

Did you know you don't need an official "canner" for water bath canning?
All you need is a pot deep enough to cover the jars 1-2" with boiling water
plus a rack on the bottom to allow boiling water to circulate under the jars.

Now I have homemade pectin ready and waiting for when I need it.


To read Dani's and Jake's informative posts, follow the links below:
Eco Footprint ~ South Africa, "Making your own pectin for your fruit preserves"
The Homestead Laboratory, "Fall Rhubarb and Crabapple Pectin"


June 21, 2016

A First Try at Making Apple Pectin

Several years ago I planted a crabapple tree, because I want crabapples for making apple cider vinegar and pectin for jams and jellies. It's coming along slowly and I have yet to get enough crabs to try either of those. When Dan mentioned wanting to mow under our Fuji and Gala apple trees but some of the branches were too low, I knew just what to do with all the underripe apples on those branches - try my hand at making apple pectin.


I followed the instructions in Grandpappy's Recipes for Hard Times (if you aren't familiar with it, you can read my review of it in my post, "Three Cookbooks for Food Independence.") It was very simply, really.

Chop the apples.

Cover with water and cook to a thin sauce.

Drain the liquid. That's the homemade pectin.

I got about 3 pints.

Grandpappy's recipe said it should be a thick slimy liquid and didn't say anything about cooking down the liquid further. Some instructions say to do that, but thickness and sliminess are somewhat relative, so I decided to give it a try as is and see what happened.

I had about a gallon of last year's figs in the freezer. Figs are very low in natural pectin, so I thought they would be a good test. The biggest question was how much, because different homemade pectin recipes give different ratios for pectin, sugar, and fruit. Grandpappy's recipe said to substitute 3 tablespoons pectin and 4 tablespoons sugar to any recipe calling for a box of powdered pectin. That didn't seem like enough, so I followed the suggestion from About.food and used
  • one-quarter cup homemade apple pectin
  • one-quarter cup sugar
  • per cup of mashed fruit;

According to Joy of Cooking, commercial pectin is finicky, which is why a high sugar content and short boiling time are required. Natural pectin, they say, is not dependent on so much sugar  and requires much longer cooking to thicken the jelly or jam. I boiled and stirred, and stirred and boiled until the jam pretty much stuck to my spoon.


It's supposed to thicken more as it cools, so the next day we tried it on toast.


Not as thick as it could be, but it certainly worked well enough. I asked Dan how it tasted and he said like apples and cinnamon. My figs are pretty bland so I thought a spicy jam would be tasty. By using the above proportions, I used less than half the sugar called for with a commercial pectin, and we both thought the sweetness was just right. 

For my records, here's my recipe.

Spicy Fig Jam

6 cups mashed figs
1.5 cups sugar (0.25 C sugar / C mashed fruit)
1.5 cups homemade pectin (0.25 C pectin / C mashed fruit)
0.25 cup plus 1 tablespoon lemon juice (1 tbsp / C fruit)
1.5 tsp cinnamon
1 tsp ground ginger
0.5 tsp ground cloves

Stir together all ingredients and bring to a boil. Simmer until thick. To can spoon into sterile jars with 1/4 inch headroom. Process in boiling water bath for 10 minutes.

I think next time I'll try cooking it down in the slow cooker.

Next - More on Homemade Apple Pectin: Testing and Storing

June 18, 2016

Solar Attic Fan

Last summer I blogged about "Living Without Air Conditioning," and had quite a few comments about the benefit of attic vent fans. This summer we decided to put one in.


The intent of the attic vent fan is to vent the hot air which stacks up in the attic and transfers its heat to the rest of the house. In order for this to work, it must be able to draw enough fresh air from the outside to properly vent the hot air. It can do this with gable, soffit, and/or ridge vents. Otherwise it can actually depressurize the attic and pull up air from inside the house (which can make an air conditioner work overtime and draw fumes from things like gas water heaters).

There are two types of attic vent fans, those that are installed in the roof, and those which are installed in a gable end of the attic. Neither Dan nor I was too keen on cutting a hole in the roof, and since we have gable vents on all the gables we opted for a solar gable fan.


Installation was very easy.

First step was to remove the old vent cover.

The fan was slightly wider than the vent opening, so a
little cutting with the jig saw was all that was needed.

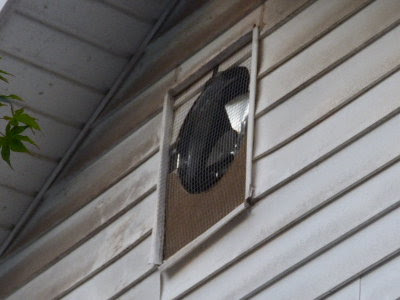
Scraps filled the gaps and hardware cloth covers the fan so that things
like bats, snakes, or squirrels can't move in. We still need a new vent cover.

The solar panel went on top of the roof. Dan ran the cord through the
opening that was already there for flood lights (which are disconnected).

This one came with a pre-installed thermostat so that the fan kicks on when the attic temperature reaches 85°F (29°C). It is easy to remove or replace with a programmable thermostat. The fan runs whenever the daylight is bright enough to power the fan (it doesn't necessarily need the sun). It picks up speed and vents fastest when the sun is overhead.

How well does it work? Last Tuesday was our hottest day so far this year.

The top number is the outside temperature, bottom
is inside (kitchen, warmest room in the house).

The high was 99°F (37°C) outside, while inside it was a "tolerable" 84°F (29°C). Some folks may argue the "tolerability" of 84° for an inside temperature, however, there is something to be said for acclimatization. We live in the southern United States, after all, and 99° is a typical summer temperature for us (and the price we pay for having such an early growing season). Dan and I spend a lot of time outdoors, so a 15 degree difference is most welcoming when we go inside. The other benefit is that going outside again isn't a wilting shock to one's system like it is with air conditioning ("hey, it doesn't feel so bad out here"). I'll also add that in the past I've found that to run the air conditioner when the temperatures are that high means it runs nonstop, and that the electric bill is then just as oppressive as the heat.

Of course we do all the common sense things to keep the house as cool as possible:
  • vent hot air from the house at night with window fans (a whole house fan would do the best job and is on our someday list)
  • close up in the morning when outside temperature matches inside temperature
  • keep curtains drawn on sunny side of house
  • use ceiling fans
  • use a summer kitchen to keep cooking and canning heat and humidity out of the house (also the solar oven and grill)

I have to add that replacing the old windows with energy efficient ones and adding more wall insulation has helped. And I'm looking forward to being able to shade those west-facing windows someday.

The other thing we do is simply accept that summer is hot and winter is cold. That's just the way things are.

June 15, 2016

Waiting on New Saw Blades

The sawmill stands covered to protect it from rain.

Well, the barn project is at a standstill for the moment. Dan needed to order new blades for the saw mill, which means no lumber making until they arrive. In the meantime, he's been busy with a few projects which have been on the to-do list for quite awhile.


One weekend we rented a chipper for our numerous piles of brush. There are plenty of sticks and branches from firewood, but using our own trees for lumber had really created quite a few new piles. It was lovely to get the place cleaned up, and very nice to get all that much-needed mulch.


I would so love to have an industrial-size chipper of our own, but even used ones are out of our price range.

Another clean-up project was to clear out the barn-building area, where we've been storing various materials. Things like a pile of railroad ties we got for free when the railroad company tore up a nearby track to make a bike trail. We've debated what to do with them, and finally decided to use them for a project that went on our 2012 Master Plan.

Idea for laundry greywater soil filtration bed. The pergolas would be used
for vining plants to shade the windows from the afternoon summer sun.

Dan used the ties to make the bed.


It will be awhile before we get the greywater hooked up, the front bedroom windows replaced, the rest of the siding put up and painted, the pergolas built, and catchment tanks hooked up to the downspouts, but it's a step in the right direction.

The next thing Dan did was to finally put in the garden gates. Two years ago this month we put up a fence around the garden in hopes of deterring deer and stray dogs from destroying it. Dan allowed for two gates to access the garden from the front of the property. We weren't ready to install the gates at the time, so the openings have been closed off with welded wire fencing.

The first gate is wide enough for a vehicle to pass through.


This allows large and heavy equipment access to the garden and also the new doe pasture beyond.

The second gate is a smaller equipment gate for the tiller, lawn or sickle mowers, or my large garden cart.


Dan made his own latch for this one.


I have one more project to show you, but it deserves a blog post of its own. I'll tell you all about it next time.

Waiting on New Saw Blades © June 2016 by

June 13, 2016

Unexpected Visitors

Saturday morning as I was getting ready to go out for chores I heard Dan calling me to come quickly. I ran to the back door to discover we had a pot belly pig in the yard!


There were two of them. They were not willing to be caught, but they were willing to follow Dan into the front pasture for food.


We had no clue where they came from, so Dan called the county animal control to come get them.


Hopefully the person who lost them will think to look for them there.

Unexpected Visitors © June 2016 by

June 10, 2016

New Pasture for the Does (and Bucks)

Recently I showed you our updated Master Plan. The biggest changes were the final selection of a location for a goat barn which connected to two pastures for the does.

Goat barn and goat corral are in blue, indicating they are planned.

We've been working on pasture #1 for several years, starting back in March 2012 when Dan scraped off all the poison ivy, blackberry vines, and about a thousand sapling trees. The following October we remineralized it and planted it to forage. This has been their primary pasture since then and is a huge improvement over what it was before. (Unfortunately I'm battling ground ivy and deadly nightshade, but that's another story.)

Pasture #2 was used for growing corn, cowpeas, mangels, and wheat, although doing so has always been a struggle. It was the one area that wasn't kept up when the house was empty and the property not in use. This field is infested with kudzu, brambles, pine and pecan saplings, nightshade, and morning glory, to name a few. We've turned the goats in several times a year, also the pigs, but the stuff always grows back. When we finally decided to move the field crops to another area, we got to work on turning proposed pasture #2 into a reality. Recently I was finally able to let the girls in for the first time.


First Dan disked it thoroughly, and then we limed and planted. It's a mix of every kind of pasture grass, herb, root vegetable, and legume for which I had seed. (This is a good way to use old garden seed such as peas, parsnips, turnips, and amaranth). Goats love variety and this is a way I can provide that. I used the same modified Fukuoka method that I showed you last October; covering the seed with a light mulch of goat barn cleanings.

The biggest challenge was keeping the chickens out. They love seed and they love straw! If you've read Critter Tales, then you know all the problems I've had and what I've tried to do to get the chickens to stay put! This time I extended the fence around the chicken yard by tying on a two-foot tall roll of chicken wire. It is now roughly six feet tall.

The green growing beyond the gate in the background is
the newly planted buck pasture (#2 on the Master Plan).

The chickens had to stay in their yard until the seed had grown into goat forage.

After planting, everything depends on rain. Rainfall is unpredictable this time of year, but we got enough to get a start on growing. I went back and reseeded the bare spots and waited until that seed  started to grow before letting the goats in.


Because the forage is new and rich, the goats have to be introduced to it slowly in order not to upset their rumens. Too much too soon could result in bloat, which can be kill them. (It can also cause soft, clumpy poops.) I started by feeding handfuls in their evening ration, gradually increasing, then gave them short grazing times (15 minutes the first few days, then 30 minutes, then 45, and so on.) The trick to getting them to come in when their time is up is to turn them in right before their evening ration. They don't want to miss out on that so they come when they're called.

The only problem is that the grass is so tall that the kids
sometimes lose their moms. Then the hollering begins.

There she is!