January 29, 2020

Solar Power Day

Back porch: freezer, inverter, solar panels in background.

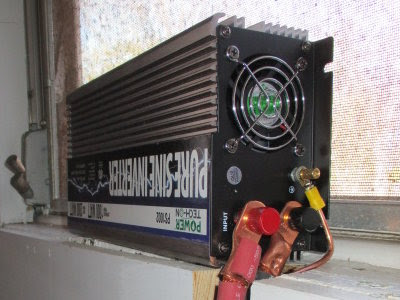
After all the excitement, anticipation, and build-up, solar power day was exceedingly uneventful. Switching our deep freezer from the grid to our solar electric system was just a matter of closing a circuit breaker, moving the plug from one socket to another, and turning on the inverter.

The back of the inverter with freezer plugged in.

We checked the freezer light—all systems go. Now we monitor.

Charge controller read-out screen.

There are two things we're keeping an eye on. One is how many amp-hours our freezer will use during a 24-hour cycle. We have 705 amp-hours stored in our battery bank, so we need to know how long the bank alone can keep the freezer running during a string of sunless days. The charge controller keeps track of this, so I must become familiar with the 100-page section in the manual dealing with reading the summary screens.

Charge controller manual

The other thing to monitor is the battery State of Charge (SoC). This is the percentage of energy still available in the battery bank. SOC varies by battery, so the exact numbers must be obtained from the manufacturer. Obviously, the goal is to not drain the batteries too low. This is of the utmost importance, because it relates directly to the life and longevity of the batteries.

My very first deep cycle battery was sealed, so I learned to check SoC by monitoring battery voltage. Turns out, it's more complex than that! To be accurate, the specific gravity of the batteries needs monitoring. This should be checked with regular maintenance anyway, but the voltage is an indicator, so we'll keep an eye on that. Most folks seem to use 50% as their bottom line, but others don't let their batteries drain that low to increase battery longevity.

What's surprising is that the 50% doesn't refer to voltage; it refers to battery chemistry. So for a 12-volt battery, 50% SoC isn't 6 volts, it's 12.10. That's why measuring the specific gravity is more accurate. But voltage is an indicator, so it's a quick and helpful way to keep an eye on things. Readings are always taken when the batteries are at rest, i.e. neither charging nor discharging.

Everyone who has gone to solar says the learning curve is such that everybody kills their first battery bank. We've done our best due diligence, so I sincerely hope that's not the case for us. But I know better than to assume anything!

I'm monitoring a few other things too. One is back porch room temp. For that I have a fridge and freezer thermometer that records highs and lows.

I like that these can be switched from °F to °C.

It came in a two-pack, so I have one on the porch and one in the pantry. I can monitor these rooms to get an idea of the temperature range during a particular season. They'll help us evaluate experiments to keep the rooms cooler.

I also bought two probe thermometers for monitoring the internal temps of freezer and upcoming chest fridge.

These come in Fahrenheit or Celsius only.

With a probe, I don't have to open the freezer or fridge door to check its temp. I've learned that my freezer turns on when the internal temp gets above 4.5°F (-15.3°C). It turns off when it reaches -11°F (-23.9°C). I'm sure that's fascinating information! LOL

Of course, we're curious how much we'll save on our electric bill. We still have a few more days left in the January billing cycle, so we really won't know the answer to the question until early March, when we get February's full bill. I'm expecting it will drop somewhat with the freezer now on solar, and even more once we get rid of my pantry fridge, an old energy guzzler. We plan to replace it with a chest fridge soon (watch this blog for more on that!)

When we started homesteading ten years ago, we wanted alternative energy, but for many years that seemed impossible. Step-by-step here we are. It's not what we originally envisioned, but it's good. Like all technology it isn't perfect, but it meets a true need, and that's what's important.

The next step is the chest refrigerator, and then we'll turn to phase 2 of our three-part plan to increase food storage efficiency: improving the pantry.

See also "Chest Freezer to Fridge Conversion."

Solar Power Day © January 2020

January 25, 2020

Around The Homestead

A (mostly) photo update of projects and happenings on the homestead.

Weather


Cold and rainy! Water buckets have been frozen so every morning we heat water before going out to do chores. Then we break the ice off the surface and top of with hot water. Everybody likes warm water on a cold day and it keeps the buckets from refreezing too quickly.

In spite of the cold our daffodils have started to bloom.


This new bout of rain is supposed to warm things up, however. No complaints about that!

Freezer


Yesterday we moved the freezer from the pantry to the back porch! All that's left to get it on solar is to hook up the inverter and plug it in. That will probably be my next blog post. Dan put it on 2x4s to distribute the weight on the porch floor, but I'm also glad for the air circulation underneath. I gave it a good cleaning when we moved it and the bottom was mildewy. Better air circulation will help with that. I'm also going to repaint the top.


It's gotten pretty rusty over the years.

Front Bedroom Exterior Siding

Is up!


But it's been too cold to paint, which is the next step. Then the trim. Hopefully, our promised warm spell will be warm enough to paint. Even so, the new windows and new layer of siding have made a noticeable difference in the front bedroom. Quieter and not as cold.

Eggs


The hens are starting to lay again. Cat nose included for size! LOL

Goats

Kidding is right around the corner.

The Girls

Daisy has a due date of February 14 and will be first.


Then Ellie, then Miracle, both in March.

I still have too many bucks.

The Boys

If anybody's interested in a registered Kinder buck, let me know!

Parting Shot

Riley

UPDATE: Our lone Muscovy duck is dead. Dan found her this morning while doing chores. Evidence suggests she was killed by a 'possum large dog. We found fresh dog tracks around the area where Dan found her. She was a favorite of his, so he's taking it pretty hard.

Around The Homestead © January 2020

January 21, 2020

Solar Project: Finishing Up Odds and Ends

Last week we had lovely weather and a break from the rain. We took advantage of it to put some finishing touches on our solar project.

First was to add an exhaust fan to the battery box to vent heat and hydrogen gas (a by-product of the batteries when they charge). A lot of people seem to like the Zephyr Power Vent, which can be installed as part of a vent pipe. It uses 3 watts of power and moves air at 6 CFM. It would be handy if one was venting from a basement, say, to the outside, but our battery box is already outside. Plus, it's pricey, about $110.

Instead, we got a DC cooling fan which Dan installed in the back side of the battery box. It uses 2.1 watts and pushes air at 43.6 CFM. It was $12.


The fan connects to the charge controller, which will regulate it.

Dan's roof design for the box allows air in under the roof eaves, but he also added air intake holes on both ends of the box.


To monitor temperature inside the box, we added a Remote Temperature Sensor.


This also connects to the charge controller and enables the controller to optimize battery charging according to temperature. It was about $30 and seemed a good investment for better battery management.

Another task was to check the specific gravity of the battery cells with a hydrometer. The battery manual gives details on the specific gravity. Battery cells were topped off with distilled water if needed.


Lastly, the batteries were connected. You may recall that they are 6-volt, 235 amp-hour golf cart batteries.


I showed you a diagram in my Solar Pantry Project: Batteries post and explained that by wiring pairs of batteries negative to positive (series connection) and then wiring the pairs together with all positive on the one side and all negative on the other (parallel connection), we now have a 12-volt, 705 amp-hour battery bank. Another task completed.

Next - Solar Power Day

January 17, 2020

And the Next Project Is.....

We're almost ready to hook up the solar! First, we were waiting on a temperature sensor for the charge controller and a vent fan for the battery box, then came days of almost nonstop rain. However, Dan can't sit still, so he had to find something to do. After finally finishing the back corner of the house, he was in the mood to keep working on the house, so he set his sights on the front bedroom windows.


He replaced the other bedroom windows (on the left) in 2013!


Good grief, has it really been that long??? It's not like we haven't worked on the house between then and now. After we remodeled that bedroom we installed the new siding, rebuilt the front porchreplaced the living room windows, then the dining room windows, re-sided the front gable ends, replaced the front windows in the sun room, replaced the front window to the room we're working on now, re-sided the back gable end, and reroofed the pantry.

He started by pulling off the trim inside to see what he could see.

Here's an interior shot before he removed windows.

Our house was built in the 1920s, and these are the original windows. The iron window weights  counterbalanced the weight of the window to keep it from slamming shut.

Iron window weights.

The problem is that the spaces for the weights couldn't be insulated, making the entire window unit an energy sieve.

He had a nice day to remove the vinyl siding and take out the old windows. Rain was in the forecast, so he covered the opening with a sheet of plastic and worked mostly from the inside.

Windows out and plastic up.


Those aren't very good photos, but we didn't empty the room for this project, and I couldn't step back far enough to get a good pic. It's being used for storage, so everything just got moved enough for room to work on the windows. Here's a better shot from outside.


Now we need a string of nice days to put up and paint the new siding.

January 13, 2020

The Garden in January

Winter is a slow time in the garden, and the seasonal change of pace is nice. I've got a few things growing, and am harvesting lettuce and collard greens. On nice days, I work on jobs from our winter project list.
  • dig two more swale beds
  • cover and mulch main aisles
  • do something with that weedy corner!

Progress on these is slow going because we've had a lot of rain. Except for a few cold snaps, it's mostly been mild, with highs in the mid-40s and 50sF. But we've had cold, biting wind, which takes the enjoyment out of an otherwise nice day.

Of my list, the first new swale bed is about dug out and ready to fill with logs, branches, sticks, wood chips, compost, and soil.

The first of two hugelkulture swale beds
I'm hoping to make this winter.

I've made a start on mulching the wheelbarrow aisles too. Here's how it looked before:

Photo from "Modest Success in Controlling Wiregrass"

Here's my progress so far...

Eventually, I'll have the whole garden looking like this!

I use several layers of heavy-duty cardboard on the bottom and a thick wood chip mulch on top of that. I prefer to do this when the soil is wet from rain. The cardboard and wood chips will help keep it from drying out, and I need to retain all the moisture I can in my soil! This past summer, I had pretty good success with this method to keep wire grass at bay.

The last project on the list is doing something about "that weedy corner." Here's how it looked last August.

Except for the hoop house and winter squash in in the
background, you'd never know this was part of my garden!

Years ago this spot was my first no-till experiment, naturalized with violets. But honeysuckle and blackberry roots lurked underneath and after years of trying to conquer them they finally won. This past summer it was the weedy mess you see above. Eventually, I'll double dig more swale beds here, but for now my solution was to dig out all the roots that I could and mulch heavily with leaves.


What's growing? Not a lot. A couple months ago, I planted carrots, radishes, lettuce, and kale, but not much of that has come up yet. Garlic and multiplier onions are doing well, however.

I have garlic planted everywhere.
Here's some in the strawberry bed.

Multiplier onions

I mentioned harvesting collards.

Heading collards

These are actually from last winter! Somehow they survived the summer with very little watering and are still producing tasty greens. I expect them to bolt this year.

Lettuce with garlic and fava beans.

We're enjoying lettuce on sandwiches and in salads. The fava beans are new for me. They are a cool weather bean, so I thought I'd give them a try. They should do okay if we continue to have a mild winter. Our winters can go either way, however, so they still might get frozen out. So far so good, although I don't expect beans until next spring.

I should also be able to start adding miners lettuce and chickweed to our salads soon. The chickweed volunteers everywhere, and the miners lettuce was transplanted from a large pot the hoop house.

Volunteer miners lettuce (claytonia)

I transplanted it in clumps into one of the hoop house beds.

It's taking off well with plenty of rain and mild temps.

Also in the hoop house is a bed of Chinese cabbages. They suffered some bug damage earlier but are growing now. I trim a few leaves for salads now and then.

Chinese cabbage

Also from the hoop house are volunteer dandelions that I harvested. I dry both the greens and the roots.

Dandelions

I have two experimental grain patches too.

Hulless oats

The hulless oats look a little disorderly, but the seed did well. The heritage wheat, on the other hand, not so well.

Heritage wheat had poor germination.

I'll continue to plug away at my projects and enjoy nice weather while we have it.

How about you? Anything happening in your garden?

The Garden in January © January 2020

January 9, 2020

Solar Project: Grounding the System


Earth ground symbol
Electricity follows pathways. Typically, that's the wiring between the source and whatever requires electricity to operate. If there's a problem, it can jump the wiring and electrify nearby metal. This could be deadly to someone who touches it. Physically connecting the wiring to the earth gives the electricity an alternate pathway, if needed. Called grounding or earthing, this is an important safety feature.

Many solar setups tie all the components together and ground them as a unit. If we had been thinking several steps ahead we could have done that too. Because we were doing this one step at a time, Dan grounded the solar panels separately, as specified in their installation manual.

The grounding holes in the solar panels' aluminum
frames are marked with the earth ground symbol.

Lay-in lugs connect the neutral grounding wire to the panels.

This photo makes it look like the wire loop on the right is
touching itself. It's not! It's just the angle of the photograph.

The grounding wire is connected to a grounding rod.


Alternatively, the ground wire could have run
through the underground conduit (white
pipe sticking out of the ground)
 to the battery box.

At the battery bank box, the charge controller and inverter are grounded together. Each clearly shows where the ground wire attaches.

Charge controller innards. Ground wire on the right.

Inverter ground wire on the right.

The ground wires from the charge controller and inverter are connected in the battery box with a thingy called a busbar.

Busbar with two of the three ground wires attached.

The third wire above (yet to be attached) will connect the busbar to the grounding rod. The ground wire from the panel array could have been connected here too. The busbar is a conductor and will direct wayward currents from either the controller or the inverter to the ground rod.

Our second ground rod near the battery bank box.

That's a very important step accomplished!

Most of the cables are in place, but they aren't connected yet. There are a few more things to do first, and then we can put the system together.