July 28, 2022

Garden Notes: July 2022

Generic daily forecast: 
Hot to hotter
Chance of pop-up showers (and chance not)
Repeat

Rainfall
  • 1st: 0.9"
  • 2nd: 0.1"
  • 5th: 0.5"
  • 7th: 0.75"
  • 8th: 0.2"
  • 15th 0.25"
  • 30th: 1.75"
  • Total: 4.45"

Temperature
  • nighttime range: 69-78°F (20.5-25.5°C)
  • daytime range: 80-98°F (26.6-36.6°C)

Note about summer rain:
  • The problem with our southern summers, is that the sun and heat will evaporate moisture right out of the ground. So small rainfall amounts have very little effect. This makes it a challenge to keep things hydrated, even with frequent rain.

Tasks
  • Picking
  • Preserving

Matt's Wild Cherry Tomatoes are prolific volunteers

Cucumbers too. We eat a lot of cucumber and cherry tomato salads.

Primarily, we eat as much fresh as we can. If there is extra, I preserve it.

Extra cucumbers become dill pickles

and relish.

Unfortunately, my cucumber vines are succumbing to blight.

Blight on my cucumber vines.

On the other hand, there's been no sign of pickle worms, which usually destroy my cucumbers. If it isn't chickens, it's feathers.

Some of my cherry tomatoes have blight as well. This is a common summer problem, but I've made an interesting observation. The plants on one side of the garden have it, on the other side there's very little of it. The unaffected plants are in my hugelkulture swale beds. This is also the side of the garden that gets the most benefit from the garden swale (because it still needs some leveling.) The affected plants are on the side of the garden that has regular bordered beds. All of them are volunteers, so it's been an affirmation of the extra work that goes into the swale beds.

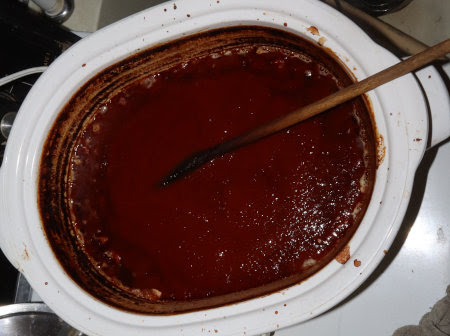
The cherry tomatoes are so productive that I'm having a hard time keeping up with them. What we don't eat fresh is made into pizza sauce and canned.

Paste tomatoes have never done well for me, but last year I
discovered that cherry tomatoes work just as well for sauce,

because like paste tomatoes, they aren't as juicy as regular tomatoes.
That means they cook down more quickly than regular tomatoes.

I also have four plants of slicing tomatoes. We eat the ripe ones fresh in
sandwiches, or quartered as a side dish if we don't have a tomato salad.

When I get more fresh ones than we can eat, I'm going
to can them with okra, for winter variety in our diet.

And I always make a batch or two of fried green tomatoes as a special summer treat.

This year, we have enough green ones to can slices for frying come winter.

Recipes for canning these and frying them here and here.

The abundance of green tomatoes got me thinking I should pick up another case or two of wide mouth quart jars. But I haven't seen canning jars (or lids) for sale anywhere. Not even at the places that usually carry them. I've managed to scrounge up a few jars at thrift stores, but no one seems to be selling canning supplies this summer. At least, not around here.

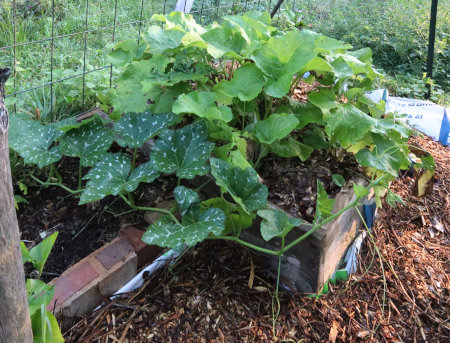
One thing that is doing surprising well is my summer squash. That's amazing because I usually lose summer squash to wilt. In fact, I've pretty much given up on growing it, but on impulse, decided to try a few seeds this summer. The first mound didn't make it, but this one was planted several weeks later.

Healthy summer squash vines!

The variety is pattypan, although when my kids
were in 4-H, we called them flying saucer squash.

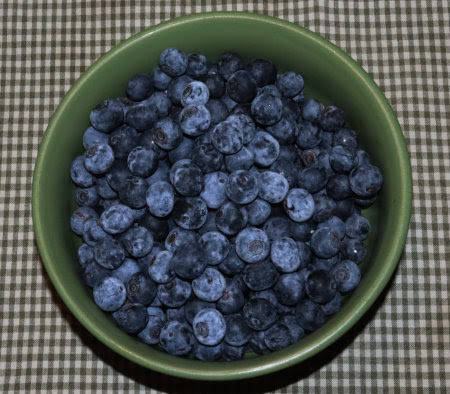
July's fruit is blueberries, of which the birds are eating more than their fair share! That means I won't be able to freeze a lot for blueberry pancakes this winter, but we're getting our fill of fresh.

These are great for snacking, pancakes, or on our breakfast granola.

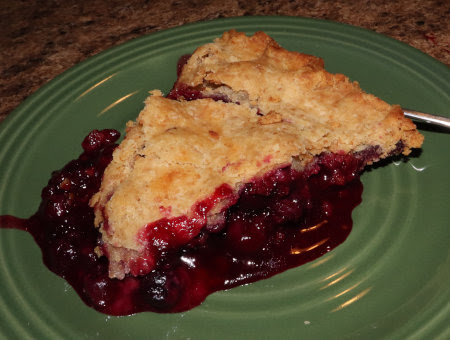
And I made sure we got at least one fresh blueberry pie!

That's everything that's noteworthy about my garden this month. How about you? How does your garden grow?

July 25, 2022

Greywater Project: A Very Basic Filtration Bed

We took time our first years here for observation, analysis, and planning. At that time, we had three areas for self-reliance that we wanted develop: food, energy, and water. Water conservation and stewardship included rainwater collection and greywater usage. For rainwater, we started with collection tanks. For greywater, we added a couple of ideas to our master plan, where we identified two potential areas to use it.

Greywater ideas from our 2012 Master Plan.

Greywater is a topic we researched carefully because there are precautions that must be taken. We bought Art Ludwig's Create an Oasis With Greywater (my book review here), and I researched dos and don'ts for household soaps, detergents, and cleaners (that blog post here.) We experimented some too, and used it to water tall plants like okra and corn. From those experiments, we felt that some sort of filtration would work best for us. 

When the summer rains became less frequent this month we got to talking about this. We got out our master plan (above) and discussed how we could construct a greywater wetland. Originally, the wetland idea was for a constructed filtration bed with rock, gravel, sand, and soil, plus water filtering plants. From there, it would drain out to the pasture. This would have required a lot of work, but we don't have the time or resources for an extensive project right now. Another commonly used idea for greywater, is a mulch pit. We got to wondering if we couldn't mulch pit that drained into our pasture swale. It would be  a first step experiment, just to see how it would do. 

This is how it fits into our swale plan. The filtration bed is the
little blue square between the house and pasture on the right.

The greywater drainage pipe was already in place. Dan installed it in 2016, complete with a bypass valve to direct the greywater either to the garden or to the septic tank. We haven't used it in several years, but this summer seemed the time to put it to use again. We brainstormed. For the mulch bed, we had a cracked water tote with five good sides. Dan cut it down and that made a start.

Filled with rain water!

He cut the existing drainage pipe and routed it through inlet and outlet holes cut into the tote. Because the cut tote walls aren't sturdy, he framed it out with some of his home-sawn lumber.

Our mulch medium is woodchips, because we make our own. To keep them out of the pipe, he used stone at the inlet, and screen at the outlet. The entire thing was then filled with woodchips. 

Completed project. You can see the greywater pipe coming from
the kitchen, and the mostly buried exit pipe going to the pasture.

View from another angle. The path leads to the garden.

Periodically, this will need to be cleaned out and fresh chips added. The old chips will get mixed into a new compost pile, and the bed refilled with fresh chips, or even better, a combination of wood chips and biochar

For now, we observe and take notes. We're already conservative with our water usage, and so far, the cut-down tote easily accommodates the amount.  There are no large amounts of water entering the swale, but if we see puddles, we use a shovel to shape the drainage path to the swale (we knew it wasn't level and would need to do this). Mostly, the water is absorbing quickly, slowly hydrating the ground as it makes its way to the swale. There is no odor and no debris in the water. It isn't potable, but it looks clear.

Eventually, the filtration bed could be expanded to a larger, more complex system incorporating plants. That will probably depend on how well this one handles the amount of greywater we produce and how long it takes for this one to need a change of woodchips. I'm glad we started with a smaller version of our original plan. That will make it easier to make adjustments as needed.

July 21, 2022

Poultry Squabbles: The Ongoing Saga

Earlier this month, I told you about the feud between Mrs. Broody Chicken and Mrs. Broody Duck (Poultry Squabbles). Well Mrs. Broody Duck (aka "Sister") has continued to have it in for Mrs. Chicken. She chases her around the chicken yard when they go out for a stretch, and tries to block her from going back into the hen house!

Sister. She shares the nest with Mom Duck, who was out at the moment.

On Monday, I was canning cucumber relish, when Dan came into the kitchen and said, "Two of the chicks have hatched, but Sister won't let Mrs. Chicken back into the coop." I went out to see too, and sure enough, two little peepsters were peeping from the nest, and Mama Hen was nowhere to be seen.

The entire poultry yard was in an uproar, but where was Mama Hen?  Since we have four Speckled Sussex, they all look alike and we can't tell them apart! Fortunately, the day was in the low 90sF (low 30sC), so we didn't have to worry about the chicks getting chilled. But we were concerned that she might abandon the nest. If she didn't return by evening, we'd have to put the chicks under the brooder lamp and raise them ourselves. That was not the desirable outcome.

That evening, when I went out to fill hay feeders for overnight, Dan said there was a chicken under the nest boxes, which are next to Mama Hen's dog carrier. He said she'd been there all afternoon, so we reckoned this one was Mama Hen. If she'd just been in there to lay an egg, she would have left as soon as the job was done. 

After everyone was in for the night, I carefully moved her to the dog crate. The chicks started peeping and she settled down on top of them. What a relief.

Mrs, Chicken, now Mama Hen.

Dan gave her six or seven eggs, and so far, three have hatched.


Can you see the second one?

It will be a couple of days before we know the final count. When the eggs start hatching, the broody hen usually stays on the nest for several more days. This is because she lays them over a period of days, so they hatch on different days. We gave her the eggs all at once (as long as they haven't been refrigerated, they remain viable for chicks), but by instinct, she'll stay on the nest for a couple of days. That's good because it gives us time to figure out how to keep her and the chicks safe. Too many squabbles in the poultry yard for that!

July 17, 2022

Liberating the Hoop House

My last garden project before picking and processing kicked into high gear was liberating the hoop house.

Left untended, the hoop house became an overgrown mess.

Our hoop house is one of those things that never quite lived up to my expectations. Originally, I covered it with poly sheeting in the hope of extending my fall growing season. But our winters have too many warm days which made the hoop house downright hot under the plastic. Everything bolted. Next, I tried covering it with shade cloth to extend my spring garden. That worked better, except one of our cats liked to use the fabric to climb his way to the top of the hoop house. Nice view, but he tore it with his claws.

Couldn't even tell there were raised beds in there, could you?

Eventually, I decided to use the hoop house for perennials. Some of these are reputed to become invasive, but with my raised box beds, I have a better chance of keeping them under control. To offer a little shade from our scorching summer sun, I planted vining ground nuts to cover the hoop house. That worked even better. (You can see pictures of all my experiments here.)

I used the pulled weeds as chop-and-drop mulch on bare spots in the pasture.

Neglect, however, has a way of making one wish they'd been more diligent with a project. Hence, the hoop house turned into a jungle. I've finally been able to tackle that job, and put my hoop house in order.

I only work in the garden in the morning (before it gets
too hot), so this job was spread out over several days.

Most of what I cleared out were volunteer cherry tomatoes, bindweed (unwanted morning glories) wild lettuce, lambs quarter, sheep sorrel, and wiregrass. Some of those are useful edibles, but they were out of control and shading out things that I want growing. I had to think twice before pulling the tomatoes (because I have a soft spot for volunteers) but Matt's Cherry Tomatoes are very prolific at volunteering, and I have more than I can keep up with anyway. So, with some regret, they got pulled.

After clearing out the jungle, everything got a
good watering, a dose of compost, and mulch.

I made some discoveries as I worked on this:

  • I had missed quite a few strawberries that were covered.
  • Last year's malabar spinach had reseeded itself and was growing under a layer of cherry tomatoes.
  • The no-show bloody dock I planted on March 9th, finally decided to grow. At least some of it.
  • My newly planted table grape was decimated by Japanese beetles. Hopefully, neem can save it.
  • The Chinese yams were looking poorly.

Everything seems to be responding to my attention and care, except the dock, which got eaten after it was uncovered. I suspect skunks. We have a prolific population of them this year, and being omnivorous, they like to eat things like that.

As far as what's growing in it, there's not a lot to show you. But I'll close out with a few photos of what there is to see.

Hoop house reclaimed. Hopniss vines make natural shade.

Cultivated grape recovering from Japanese
beetle damage. The neem really worked!

The beetles did quite a bit of damage to the Chinese
yams too, but happily, they're recovering as well.

Fancy bindweed, aka morning glories. I didn't plant these! But they look pretty.

Cultivated burdock and volunteer winter squash.

Malabar spinach

Liberating the Hoop House © July 2022 by Leigh

July 13, 2022

A First Try With Hugelkultur

Last winter, when we were making our garden swale, we dug up a lot of dirt. Some of it became a berm on the downhill side of the swale, but with some of it, Dan decided to try hugelkultur. 

Hugelkultur is a permaculture term that I'm sure a lot of you are familiar with. It's German for "mound culture," which is actually a type of raised garden bed. It's built from dead logs, soil, branches, and sticks. According to richsoil.com, hugelkultur decreases the need for irrigating and fertilizing, plus it sequesters carbon. Since it's pretty much just buried wood, it's a productive way to use up rotting wood, twigs, branches, even whole logs, rather than dumping or burning them. Hugelkultur beds are primarily mounds, but can be made in trenches to be ground level (like my swale beds).

I confess I've been a skeptic because I've read reports from others in hot climates that say they don't work. I even mentioned this in 5 Acres & A Dream The Sequel

"Other gardeners were raving about hügelkultur beds, so I put some research time into the idea. While they seemed to work well in mild climates with fair rainfall, gardeners with hot summers and annual dry spells like mine were giving up on them. Hügelkultur beds appeared to work better in some climates than others. Mine was one of the others."
“Food Self-Sufficiency: Feeding Ourselves,”
5 Acres & A Dream The Sequel (p. 61)

I think what changed my mind was Permies.com, where hugelkultur is a basic tenant of permaculture gardening. The key seems to be the size of the mound. Many people seem to make small mounds, which will dry out quickly. The bigger the mound, the more moisture it can hold. Dan wanted to give it a try, so here we are. Now, I'm wondering if I'll have to eat my words. Well, I hope so! Since we have an abundance of dead wood (mostly pine), hugelkulture would be a great way to deal with it.

Here's our hugelkulture in pictures.

Some people dig them out first, but Dan started with a long pile on the ground.

On top of this, he added sections of old pine logs.

He covered each layer with some of the soil from the swale.

Close-up. Longer longs could have been used parallel to the build,
but these smaller sections were much easier to move and handle.

The whole thing was covered with dirt and then I tossed on a
 clover and pasture forage mix, and covered it with compost.

My concern was that the seed and compost would wash downhill when it rained, It did, though not as badly as I anticipated. In the bare spaces on top, I  poked winter squash seeds into the soil. On the sides, I planted black turtle beans.

May.

June.

Close-up of the forage mix: crimson clover and chicory.

Close-up of one of the squashes planted on top.

Here it is now.

July
Close-up of the squash and chicory flowers. The crimson
clover is done flowering, but red clover is starting to bloom.

I have to say that I'm quite pleased with how well our hugelkultur mound has grown. I know it will take some time before all those logs and sticks break down enough to be of best benefit, but it's a start. The only thing I've watered has been the squash seeds planted on top. The top is where it dries out most quickly, and I want the squash to survive.

Time will tell how successful it will be in the long-run, but so far, so good.

Has anyone else experimented with hugelkultur? What did you think?

July 10, 2022

Poultry Squabbles

Muscovy ducks are seasonal layers. The two females of our trio were laying well until we lost our drake. After that, they continued to lay eggs for a while and then stopped, which seemed early in the year. Shortly after we got another drake, they started laying again. They chose a corner in the chicken coop, prepared a nest, and started laying there.

Sister (on the left) and Mom (on the right)

The chickens, however, are no respecter of Muscovys, and have not wanted the ducks in their yard. They've been very straightforward about their opinion on the matter, but unfortunately, the Muscovys rejected the two yards we made for them, firmly insisting that they wanted to live in the chicken yard. Even after the chickens attacked Mom and pecked her eye out, the ducks stuck with their determination to stay in the chicken yard. Getting Big Duck (our drake) gave the chickens pause in further attacks, but we really would have felt better if the ducks would consent to their own yard. They didn't. Anyway, it was no surprise when the chickens insisted on laying their eggs in the ducks' nest. We dutifully removed the chicken eggs (and chickens), but for whatever reason, the chickens were determined to take over the nest anyway.

So, this latest squabble began when Mom began to brood the eggs. We were really pleased because we would love to have some ducklings. Then Sister went broody too and joined Mom on the nest (which is a good thing because there are more eggs in it than one duck can keep warm.) 

Wouldn't you know it that one of the Speckled Sussex hens decided to go broody too. Great! We want more chicks too! Except! She insisted on taking over the ducks' nest. This greatly upset the ducks, and no amount of repeatedly removing Mrs. Chicken would deter her. I made a second nest with chicken eggs near the first, but nope. Mrs. Chicken didn't want that nest.

If you've ever dealt with a broody chicken, then you know that they are some of the most tenacious creatures on Gods' green earth. I've tried to break a broody in the past (that story here) with zero success. You just have to let them do their thing, except for us humans, that thing means hatching baby chicks, not ducklings.

We finally put her and some chicken eggs in our dog crate. We gave her food and water, and waited. She fussed about it at first, then finally separated out some eggs and set on them. By the next day, she had accepted all of the eggs. We watched her closely and she seemed content for several days. Finally, she wanted out. Of course we let her, hoping she was now bonded to that clutch of chicken eggs. Even so, we kept an eye on her, to make sure. 

On one of my frequent checks, there was Mrs. Chicken, back on the duck nest! Mom ran out in a huff but this time, Sister was more determined. She rooted her way under Mrs. Chicken and tipped her off the nest! I went into the coop to put her back in the dog crate, but she ran out squawking. On my next check, she was back in the dog crate on her chicken eggs and has returned to them ever since. Sister and Mom are once again sharing the ducks' nest.


Projected hatch dates are July 19th for the chicks and August 2nd for the ducklings.

July 7, 2022

Product Review: Elegear Men's Cooling T-shirt

My Luxear cooling blanket product review last month went so well (thanks to you all!), that the company offered to let me review another of their products. This time, it was an Elegear Men's Cooling T-shirt, made with the same Arc-Chill technology that makes the blanket such a fantastic product.

The concept of cooling clothing really intrigues me because Dan and I are essentially outdoor people. Much of our lifestyle involves being outdoors, and in summer, it can get pretty hot and humid out there. In winter, we can always add layers, but in summer, there's only so much that can be taken off!

The Elegear cooling t-shirt is made of a 90% nylon/10% spandex blend. It utilizes the same Arc-chill technology that I love about the Luxear cooling blanket. I won't repeat myself here, but if you're interested in what my research revealed about Arc-chill fabrics, you can find it here. The t-shirt comes in a choice of black or white, and sizes range from medium to XX-large. For this review, I received a medium size in black. 

For my review, I tested it in both outdoor and indoor conditions, comparing it to my usual cotton t-shirt garb.

First impressions

Upon opening the package, I discovered that the fabric was soft, silky, and cool to touch. 

The black, especially, looks more like a dress t-shirt than a work t-shirt. My first thoughts were that it would be perfect for any outdoor summer event for which I wanted to be cool, comfortable, and dressy casual: street festivals, outdoor concerts or parties, Shakespeare In The Park, sporting events, etc. 

I was very curious about the sizing, because ordering clothing online can be iffy. I usually wear a medium in a men's t-shirt, and the Elegear medium t-shirt fit perfectly. The spandex gives it enough shape to keep it from looking sloppy, yet it's stretchy enough to not feel tight or binding.

Outdoor test

We've mostly been in the mid-90sF (mid-30sC) in the afternoons, so that's when I tested it. I stick to jobs I can do in the shade and thought these would be good conditions to put the cooling t-shirt through its paces. 

How did it compare to a cotton -t-shirt? Was it like wearing an air conditioner? Not the way most people like their air conditioning! LOL. The manufacturer rates the cooling effect to be 3.6-9°F (2-5°C). Not comparable to AC, but even with an outdoor temp of 95°F (35°C), the Elegear t-shirt always felt cool to touch. I still got hot and sticky as I worked, but where the technology really shines, is when the breezes stir. Cotton t-shirts are better than polyester, which traps heat, but cotton still blocks the breeze and it's hard to cool off. The Arc-chill fabric, however, somehow worked with the breeze. While it's lightweight, it's by no means flimsy and see-through. Yet I could feel the cooling breeze through the t-shirt. That was lovely! Even better, the heat and moisture wicking effect helped me cool and dry off quickly. I didn't feel sticky the entire time I worked outside.

Indoor test

My indoor test conditions were on the warm side as well. Summer is preservation season, and even with a back porch kitchen, my house kitchen gets hot. For my test, the kitchen was about 84°F (30°C), and I had the ceiling fan turned on high. 

With a cotton t-shirt, I just tolerate being hot when I'm working indoors like that. The fan feels good on my bare skin, but under the shirt I'm still hot. With the cooling t-shirt, I was actually comfortable the entire time I worked in the kitchen. 

Laundering

I wanted to make a special note about laundering, because the Arc-chill fabric can lose it's cooling effect if not handled properly. It's very easy, however: cool water machine wash and line dry in the shade. No clothesline? No shade? Just pop it on a hanger and hang it up in the laundry room or on the shower rod. The hardest part would be keeping track of it in the laundry to not accidentally run it through the dryer.

Conclusion

I admit, I was skeptical at first. But I gave it a fair try and discovered that the more I wear it, the more I like it. Now, if we have a forecast for another super hot day, I find myself reaching for my cooling t-shirt. I definitely want to have a couple of these in my summer wardrobe. For myself, and Dan too.

Besides the uses mentioned above, I think folks who are trying to cut back on their air conditioning might want to give this t-shirt a try. It could definitely help under those conditions too.

Shopping link and discount coupon!

Discount Code: KTGSIXJV (for 10% off)

For me, this is another way to help beat the heat! And we certainly seem to need it this summer.