Showing posts with label food preservation. Show all posts

August 10, 2026

August is Applesauce and Vinegar Month

 The apple harvest is at hand. 

It's been a good year for apples, and that has meant my afternoons are spent making and canning applesauce. 

I'm made applesauce two different ways in the past. The first is to quarter the apples, simmer them till tender, then run them through the food mill. But then I learned how to make vinegar, and changed my prep method to save the peels and cores for making apple cider vinegar. 

The peels and cores go into a glass gallon jar, covered (submerged) in water, and allowed to ferment.


After a couple of weeks I'll strain off the new vinegar, jar it, and lid the jars to let it ferment a few weeks more. It will keep until we use it. The leftover peels and cores are fed to the goats.

The peeled and cored apples are simmered with a bit of water until soft.

Apple chunks simmered to softness with a cinnamon stick.

Once the apples are cooked, I can either puree them in the blender for smooth applesauce, or mash them with a potato masher for chunky applesauce.


The apple puree is scraped into another gallon jar. I work on this several hours every afternoon and when I have a gallon's worth, I sweeten if needed and add water or juice for applesauce consistency. Then I water bath can it in quart jars.

2026's first batch of canned applesauce.

Elderberry harvest is in progress as well, and the first of the muscadines are beginning to ripen. Cheesemaking continues, although production is slacking off. Busy days ahead. 

What's everybody else up to? Staying busy, or staying cool?

January 11, 2024

Dehydrating Cranberries

Right after the holidays, seasonal food items that we like go on clearance. There are several things that I look for and stock up on, like molasses and dried dates. This year I bought several bags of fresh cranberries for 99¢ each.


I especially enjoy dried cranberries on my breakfast granola when there's no fresh fruit in season, and I thought it would be nice to make some without the stuff commercial processors like to add.

I consulted my two books on dehydrating foods to compare instructions.

Mary Bell's Complete Dehydrator Cookbook and
Making & Using Dried Foods by Phyllis Hobson

I always like to look at more than one source for projects, to compare notes and possibly pick up unique tips. Their directions were similar and started with popping the raw cranberries into boiling water until the skins cracked. (No pic). Then they went into a bowl where I coated them with honey.


Then it was onto the mesh dehydrator screens.


Both sources recommended a low heat for 10 to 12 hours. What I found however, was that mine still weren't dried in that time. I had to repeat the drying several times. While it took a long time, I ran the dehydrator at night so we benefited from its little bit of heat in the kitchen come morning.


I removed the dried ones along the way and eventually got them all done! 

When I tasted them, however, I was dismayed that the honey didn't help sweeten them at all. So when I put them into a half-gallon jar, I sprinkled with unbleached sugar. 

My final yield was 5 cups.


Because of how long it took, I doubt I'll try these again. And I will probably save these for baking, rather than eating on my granola. But I'm glad I gave them a try anyway.

November 20, 2023

Product Review: Fresh Keeper by Luxear

I don't often do product reviews, but when I was contacted by Luxear, I was really interested in doing this one.  Luxear is the same company that makes those fantastic Arc-Chill cooling blankets that I love. So I already have confidence in their products and this one, Fresh Keeper Refrigerator Storage Containers, sounded like a must have. With a garden like mine, something to help keep things fresh would be a real bonus!


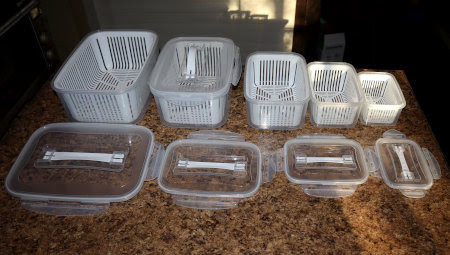
The box contained a set of five storage containers with lids.


These included a good range of sizes: 

196 oz, 129 oz, 78 oz, 46 oz, and 24 oz.

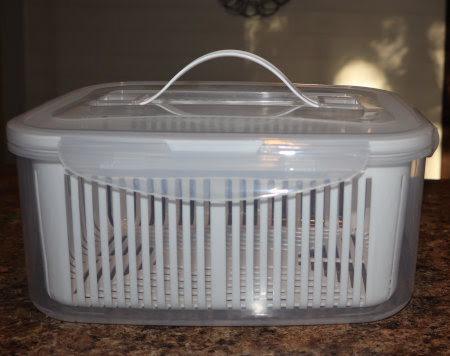
I like the lids, both the carrying handle and the way they snap on.

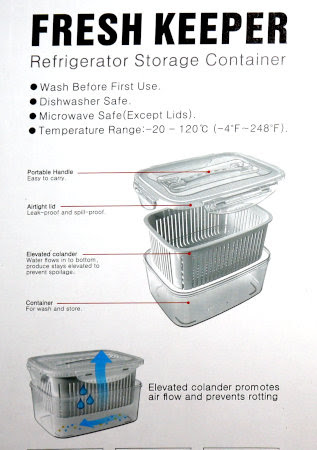
The removable colander is nice for rinsing produce before storage.

I'm going to confess here, that I wondered if the freshness wasn't due to some sort of chemical additive, but no. The fresh keeping is just simple common sense.

The inner colander lets moisture drip off
and allows for air flow to keep foods fresh.

These can be used for any fruit or vegetable, so for my test, I chose fresh picked garden greens. I washed them well, shook off the excess water,and divided them into thirds. One third went into the Fresh Keeper, one went into a ziplock bag, and the other will be wrapped in a paper towel to store.

Then I popped them all into the fridge. 

Day 1

I checked them daily. Of course, the greens on the paper towel wilted the quickest, so the real competition was between the greens in the plastic Ziploc bag and the Fresh Keeper. After 7 full days, the difference started to show.

Day 8

The greens in the ziploc were beginning to lose color and wilt. The greens in Fresh Keeper were just as fresh looking as the day I picked them.

Conclusion? Fresh Keeper is definitely a keeper! The Amazon link is here. And the good news is that Luxear has given me a 10% Amazon discount code to pass on to you. They're currently running a Black Friday Deal, so the discount will count on top of that!

Seller Rywell Direct:4QL428NE 
Seller LUXEAR Inc:ETUJOFJH
Expires 12/31/2028

(Not in the US? You can order directly from the Luxear website.)

With the discount, these would make great holiday gifts. 

August 25, 2023

Garden Notes: August 2023

 Rainfall 

  • 2nd: 0.02" 
  • 3rd: 2.72"
  • 7th: 0.35"
  • 9th: 0.2"
  • 10th: 1.07"
  • 11th: 0.04"
  • 12th: 0.44"
  • 24th: 0.28"
  • 27th: 0.23"
  • 28th: 0.43"
  • 29th: 0.45:
  • 30th: 0.14"
  • Total: 6.37 inches

Temperature
  • range of nighttime lows: 62 to 75°F (17 to 24°C)
  • range of daytime highs: 76 to 95°F (25 to 35°C)

Weather Notes

The weather service keeps trying to forecast us into scorching temperatures, but Mother Nature simply isn't cooperating. Of course, we live amongst trees and vegetation, so our temps will be considerably lower than in towns and cities, where concrete, asphalt, and blacktop absorb and retain heat. Even so, we still have humidity to deal with, so it feels hot as usual! What is unusual, is our continued overnight lows in the 60s. I don't ever recall nights like these; our summer lows are usually in the mid-70s. Getting down into the 60s really helps cool the house down and keep it more comfortable during the day.

Planted
  • kale
  • turnips
  • carrots
  • parsnips
  • collard greens
  • lettuce

Picking and Preserving

August is my busiest month. I spend the morning picking and the afternoon preserving.

Harvest bucket in early August

Harvest bucket in late August

It's the month for figs and pears, so these keep me busy.


We seem to have had an extra long run for the figs, which usually only last a week or two. They kept producing for more than three weeks this year. 

Fresh figs with kefir and granola

When the harvest is in full flush, I can pints of figs. When it trickles down to smaller numbers, I quarter and dehydrate them. Sadly, another of our fig trees is dying. That's the third one in as many years.

Amazingly, we have very little bird damage to our figs this year. I suspect it's because they're feasting on elderberries instead.


While I'm not getting a lot of elderberries, I did get enough to make another half-gallon of elderberry infused vinegar. 


We eat pears fresh and the rest go to make pear sauce. 


Dan's not keen on canned pear pieces, but we both like pear sauce, which I think is easier to do than chunks anyway. Most of the sauce is canned, but I'm going to dehydrate some too.

Fresh pear pie

I guess because of the rain and cooler temperatures, my cucumbers continue to look good.


These are my landrace cucumbers, second year. As it gets hotter they slow down a bit, but I've replenished our dill pickle supply and we continue to eat them in salads almost daily. 

Peppers are doing well.


As is the okra.


I had volunteer cherry tomatoes come up in the okra bed. They sort of lean on the okra plants, making them easier to pick. Both seem to be getting enough sun and are producing well.

Okra and tomato plants growing together.

I try not to plant too much okra, because one year I had so much I still had okra in the freezer when the new harvest came in. Frozen okra oven-fries nicely and makes a tasty vegetable, but we'd eaten so much of it over winter that the first fresh harvest wasn't as appealing as it usually is. I love the anticipation of those first seasonal tastes. 

Even so, I'm freezing some of the extra.

Ready for the freezer. I'll add more as I have extra.

The nice thing about okra, is that it can be frozen without blanching. I may try to can some with cherry tomatoes as an experiment too.

Speaking of cherry tomatoes, we have those in abundance. I only have half-a-dozen slicing tomato plants, but the cherry toms absolutely thrive. I've already shown you some of the pizza sauce I made, and I've been popping extras in the freezer for next year's batch. Also, I've started a couple of jars cherry tomatoes preserved in olive oil. I found the recipe in Preserving Food Without Freezing or Canning and I tried a couple of pints last year, and we really liked it. 


This year I'm going to preserve a couple of quarts. The recipe calls for cherry tomatoes, small onions, and fresh herbs (I used rosemary, thyme, and oregano). Everything is sprinkled with salt and a couple tablespoons of vinegar or lemon juice, then covered with extra virgin olive oil. I vacuum seal the jar as well. 

These make a wonderful condiment or salad topper, complete with tomato and herb flavored oil and vinegar salad dressing right out of the jar!

My watermelons have been incredibly slow to do anything.

Baby watermelon

I hope we get some before first frost!

And here's a treat.

Asparagus!

I always thought asparagus was a spring thing, but I've been regularly cutting small handfuls this month. They make a great snack, addition to salad, or scrambled eggs. 

Speaking of salads, I usually show you one.


This is my version of taco salad, with chips instead of a taco bowl. Avocado makes it special, as does the sauce, which is ricotta cheese mixed with salsa. We've been eating these once a week.

Varmint

Earlier this month I had a problem with something eating the leaves off my sweet potato plants. Dan put out his live animal trap and trail camera one night, and caught this!

Raccoon in live animal trap.

That's pretty much it for my August garden. How about yours?

January 10, 2023

An Experiment in Making Jerky

Last month, I showed you my first experiment in off-grid meat preservation, making pemmican. That was definitely successful, so next, I wanted to try making jerky. 

Jerky and pemmican are both dehydrated meat products. What's the difference between the two? Jerky is mostly thought of as a snack food, while pemmican is thought of as a survival food. Jerky highly seasoned and dried until it's pliable. Pemmican is not seasoned and dried until crisp, so it can be powdered for the next step.

For my jerky experiment, I started with 1.62 pounds beef bottom roast from my local not-a-chain grocery store. They have really good meat prices, and I found this roast "reduced for quick sale" for $3.99 a pound. I got started on the jerky that afternoon.

There are probably hundreds of recipes for jerky. Many of them call for jerky seasoning mixes. Most of the other ingredient lists include soy sauce and often Worcestershire sauce. Sweetener is optional and may be sugar or honey. The seasonings and spices vary a bit, so I used what I had. Commonly called for ingredients that I didn't have were soy sauce, smoked paprika, red pepper flakes, and liquid smoke. I did have Bragg's liquid aminos, so I used that in place of soy sauce. I jotted down the ingredients and amounts, so I'll know what to adjust if I do it again!

Ingredients
  • 1/2 cup Worcestershire sauce
  • 1/2 cup liquid aminos
  • 2 tbsp honey
  • 1/2 tsp black pepper
  • 2 tsp onion powder
  • 1/2 tsp garlic powder

Marination time recommendations in the recipes varied from 3 to 24 hours. 


I marinated this batch for about 7 hours, drained it well, and put it in the dehydrator. It took about 8 hours to become slightly pliable and thoroughly dry.

Beef jerky

Then came the taste test. I'd never eaten jerky before and found it flavorful but chewy. Dan said it tasted just like the stuff from the store and declared the recipe perfect! (It's not often I get something right on the first try!)

To store, I packed it into a wide mouth quart canning jar and vacuum sealed it.

So this experiment is declared a success! Who else makes jerky? I'd love your recipes!

December 9, 2022

Pemmican: An Experiment in Preserving Meat

When I wrote Prepper's Livestock Handbook, I researched off-grid meat preservation methods and came up with quite a few. What surprises me now, is that I didn't think of pemmican. Pemmican is one of those things I recall reading about in grammar school history lessons about Native Americans and the early English and French explorers. I'm not sure why it didn't come to mind when I did my research for that book. 

I was reminded of pemmican when I was watching videos to pass the time while I shelled pole bean and turnip seeds for next year's garden. I subscribe to two historical cooking YouTube channels, and I ran across pemmican videos on both. Off-grid food preservation interests to me, so I did a little more research and decided to give it a try.

What is pemmican? It's a historical staple food of the Indigenous peoples of North America. Basically, it's dried meat, traditionally made from buffalo bison or venison. After it's dried (typically by the sun or campfire), it's powdered and mixed with melted suet or tallow. Sometimes, it contains dried fruit, but sometimes not. During WWI, the Norwegian army produced a version containing dried vegetables. Most importantly, it's shelf stable, which means it doesn't require refrigeration for storage. That makes it ideal for long trips, when hunting or stopping at the convenience store isn't possible. It's a concentrated source of protein and calories, and because it's fully cooked, it can be eaten as is (which is why it's often thought of as a survival food), or as an ingredient in soup, stew, or hash. 

The ingredients are simple: lean raw meat and suet or tallow. Since dried fruit is optional, I opted for a plain version. Here's the process in pictures.

Lean, top round beef roast. It weighed 2.42 pounds.

Cut cross grain into thin strips for dehydrating. No seasoning added.

Dried crisp, which took about 12 hours in the
dehydrator. The dried weight was 0.75 pound.

Pemmican is different from jerky in several ways. One is that it is cut cross grain instead of with the grain. Jerky is highly seasoned and dried until it's pliable. Pemmican is not seasoned and is dried until crisp. 

Cutting cross grain meant it was easy to snap into pieces for the
next step. Here it is in my power blender, ready to ground fine.

Meat "powder." (Actually, more like very tiny fine shreds.)

If suet is used, it needs to be rendered, i.e. melted to remove non-fat bits. If it's made from pig fat it's called lard. If it's made from cow, sheep, or goat, it's called tallow. My blog post on rendering tallow is here. Since I already had it, I just had to melt it to mix with the finely ground dried meat.

Melted tallow is added to bind the meat powder together. The amount
is roughly the same weight as the meat or less. I used my goat tallow.

It needs enough tallow to hold together without being overly
greasy. Gloves were recommended for easier hand clean-up.

Pressed into a mold and allowed to cool.

Turned out of the bread pan mold after a night in my unheated pantry.

Mine was crumbly when sliced. I'm guessing
this means it could have used more tallow.

Of course, we sampled it, and it wasn't what I expected. I watched a number of prepper videos where they sample it and think it's extremely bland and tasteless. Nobody seemed to care for it much and thought it's best use was for survival food. Dan and I thought it just tasted like beef. Not terribly greasy, and it could have used some salt, but the flavor was fine.

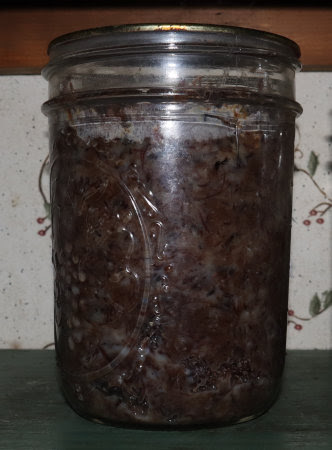
I packed most of it into wide-mouth pint
canning jars and then vacuum sealed them.

So, what will I do with it? Modern thinking classifies pemmican as a survival food, to eat as-is in a bug-out or emergency situation when one is unable to cook. For that, I think the addition of powdered dried fruit would help, not only for flavor, but to provide much needed carbohydrates. Historically, however, pemmican making was a food preservation method, and it was cooked, or used as an ingredient. As an ingredient, I found two recipes for it: rubaboo and rousseau (or rechaud). 

Traditionally, pemmican was stored in skins rather than molded as most modern instructions call for (because how many of us have a few storage skins handy?) For my second batch, I added salt (1/4  tsp. per 1/4 pound dried meat) and packed it directly into pint canning jars. 

1/2 lb dried meat + tallow = roughly one pint of pemmican

I can scoop out what I need when I use it.

When we taste tested this batch, we thought that the salt ratio of 1/4  tsp. salt to 1/4 pound dried meat was perfect.

Next time, I'll share how I made rubaboo and what we thought of it. (Click here for that blog post).

Resources:

© Dec 2022 by Leigh at  http://www.5acresandadream.com