Continued from here.
It's been awhile since my last sewing room blog post, so I have a lot to show you. Pictures will tell it all.

|
|
Trimwork done, ceiling painted, walls washed.
|
For painting, I kept the same color scheme as the room originally had: white
ceiling and crown molding, light green walls. The paint was leftover from when I
painted our bedroom years ago, and amazingly, it was still good.
 |
| Hard to catch the actual shade of green. |
One challenge with the trim was that Dan couldn't match the new with the old.
We couldn't find the same crown molding for the ceiling, nor the cove molding to finish the
baseboard. For the closet and now where he covered the old outside doorway, he went with something
completely different. So, I painted it a bit differently too.
That's how a problem becomes a design feature. I think it looks okay. Actually, I can visualize turning that panel into a chalk or corkboard, except
that I need the wall space for shelving and storage.
I also had to address the tiny closet.

|
| Closet before painting |
Its plywood walls were stained dark green and the floor was painted dark brown. Those colors plus the cob-webby ceiling gave it a creepy feeling. Being small and having no light, it was difficult to photograph.
 |
| Closet after painting |
Big difference, huh? I like it! I will use it mostly for tote storage.
Then it was time to start moving in, with shelving and area rug first.
Amazingly, the area rug fits perfectly. I found it at
Ollie's ("Good
Stuff Cheap"). I'm hoping it works well for a sewing and fiber room floor because the colors
aren't solid. Every other stripe is two-tone. Maybe that will help "hide" random threads and fibers that inevitably end up on the floor!
 |
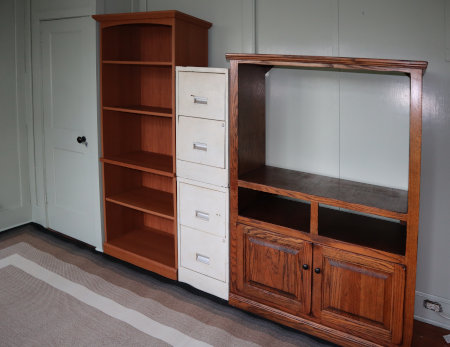
| Shelves, filing cabinet, and old-fashioned TV cabinet ready for stuff |
After we got a flat screen TV, I almost sold the TV cabinet, but now I'm glad I didn't. I kept it because it's oak, and I figured it would be useful someday. I have
storage containers that will work well there. The filing cabinet will be
perfect for patterns, handouts, and loose leaf project instructions I've
collected.
On the exterior wall of the room, I used my tall bookcase as a room divider because I didn't want to cover any of the windows. I painted the back of it the same color as the walls, so it makes a corner on that wall.

|
|
Still to hang - curtains, And the baseboard needs to be finished. |
I want to put a work/cutting table in that corner, so I've started checking thrift stores for an old dining table for that
purpose.
As you can tell by my using the bookcase as a room divider, I'm not using the
entire room for my sewing area. The actual length of this room is 20 feet, but
I'm using 11 feet of it. The other side opens up to the living room (original photos here), and that's the side where the door to the greenhouse will go.

|
|
The tall left-hand window will be replaced with a door.
|
After the door is in, Dan will finish the back wall too.
The next step is going through my fiber, fabric, sewing, spinning, and
weaving boxes and deciding where to put everything. All of that will likely take some time, but eventually I will have a functional sewing room to show you!
Next: Sewing Room Sneak Peek


