February 27, 2015

Evolution of a Room

Click the link in each caption to see the entire room.

The Sun Room before we moved in, May 2009

My Studio, June 2009

When we began our ongoing repair and remodeling projects we needed a place to store everything from whatever room we are working on. This 9.5' by 20' room became that place, except for setting up a small office space for the computer at the far end, near the front of the house.


When we started on the front porch I needed to dig out the new front door from that room. As I was moving boxes out of the way I had a sudden "why didn't I think of this before" moment. It occurred to me that I could swap my office with storage space. So .......

My "new" office. View from the living room looks a
zillion times better than the piles of boxes and stuff.

I created a wall with bookshelves and boxes. The quilt
insulates & gives access to the storage part in the front.

Curtain fabric came from my stash. Carpet was
a remnant from carpeting the master bedroom. 

Gardening and homesteading books readily accessible

With nine large old windows and no insulation, this room has been a sweatbox in summer and an icebox in winter. This new arrangement is not only more convenient, but now I get the benefit of heat coming from the wood stove in the living room. The curtains help in blocking the cold seeping through the windows. The only thing I had to buy for this remodel was the little throw rug in the doorway.

The room itself is pretty much last on the house project list. I haven't wanted to think about it because it seems there's nothing for it except tearing the whole thing down and rebuilding from the foundation up, including the foundation. Dan recently proposed a brilliant idea which would serve a double purpose - rather than rebuilding the room, add a lean-to sunroom / greenhouse along the length of the room on the outside. It would insulate and solar heat the room without having to replace all those old windows, plus give a greenhouse the benefit of warmth from the house. Considering that we have more projects than time and money, however, I'm guessing we'll get to this one somewhere around 2035. That's assuming we live that long and the zombies don't take over first.

February 24, 2015

Bone Broth Days

Sleet, snow, ice and freezing temperatures last week were all good reasons to stay inside and close to one of the woodstoves. When the weather forecast called for our first real winter storm of the season, I decided it was time to make my annual supply of bone broth.

Monday
Low 27° F / -18° C
High 35° F / 2° C
0.5 inches of sleet and freezing rain

Only a quarter inch coating of ice on the tree branches, not bad

Dig through the freezers for the the various bags of bones I popped in over the year. These are set in bowls in the chilly pantry to defrost.

Treks outside to fill hay feeders and top off water buckets with hot water are frequent, but having that good wood heat to come back to is a comfort.

Tuesday
Low 31° F / 0° C
High 35° F / 2° C
Ice begins to melt but refreezes again

Frozen sleet encrusted the ground, bushes, and trees, but not the goats

Begin soaking defrosted bones in mild vinegar water (1 tablespoon apple cider vinegar per half gallon of water) to dissolve the minerals. The long soak followed by two days of simmering extracts calcium, collagen, magnesium, phosphorus, silicon, sulphur, chondroitin sulphates, and glucosamine from the bones.

This is the first year I've had chicken feet to add to my broth. These are rich in glucosamine chondroitin, collagen and other trace minerals.

Chicken feet, scrubbed, declawed, & set to simmer before peeling

Wednesday
Low 22° F / -5° C
High 37° F / 3° C

Coffee, more toast, & a pot of bone broth

Day one of simmering.

Shards of ice break free from tree branches and sprinkle down everywhere.

Thursday
Low 13° F / -10° C
High 28° F / -2° C

Day two of simmering.

In one of my frequent critter checks I find Surprise shivering from the cold and have to do something. First make-do goat coat was a towel secured with grosgrain ribbons. That didn't last. Second coat was made from an old sweat shirt worked better.

Surprise in her goat coat.

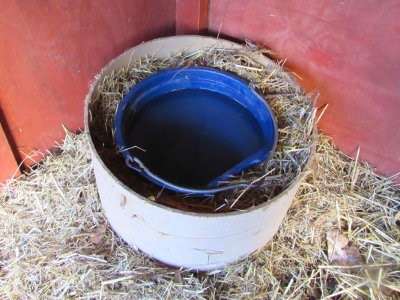
Keeping water from freezing is a concern, but since this kind of weather is the exception for us, rather than the norm, I can't justify buying electric water bucket heaters and stringing power cords all over the property. We make frequent hot water trips instead. This helps ...

Insulating the water bucket with manure and straw

The composting action of the manure and straw produces heat. Overnight, ice in all other buckets was too thick to break by morning, but this bucket was just starting to form ice on the water surface.

Friday
Low 10° F / -11° C
High 35° F / 2° C

Strain broth, set in fridge to cool.

Warmer temperatures are predicted over the weekend and the ice has slowly been melting. Actual damage from the ice and wind hasn't been too bad, with only nominal damage to the fence.

It was fortunate only the top of the tree landed on the fence.

Saturday
Low 29° F / -1° C
High 40° F / 4° C
0.55" of wintry mix

Skim the chicken fat from the stock but there isn't much. A good bone broth will be congealed when it's chilled.

Looks to be a good batch. I'll add salt to each jar I can.

Bring the broth to a boil for canning. Get the canner, clean jars, and lids ready. While everything is heating, pick the meat from the cooled bones.

Can the broth. I like pints the best because it's just the two of us. I use them for soups, stews, gravies, and cooking grains or beans.

Open a quart of home canned chicken and make a homestead chicken pie for dinner, adding the meat bits. If there had been enough chicken fat, I would have used it to make the biscuits, but there wasn't.

Yield: 15 pints

A few mild days and nights bring some relief, but they're calling for snow tonight and tomorrow. I hope all of you are staying safe and warm.

February 22, 2015

Goat Sized Butter Churn

Back in my back-to-the-land days I had a hand-crank butter churn. It was one of those small ones - a square gallon jar with a crank on top. I kept it for a long time in hopes that I'd someday have a cow for cream and butter. Along the way it got given away, something I've somewhat regretted. Of course, getting a gallons-worth of cream from goats is hardly feasible with the number of goats I keep. I've not minded my shake-a-jar method but I've still wished I had a butter churn.

You can imagine how delighted I was to find this one on Amazon. Made in France, it will hold 17 to 27 ounces of cream. At the time it was $87 so I added it to my wish list where it remained for some time. When the price went up I regretted not getting it sooner, but oh well. It continued to sit on my wish list.

The other day I was ordering something from Amazon and noticed that there was a "used - like new" one of these listed for $64. I jumped on it!

The amazing thing was that it wasn't used at all, it came wrapped and packaged like brand new.

Although I'm getting less than a quart of milk per day, I've been hand skimming my milk all along and storing the cream in the freezer. To try out my new churn I defrosted three cups (24 ounces). I let the cream sit out until it reached (approximately) the recommended 65° F (18° C), and then started churning. Within less than eight minutes ...


I do love proper low-tech tools.

Kidding starts next month here, and I am very much looking forward to trying Kinder milk. Kinders give such a high percentage of butterfat (about 7%), that between my new cream separator and butter churn, I should have a good supply of butter for both table use and cooking, plus buttermilk for baking and cheese making. I am so looking forward to that.

February 18, 2015

How-To Home Soil Tests

How has everyone fared this winter storm? Being ice bound has given me some lovely, guilt-free time to work on my writing projects. The result is that I am very pleased to announce the fifth ebook in my The Little Series of Homestead How-Tos.


I'm hoping it will be a useful resource for gardeners, homesteaders, homeschoolers, or anyone interested in the soil.

Chapters:

What Is Soil?
How To Determine Soil Texture
    Touch Test
    Ball and Ribbon Test
    Soil Texture By Feel Chart
    Canning Jar Test
    Texture Triangle (chart)
    How To Use the USDA Web Soil Survey
How To Test Soil pH
    How To Dig a Soil Sample
    Kitchen pH Test
    Red Cabbage pH Test
    How To Make Cabbage pH Paper
    Litmus or pH Paper Test
    pH Meter Testing
How To Read Soil Colors
How To Test For Drainage
How To Do an Earthworm Test
How To Read Your Plants
    Symptoms of Deficiency
    What Your Weeds Can Tell You
Why All Soil Lab Results Aren't The Same

Like the other ebooks in the series, it includes a glossary and resources for digging deeper.

List price is $1.99 USD, but I am offering it for free - today and tomorrow only. The free offer is at Smashwords, where you can choose any eReader format, including a PDF version for those who wish to read it on their computer. Simply enter the code RZ77V (expired) at checkout.

It's also available at Amazon, although I don't have an option there for a coupon code there. Still, for $1.99 you can have it auto-delivered directly to your Kindle.

I very much hope you will enjoy it, and that you will consider it worthy of a good review at either Amazon, Smashwords, or both!

February 15, 2015

How To Get Heat From a Soapstone Woodstove

Our woodstove. Installation details
and close-ups - click here.
I know that seems a very odd title for a blog post. After all, woodstove + wood + fire = heat, right? You'd think so, but interestingly enough, we get quite a few blog visits through various search engines with the search terms - "soapstone", "not putting out heat", or "no heat". If this describes you, then perhaps I can help.

We have a Woodstock Fireview Soapstone woodstove, complete with a catalytic combustor. My tips will apply specifically to it, but hopefully will be useful for similar stoves of different make and model.

This stove is rated to heat up to 1600 square feet, but because of the soapstone, it is slow to do so. The appeal of soapstone is its ability to retain heat. Even after the fire has long gone out, the stove will be pleasingly warm to touch. The problem is that soapstone, unlike cast iron, takes awhile to heat up. This is one reason why it's slow to heat the house.


What we've learned, is that the soapstone plus catalytic combustor requires a different technique than a cast iron woodstove. With our past cast iron stoves, we would get a good fire going and then damp it down to regulate the burn. Doing so with this stove means it takes a very long time to produce enough heat to warm the house.

The key is to start the fire and keep the damper all the way open until the stovetop thermometer registers in the catalytic burn range.


As soon as the temperature hits that mark, engage the combustor and damp down the stove. The result is that the gases start to burn and glorious heat quickly begins to radiate out. Depending on how cold the house is, it still takes time to make the farthest rooms more comfortable. Fans help, of course.


Once the house gets warmed up it doesn't to take a roaring fire to keep it comfortable. The energy efficiency of the house is a factor here, and we've been enjoying better heat retention as we upgrade our windows and add insulation.

I should also mention that the configuration of the house is a consideration for any woodstove. We have about 1500 square feet of living space, with the soapstone stove in the living room in the front of the house. Because of the arrangement of walls and doors, the hardest room to heat is the kitchen at the back of the house. However, for that we have our wood cookstove. Between the two, we are very comfortable indeed.


February 13, 2015

Progress on the Bay Window? Not Much

Our recent run of nice weather has seen us busy with the forest garden hedgerow rather than working on the house. Even so, I had hoped to have painted the front porch by now. I did manage to get on the primer, but then it turned a little too cold for painting.

Bay window primed, but we need warm weather for a couple coats of paint.

On rainy days Dan has been working on the window interior.

Certainly lightens the living room. 

We debated about what to do with the area under the window seat. The window was framed out right on top of the new porch decking, so that's its floor. The decking boards have some rather nice gaps between them which allow quite a draft into the living room. The first step was to cover that.


The plastic helped, except when breezes poofed up the plastic. Dan placed a piece of plywood over the plastic, and insulation on top of that.


We decided not to make a storage space under the window seat. This is because we have so much trouble with humidity and mildew, especially in spaces that get little air circulation. This was a huge problem in our old bedroom closets, even when I left the doors open.

The space has been claimed.

The seat itself is made of finished plywood, stained, and polyurethaned. I think it looks real nice.

There is still a lot to do, but finishing this is not our top priority. When we prioritize, our motto is "food first." That includes both for our livestock and us. Dan's not one to leave projects unfinished, but sometimes, house projects have to wait. This latest cold snap may see a little more progress, however, and that will make him happy.

Next → "Finishing The Window Seat"

February 11, 2015

Volunteer Day Rooster

Our volunteer day rooster
Well, we didn't remain roosterless for long. No, we didn't go out and get another rooster; rather, the junior rooster from next door was quick to notice that our flock of lovely hens was without, and quickly made himself available for the job.

The first I realized he was there was one morning when I went out the back door and heard a rooster clucking his prettiest "I found a treat to eat" song. There he was in our backyard, clucking to about half a dozen of my hens who were in the chicken yard, on the other side of the chicken wire fence. They were extremely interested in what he'd found, but couldn't get out to get it.

The next morning, Mr. Rooster was in the pasture with the hens, just as happy as he could be. He's shown up every day since, not that he's been invited to stay (by the humans, that is), but the hens haven't discouraged him either. I'm not sure if our next door neighbors have noticed, but I'm sure their senior rooster doesn't mind getting rid of the competition.

Unfortunately for him (but fortunately for us?) he can't quite figure out how to get into the chicken yard.

He's on one side of the chicken yard fence ...

the hens (who come and go as they please) are on the other.

The chicken entrance into the yard is a bit tricky because I'm routing them into the front pasture. I did that when I replanted the back pasture and didn't want them gobbling down all the seed.


To go out to the pasture they have to go out the chicken gate ...


... then follow a small lane I made with a scrap of fence. I tied it off on the gate you see above, which is propped open for the time being. From there they head on out. The barn red building you see off in the distance in center of the photo is the goat shelter.

Getting back is a bit trickier, however, because the chickens have to remember where the entrance to that lane is. The bright ones do, but a few of the others initially bypass it and end up in the corner instead. They "remember" when they see another chicken make it successfully back into the yard.

Hens in the compost with Mr. Roo
watching from outside the chicken yard. 

Our volunteer day roo is usually around at chore time, so Dan or I toss him scratch over the fence. But no one is going out of their way to show him the secret entrance to the chicken yard. So, during the day he happily escorts the hens around the pasture, but heads back home for the night. For the time being, it appears to be a pretty good arrangement.

February 9, 2015

One Recipe for Canned Greens

When I was a kid my favorite vegetable was spinach - canned, frozen, it didn't matter. My mom never got fresh spinach, which later opened up a whole new world for this spinach lover. For growing myself, I find spinach rather short lived in my garden in my garden because it bolts too quickly, but I love other greens as well.

Probably our least favorite is Swiss chard, but one summer I had oodles and oodles of it and so canned a couple dozen pints of the stuff. Yes, I know frozen is better but my freezer is small and filled with other things, so canning was my next best option (although dehydrating isn't bad either). Well, it didn't go over so well, until I devised a couple of recipes to make it more palatable. This one is easy, tasty, and even requested.

Canned Swiss Chard with Onions & Garlic


  • 1 pint canned Swiss chard (can substitute fresh or frozen)
  • 1/2 half cup chopped onion 
  • 1 bulb (yes bulb, not clove) garlic 
  • drizzle of olive oil
  • dash of Balsamic vinegar
  • salt and pepper to taste 

Drain the chard. Saute the onion and garlic in olive oil until translucent (Dan likes his slightly browned). Heat until warmed through, season with salt and pepper, and a dash of Balsamic vinegar.

Recipe Notes:
  • Strong flavored greens match well with other strong flavored ingredients. 
  • Any green can obviously be substituted.
  • If you make your own butter, that can be substituted for the oil and vinegar, to make this an almost 100% homegrown side dish. 
  • I give the liquid from canned veggies to our pigs.

I've since learned that we can grow kale and collards almost all year around, so canning greens isn't necessary. Any extra greens are dried for my goats' vitamin and mineral mix, or to add to soup. Still, we like this recipe well enough that I do enjoy keeping canned greens available. 

Do you like greens? What's your favorite recipe for them? I'd love to know!

February 6, 2015

15b0513

Cheese 15b0513

I have not blogged about cheese making in a long time. This is mostly because I didn't make any hard cheeses this past summer, I focused mostly on mozzarella. The reasons for that was 1) we had all twins and triplets which meant more milk going to kids, and 2) of my 19 previous cheeses, only a couple had been okay. I was considering giving up on hard cheeses.

The other day I looked in the fridge and saw two cheeses left. I grabbed one thinking it would probably be another flop, but suitable for the pigs. I was surprised at how pretty it looked when I cut it open. I took a cautious taste. It was sharp, having aged for about a year and a half, but it was pretty good! I made myself a grilled cheese sandwich and was pleasantly surprised. This cheese was very good.

Labeled 15b0513, it was a second try at one of my repeatable cheeses - No. 15. It's a washed curd cheese using aged mozzarella whey for the culture (I don't buy cheese cultures). Washing the curd means that instead of "cooking" the curd in it's own whey, the whey is drained and the curds are "cooked" in warm water. The result is a milder cheese. Rather than give you the entire recipe in this post, click here if you're interested in that.

The thing that seems somewhat providential in this tale, is that the very next day I went to buy hay. I hadn't purchased hay from this source before, a dairy farmer about an hour's drive away. They grow and cut their own hay, this one being triticale cut in the milk stage. That means that it was cut before the grains had ripened, so that the critters get the entire plant - leaves, stems, and immature grain heads - very nutritious. Anyway, when he found out I had goats the gentleman asked me if I made cheese. I hesitantly said yes. He said he had hay available all year and if I was willing, he would love to trade cheese for hay. (!!!!)

Oh, the "15b0513"? It's just a code I made up to keep track of which cheese is which. 15 is the original cheese number, b means it's my second try, and 0513 refers to the date I made it, May 2013.

I can only add that my cheese journal, with detailed notes about all my hard cheese experiments, is invaluable. I even notated which goat's milk I used. I think that's significant because my 1st year of cheese making included Jasmine's milk. For those who don't know or may not remember, Jasmine was a Nubian of mine with a lot of health issues. Her milk tasted fine, but why should I be surprised that the cheese from it wasn't the best? If what they eat can effect the taste of the cheese, why wouldn't subclinical health problems?

Now I'm excited about making cheese with my Kinder milk. First kid(s) due in mid-March. Second kidding will be early April. There's nothing finer than new kids, fresh milk, ... and cheese!

15b0513 © February 2015 by Leigh
at http://www.5acresandadream.com/

February 4, 2015

A Start on the Forest Garden Hedgerow

I was very excited to get some preliminary ideas for our forest garden hedgerow down on paper (i.e. the Master Plan). Also to start a list of possible things to plant. The next step to making it a reality was to go out and assess what is growing there already. We decided the oaks should stay (acorns), also the sweet gum (for the time being), but the black cherries needed to come down.

The goats were right there to "help".

This is because wilted black cherry leaves can be toxic to goats, so I wanted to replace them with something better for them, and good for us.

The next step was to start fencing in the area, so I can start to plant.

The gnarly shrub on the right is a wild rose bush. The goats have
all but killed it and I'd like to save it for the wild rose hips. 

We decided to use cattle panels and t-posts. Cattle panels are a little more expensive rolls of fencing, but we wouldn't need to sink brace posts. Plus we can reshape if need be (a distinct possibility since this is an experiment). It curves around to the blueberry corral on the one side.


The gate here will serve as entrance to the entire
hedgerow once a few sections of rails are removed.

And on the other side too.


The two panels above are offset, height-wise, because the fence must cross a ridge. Dan put the t-post in the center of the ridge. It worked out so there are no gaps under the fence.

Here's a birds eye view of what I'm talking about.

Yellow is what we're working on. Blue is existing.

What we've been working on is the bottom part. The top part will be next. Dan will remove two sections of rails of the blueberry corral, giving access to both sections of the hedgerow.

Also to be added will be two gates (these will require brace posts). We need a drive-through gate (bottom), and for convenience, will add a wheelbarrow width walk-through gate as well (top). The walk-through gate is pretty much a straight shot from the goat shed and hay storage to the hay feeder in the goat shelter.


There is still quite a bit of work to do, but we're happy with our start.

February 1, 2015

Roosterless

Some folks seem to do well with more than one rooster. I've read of cases where roosters don't fight and actually help one another watch the flock. We have not had the privilege of such an experience.

Our flock consists of Buff Orpingtons, Silver Laced
Wyandottes, Speckled Sussex, and a few mixes.

This past summer we had two broody hens, each raising only one chick. Both turned out to be cockerels. Our Wyandotte rooster was pretty good with them as chicks. Unlike roosters past, he pretty much tolerated and ignored them. I compared the roosters of our experience in "Rules With An Iron Claw", and I hoped peace would continue in the chicken yard.

The Sultan with part of his harem. He had a marked preference for the Buffs

I called the two cockerels R2 and R3. As they got older The Sultan started chasing them away from the hens, food, and coop. R2 was pretty intimidated by him, but as time went on R3 got bolder. When The Sultan started backing off, we knew a challenge for the top spot would be going from a simmer to a full boil in a matter of time.

R3 in the background. R2 was usually hiding behind the coop.

Initially, the two young roosters kept their distance from one another, but eventually they paired up. Every morning The Sultan would chase them behind the coop where they would hide until the chickens were let out to free range. Then they would go back into the coop and wait for a hen to come lay her egg, where they would jump her.


The chicken yard was in a constant uproar. As the crowing, challenging, and chasing got worse, we knew it was time to do something. The Sultan too. For his good qualities he had some bad ones, particularly that he would bully the hens. They are the producers on the homestead and they needed a break.

So. We are currently roosterless, peace resides once again, and I have three roosters in the freezer. Such is life on the homestead.