Showing posts with label rainwater catchment. Show all posts

January 18, 2025

The Greenhouse Is Almost Done

The last time I blogged about the greenhouse, Dan had just repaired the rainwater collection system. Several rains later, I can tell you that it leaks no more! Gradually, a little here and a little there, we're at the point where our greenhouse to-do list is pretty much checked off. 

For setting up the inside, it took me awhile to figure out what I wanted. When we first got serious about plans for the greenhouse, I collected all sorts of neat pictures of greenhouse interiors. Some of them had shelves for pots, others planted directly into beds dug into the ground. I spent a lot of time trying to envision our greenhouse and what my goals were.

I was initially assumed I just needed shelves, until I started thinking about how I actually want to use it. For one thing, I want cold weather veggies for fresh eating in winter. I also want a place for spring seed starts, and someplace to store pots, potting soil and compost. For spring starter trays, shelves make a lot of sense, but I knew I didn't want to plant lettuce and broccoli for the winter in small pots. It made more sense to use larger pots to give the roots some room. 

 First Dan finished the interior walls beneath the windows with cement board.


Then he made a bordered bed from old mill lumber, given to us by a neighbor.


Then I moved in the lettuce, kale, and chickweed I started outside in gallon pots, and tucked them in with spent straw from the barn.


Surrounding the pots with straw will act as good insulation. 


The bed can hold 14 one- and two-gallon pots pus 3 half-barrels from 55 gallon drums. There's enough room on the end for more pots if I want.

Then there was the other wall. 


This is where Dan built the bench.


The shelves are made from the tongue-and-groove boards he tore out of the front bedroom in anticipation of remodeling its closet. I have plenty of storage space for pots and buckets of soil and compost. The top shelf has plenty of room for starting spring plants. 

The other thing checked off the to-do list is the hose for the rainwater tank. 


The wand type nozzle I attached works well for potted plants. I got it from Amazon.


Still to do is stone for the floor and finishing the trim around the house door. Oh, and I have a little more painting to do. In the meantime, I've got stuff growing in it! And that's the main thing. :)

December 6, 2024

Greenhouse: Rain Collection Problems

The only thing left on our greenhouse project is to finish the interior. Over the summer, however, one of the rain barrels sprang a leak. So this had to be dealt with first.

Original setup. Photo from last April.
The tank on the right was the leaky one.
 

At the time, Dan drained the barrels and took the leaky one down. He also wanted to change the pipe from the downspout, because the amount of water coming off that roof was more than the PVC pipe could handle. So we postponed dealing with the rain barrels and he set up a new collection tote outside.

Photo from last August

This set-up bypassed the greenhouse altogether, which was okay because I don't use the greenhouse in summer anyway. Now that the heater is done, it's time to get ready to put the greenhouse to use.

The experimental fix was to run a smaller tube off the downspout . . .

  . . . and into the remaining rainwater tank.

This will slow the flow or rainwater into the tank, hopefully not too much. It may need to be a little larger, but it's a start. We're supposed to get a good rain next weekend, so we'll know better then if a larger hose or other changes are needed. 

If this works out, we'll add a new second barrel soon.

August 6, 2024

Summer Project List Progress

In the early summer, I posted an informal summer project list. Nowadays, these lists are typically short and sweet because our main projects (infrastructure) are already complete. Our daily patterns are mostly set by the rhythm of our seasonal routines. Even so, we like to do a seasonal evaluation and make a to-do list which includes less essential projects. And periodically that evaluation needs to be evaluated, which is what we have here. 

Something I've already blogged about is the new African keyhole garden. But in case you missed it . . .

Growing volunteer lambs quarter and cherry tomatoes

Dan enjoys building these and is asking about where to put another one. 

Something that wasn't on his list was adding another rain water collection tank. We've got quite a bit growing in the front yard, and last month's dry spell got us wishing we had more irrigation water there. The key with a gravity rainwater system is having pressure. The front yard is our highest elevation, so we can't bring water up from the other tanks which are lower. Unless we want to install a pump! But this will help tremendously.


He also sectioned off part of the buck pasture and welded a gate with bed rails and a cattle panel.


Doesn't get any more economical than that!

Dan's big project this summer is one that's been on his project list for several years - getting started on the masonry stove. 


We've lived with a conventional wood heater for, gosh, almost 25 years. While we love wood heat, we also understand the inefficiencies of these in terms of heat retention and the amount of wood required. The appeal of a masonry stove is efficiency. 

How can masonry stoves be more energy efficient? It's in the design. Wood stoves typically have the chimney at the top of the stove, so most of the heat goes up and out the chimney along with the smoke! A masonry heater has a thermal mass which holds the heat for hours after the fire has gone out. Combine that with a firebox designed to burn the wood gases and a chimney flue at the bottom instead of the top, and the result is an efficient, non-polluting stove that requires less firewood for more heat. What's not to like about that? 

I have more photos of this project, but I need to sort and optimize them. Then I'll share them wotj you in another blog post.

On my project list is repainting the barn, but the rain and forecast for rain hasn't let this happen yet. Most of my time is taken up with seasonal chores anyway: picking, preserving, and cheesemaking. One thing about preserving and making cheese is the wait times in between steps. I need to stick close for when it's time to do those steps, but this gives me time to do other things. One of those things was to experiment with pokeberries as dye.


I found Carol Leigh's recipe for non-fading pokeberry dye last summer and started to collect and freeze pokeberries. I managed to get about a gallon and a half, or so last summer. Last month, I gave it a go. You can see more photos and read how I did it at my fiber journal. 

As you can see, it's been a productive summer so far. August remains hot and humid (what else is new?), but we're able to pace ourselves comfortably. Even so, we're looking forward to autumn and cooler weather. Isn't everybody?

Anybody else making progress on their summer projects? Or maybe you get the summer project free! Do let us know, either way.

April 21, 2024

Greenhouse Rainwater Collection System

The rainwater system in the greenhouse is assembled and connected! Rain is imminent in the forecast, so we'll soon know how well it works. Ed (Riverbend Journal) was interested in this project, so I hope the photos explain it well!

All the pieces are 4-inch PVC

Dan removed the downspout from the gutter and replaced it with the set-up you see above. The clean-out plug serves as a roof washer and will catch most of the initial debris washed off the roof and gutter when it starts to rain. It has a removable cap at the bottom for easy cleaning out. 

Close up. Still to do - seal the gap around the PVC pipe entering the greenhouse.

Once the clean-out plug is filled, the water will runoff into the two barrels inside the greenhouse.

(Note the overflow pipe on the right.)


We didn't buy anything for this project; everything was from previous projects. The only thing he didn't have was another elbow to direct the water into the barrel. 

So he made his own from an old screw container.

The last step was an overflow pipe. Remember in the above photo I said to note the overflow pipe? Here's the rest of it.


The drain pipe empties out over an overgrown French drain that Dan dug years ago. It directs roof runoff away from the house and toward the garden swale, which is directly downhill from the greenhouse. 

Stepping back . . . 


This will be so much more convenient than hauling buckets of water! I'm planning to attach a hose and a watering wand for indoor plants.

What I'm really curious about, is how it will function as thermal mass next winter. Thermal mass is anything that retains heat. In this case the barrels will be heated by the sun and hopefully retain enough heat at night to help keep my plants healthy on our coldest nights. 

I'm really happy this is finally done!

© April 2024 by Leigh at http://www.5acresandadream.com

April 10, 2024

Greenhouse Update (Reporting a Little Progress)

April is prep and planting month, so our other projects pretty much take a back seat. Even so, I have a couple of things in the greenhouse to show you.

The first is progress on our rainwater collection tanks/thermal mass.

They still need to be connected to the front porch gutter spout, and the overflow needs to be finished, but the big pieces are in place. 

The second is a solar patio light. 

I don't plan to work in the greenhouse at night, but it will be handy for fetching lettuce when winter dark comes early, or to check to see if any cats are out there. (I say that because Riley loves the greenhouse during the day. At 14 years, he appreciates long naps in the warmest places he can find.)

I got this one on Amazon. What I liked about it (besides the price) is that it has a pull chain to turn it on and off. 

So many of them have remote controls only. In my mind, a remote control is just another battery I have to monitor and provide, and I'd rather keep all that to a minimum if there's a simple alternative. 


I'm happy with it.

With the warmer days of spring, I've also been monitoring my winter plants in the greenhouse. Some days the interior temp is topping 80 (27).


The broccoli is flowering, but the kale is still happy. Also, on the right you can see some volunteer cherry tomato plants! Last year's was my cold weather bellwether, and while it eventually froze, it provided valuable information about greenhouse temps when it gets really cold outside. I'll use this one to monitor summer temps (and my attempts to mitigate them).

My potato containers are doing well, and my potted lettuce is still producing. I cut it back pretty ruthlessly, but it hasn't bolted yet, in spite of warm days.


Also in that photo, you can see some of my early seed starts. That's winter squash right below the potatoes, and starter trays of tomatoes and Swiss chard in front. Working with these has emphasized the need for more appropriate greenhouse furniture! I need something tall for a potting bench and higher growing tables. 

We're busy these days, but even a little progress is welcome. I don't plan to use the greenhouse in summer, but hopefully, it will be finished by next fall.

January 6, 2023

Around The Homestead

This blog post started off as a winters project list update, but that wouldn't make for much of a post. It's been either too cold or too wet to tackle our outdoor projects, which make up the bulk of interesting things to blog about. Our project lists are never written in stone, anyway, and mostly used to prioritize. And that allows us a lot of flexibility to address whatever presents itself. 

One non-list project that took priority recently, was a cracked runoff debris clean-out tube, frozen and broken from our big winter freeze. 

Clean-out plug for the 1550-gallon tank catching rainwater off the goat barn.

We were quite fortunate that this was the only water pipe problem we had. Many others in the area had plumbing damage with their houses, but of our house and five rainwater collection tanks, this was the only breakage. Happily, Dan had another section of the right size pipe to replace it.

Of the winter project list, it's been too wet to work in the garden, but we've gotten a few nice days and  made a little progress on the greenhouse.

Hardi backer board was used as sheathing for the pony wall

The other item on the outdoor project list is fence maintenance and repair. Dan tends to tree thinning and limb trimming first, because these often create peril for existing fences.  

Tree thinning makes  a start on next year's firewood.

Branches and sticks end up in the wood chip piles.

On cold rainy days I've been tackling mending, which I've combined with my winter learning project. I've found numerous interesting videos on visible mending, and I'm especially impressed with Japanese mending, particularly boro and shashiko. These two techniques combine two of my favorite needlework arts—quilting and embroidery—with the utilitarian skill of mending. Here's an example.

Visible mending techniques are very fun because they add
a creative aspect to something needful. More on this soon.

I've taken notes and am gradually organizing them into a blog post (which I'll hopefully publish later this month). 

Not on the project list was an early start with spring cleaning. This came about because of the beautiful cross-stitch my wonderful daughter-in-law made me for Christmas.

You'll see this often in my upcoming kitchen photo blog posts.

I had to have it where I can admire it every day, and decided that my one free kitchen wall was the perfect spot. That meant taking down everything I had hanging there, and that meant that the wall needed washing, and one thing led to another, and so spring cleaning has begun. This, combined with my winter purge project is getting me off to a good start to an more organized, cleaner house. Once spring planting season hits, about all I can manage for housework is a lick and a promise until after the harvest is picked and preserved.

In critter news, I have four does all due in March.


Because the pasture was winter-killed last month, there is less grazing for the goats. So I try to take them down to the woods more often. 


The turkeys are now full grown, and unfortunately, all appear to be male.

I reckon we'll be looking to keep one and get a female for him.

I think that pretty much brings everything up to date. January looks like it will be relatively mild, so if we get a lot of sun to dry the ground out, we'll be able to tackle more on our winter project list.

Around The Homestead © January 2023

May 4, 2022

Swale Project: More Experiments

Digging swales is our big infrastructure project for 2022.

Proposed plan for approximate swale placement.

The first swale was for the kitchen and canning garden. We dug this one by hand. It was a lot of work, but not too bad with the two of us working on it.

Blog posts with more pictures here and here.

It still needs a bit of leveling, but it works well and captures a lot of rainwater.

Next, Dan hand dug a second small swale for the little production patch next to the driveway. No roots and soft soil, so it went pretty quickly.

After we get a good rain to see how
level it is, we'll fill with wood chips.

This spot is where we plant a plot of something, like corn or wheat, rather than a bed. But because it's located on a high point of our property, it dries out quickly once we hit our summer dry spell. Whatever  rainwater we can catch here will hydrate the soil more deeply than just rain. 

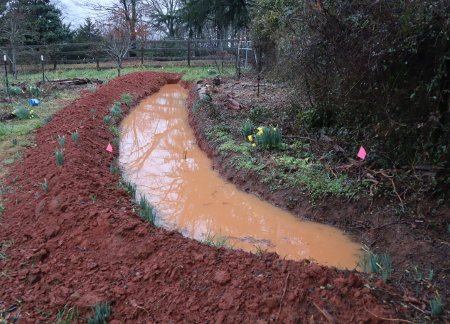
The more challenging swales are the ones for our pastures, because they are too big to dig by hand. But we've finally made a start! We started with the pasture closest to the garden, where we can use a spillway to direct garden swale overflow into the pasture swale.

After we moved that big mound of dirt, the next step was to find and flag a level line for the swale.

We used an inexpensive transit to find a level line for a swale.

Being level is key to a swale's effectiveness, because it ensures the water will be distributed evenly across the length of the swale.


Flags mark a level path for a future swale.

The how-to has been the big question. People often use large equipment such as a backhoe to make swales. But a lot of folk have been creative with what they have and have used turn plows or scraper blades. 

Dan decided to see what the scraper could do and made a start.

Then he ripped it and scraped it again.

Then the tractor called it quits and stopped running. At least we've made a start.