January 29, 2023

Garden Notes: January 2023

Rainfall 

  • 3rd-4th: 3.2"
  • 8th: 0.5" 
  • 12th: 0.65"
  • 17th: 0.75"
  • 18th: 0.3"
  • 22nd 1.2"
  • 25th: 1.6"
  • 29th: 0.3"
  • Total: 8.5 inches
Temperature
  • range of nighttime lows: 22 to 57°F (-5 to 14°C)
  • range of daytime high: 42 to 68°F (5 to 20°C)

Not much to report garden-wise this month. We lost our winter garden during the December winter kill, and it's been too cold, windy, or rainy to do much outdoors. But the daffodils are blooming, and that's a happy sight.

With all the rain and cold temps, the ground's too wet to work on swales and swale beds. My garden project on nice days has been to finish bed clean-up and mulching. I'm working on re-mulching some of the aisles too. 

The beds are mulched with leaves and the aisles are scraped with a shovel. Then I put down a layer of cardboard and top with woodchips. That will last for about two years, until the weeds start popping through. Then I scrape up the decomposing wood chips, mix them with compost, and spread them in a vacant garden bed to age a bit more.

Next month, I'll sort through my seeds and make a garden plan. 

Anyone have anything going on in their garden?

January 25, 2023

Kidding Has Commenced!

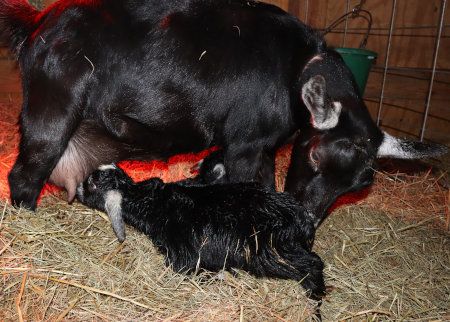
River's due date was January 24th, so I'd been on kidding watch for the past four or five days. On Monday morning, the 23rd, she stayed back in the barn while the others went out to pasture. Not much was going on by lunchtime, so I thought I had some time and put her in the kidding pen. I went in to make lunch, came back about an hour later, and found this!


So, I missed it! The black is a little buck and the spotted is a little doe.

Yes, he's quite a bit bigger and heavier than she is.

I'm thinking that the buck came first because River was cleaning him off when I got there whereas the little doe was still covered in birth membranes. It was sunny but chilly so I helped dry them off. They were up on their feet in no time. Then came the business of finding that first meal.


I usually try to help with this, but goats are stubborn from the git-go! Even when you rub their little noses on a teat they clamp their mouths shut and push away with all their might. Sheesh. 

Here they are the next day, dried off and sporting their little sweaters.

River and her twins

Little buck

Little doe

All of this was much earlier than I planned, but we had a buck breakout last August and we weren't able to get the bucks back before they'd done the deed. The other doe was Sky, who is due any minute now too. The amazing thing is, they were bred by the bucks I intended to put them with anyway!

January 22, 2023

New Weather Station

For our Christmas this year, we treated ourselves to a new weather station.


This is a Logia 7-in-1 Wireless Weather Station from Amazon. We've wanted one for awhile and Christmas seemed like a good time to make the purchase. 


It's considerably more sophisticated than the little Acu-Rite unit I've been using. Fortunately, it came with a printed manual! That's rare nowadays and a huge plus. It was very easy to set up.

The Logia has lots of buttons below the LCD display, which offer a lot of choices of information to view. Some of it I don't get the point of, such as, I have no need for a temperature or humidity alarm. And I definitely don't need a smiley or frowny face to tell me it's either too hot, too cold, or comfortable in the house. The forecast icon is said to be 70-75% accurate for the upcoming 12 hours for a 19 to 30 mile radius. We'll see. 

Because the wind and rain gauges are built in, the unit had to be mounted in an open spot.

It's still somewhat surrounded by buildings and trees, but off the carport was the best we could do. One big difference we'll see is in temperature readings. The outdoor sensor for my old unit is on the back porch in the shade. Those are the temps I've used in all of my garden notes posts. The new unit will record highs in the sun, which will mean a big difference in my record keeping. In other words, our summer highs will be a lot hotter on record!

The lows differ as well, but not necessarily because one is more accurate than the other (although that could be a contributing factor). The variances are also due to the location of the thermometer. A thermometer records the temperature of it's exact location. Place ten thermometers around your property and you'll likely get ten different readings at any give time. We see this in a rather dramatic form on bank temperature displays, where the reading is made on an open sunny black-topped parking lot. It displays a bazillion degrees while the weather guy on the radio is reporting something entirely different. 

Generally, a sunny location for an outdoor thermometer is not recommended. In this case, though, shade would also change the wind and rain readings. A really good web article explaining all the things that influence temperature readings can be found at Smart Wise Home. I'm thinking maybe I'll keep the Acu-Rite where it is and record both temps for awhile. 

I'll be keeping my old rain gauge as well, because I've noticed that the two units record different rainfall amounts. The Logia can record rain rate (inches per hour) and doesn't seem to need emptying, so I'm wondering if it calculates rainfall totals by rate and time. That's something to look into.

Price-wise it was about $100. That was enough for me to do some careful comparison shopping before buying, but it's really on the cheap side for this kind of weather station. So far, so good, so I think we bought the right one.

New Weather Station © January 2023

January 18, 2023

Winter Mending Project: Barn Jacket

In my last post ("Japanese Mending,") I promised to show you my visible mending project - my old barn jacket. There's a story to go along with this project, which means this post will be wordy. But for those who prefer to scroll and scan, there are lots of pictures too, which will probably stand on their own.

About the jacket. At one time, this denim jacket was my favorite fall and spring work jacket, and I wore it for years. It has a warm fleecy lining and the outer fabric is denim, which I love because it wears well and isn't prone to getting straw and hay stick in it (a huge plus when one works with barn animals!). Gradually, it got torn here and there, and the cuffs began to fray.

Lots of small holes on the jacket front and sleeves.

But it wasn't until it got a big tear in back that I stopped wearing it. 

Big rip in the back.

By that time, the denim was badly torn, worn, and stained in too many places anyway. The jacket wasn't even fit to donate to the thrift shop, and I decided to discard it. I went so far as to cut off and save all the buttons, but I just couldn't bring myself to throw it away. Instead, I buried it in my mending box.

I pulled it out a few years ago when I needed a mending project for a Permies SKIP merit badge. SKIP is a free online program at permies.com, for learning homesteading and permaculture skills. That link will tell you all about it and what's offered, so here, I'll just add that it's an excellent resource for learning, documenting, and sharing a wide range of skills. In this case, I was working on the first textiles badge and needed to sew on a patch. The jacket was perfect.

A series of tears on the underside a sleeve.

Even then, I got a bit creative in stitching down the large patch.

As I worked on it, I remembered how much I liked this jacket. But there was still a lot that needed mending, so I stuffed it back into the mending box and forgot about it for several more years. Until I was stuck inside due to inhospitable winter weather and came across several interesting YouTube videos about visible mending (which you can read about in my previous post). I pulled the jacket out again and gave it another look. It would be a good canvas for learning and experimenting!

The next time I was at the thrift store, I found some patching fabric that I liked. Actually, it was a pillow sham that I got for $1. I took it apart and gave it a good pressing. Perfect. 

Then I made a start. The biggest tear was first, although it wasn't too bad when I spread out the jacket and laid the pieces back in place. 


The lining was in good shape, so I sewed the torn parts onto the lining with sewing thread and drew out my top stitching lines with a fabric marker.


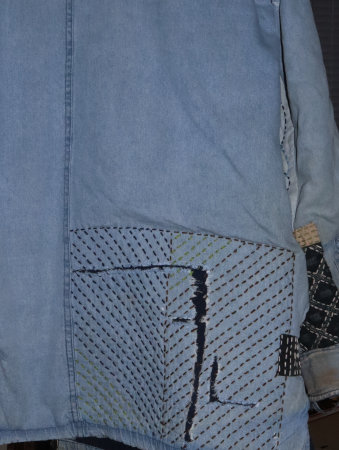
From boro, I learned that it's okay to have patches and stitching overlap, like the patch above, which I added to support the pocket.

From sashiko, I find the concept of working only in running stitch intriguing. I like the mental challenge of figuring out my stitching path with the fewest cuts and knots in the thread.


Once the creative ideas started flowing, I added some embroidery to my first sleeve patch (and patched a few more holes). 


Jacket right front with two patched tears.

I stopped thinking about simply covering holes and tears, and began to think more about the overall affect on the jacket.

Below is a patched and embroidered hole on the other sleeve.

In the first picture you can see the hole in the left sleeve.

One problem that developed was because the outer jacket fabric and the lining have different fiber contents. That means they shrank at different rates! It wasn't terribly noticeable before, but the patches and embroidery cause the denim to pooch out in some places.  


On the one hand, this is just an experimental project on a barn jacket, so, so what? But it was a challenge and I wanted to rise to it. As Bill Mollison, the Father of Permaculture says, the solution is in the problem. I thought about this and settled on a sashiko design that I thought would work.

I smoothed out the outer fabric as evenly as I could and pinned it to the lining. Then I added lines with my fabric marker.


With variegated embroidery thread, I'm working a pattern that will distribute the denim more evenly over the back of the jacket without puckering.

A problem becomes a design element! The result will be a quilted look that stabilize the fabrics. 

Another problem is that, apparently, I don't have full ownership of the jacket. 

Meowy staked her claim

and stubbornly refuses to give it up.

What's a human to do?

Between mending my jacket and some knitting, my cold and rainy days are interesting and productive. Maybe I'll be able to wear the jacket again this spring. 

Your turn. Anyone else care to share to share their winter projects?

January 14, 2023

Japanese Mending

I mentioned mending on my winter project list. It's an ongoing job (our lifestyle is hard on clothes), and a good task for when the weather is too cold or rainy to do outside things. It has a utilitarian nature and so tends to be tedious, but I prefer the mindset of longevity through repair rather than buy, buy, buy. Plus, I like hand sewing.

When I discovered "visible mending," I was delighted to realize I can put a creative twist on a mundane chore, because it transforms a potentially boring task into something fun and interesting. Like when I mended my barn gloves, I used variegated embroidery thread and enjoyed the plaid-like patterns it made. Another example, when I hang laundry on the line to dry, I like to hang items in a color pattern, like a rainbow. The challenge is, can I do it? I try, for no other reason than it amuses me during an otherwise tedious job.

Two of the visible mending techniques I've discovered in exploring YouTube videos are boro and sashiko. These Japanese techniques are currently very popular with the needlework crowd, so if you're a stitcher, you're probably familiar with them. As a longtime embroiderer and patchwork quilter, they appeal to me immensely. I was curious to understand them better and started exploring videos. 

The best of these videos are by Atsushi Futatsuya. He is a native Japanese from a sashiko family, who lives and teaches sashiko in New York. He's the most authoritative source I've found. He has a YouTube channel, 刺し子 物語 & Sashiko Story, and website, Upcycle Stitches

From Atsushi's "Sashiko Story" video series, I learned not only about the tools and techniques of boro and sashiko, but was also introduced to the Japanese cultural significance and identity of these skills. 

Public domain image of late 19th century child's boro sleeping mat

Everything that follows below are the beginnings of my understanding.

Here's a close-up of the above

Boro could be translated as "tatters" and describes the overall patchwork look of boro textile repair.

Another close-up

Sashiko means "little stabs," which describes the running stitch used to hold the layers of fabric together. Originally, the stitching served to strengthen and reinforce the fabric (like quilting). 

And another

Fast forward to today, and we see boro and sashiko are still mending techniques that have became more focused on the decorative aspect. They have become an art form in their own right. 

Even so, the precise origin of these crafts is vague, so there is a lot of speculation and opinion out there. Most sources agree it likely developed in rural Japan, at a time when fabric was expensive to buy.  That meant fabric was scarce and valuable. It was used and reused out of necessity. 

This kind of necessity is foreign to us moderns because fabric and clothing are now cheap and readily available. I buy almost all of Dan's and my clothing off the dollar rack at thrift stores. Much of it is never or barely worn! I buy a lot of fabrics at thrift stores too, and because these are so abundant and so cheap, it almost seems to make mending and clothing repair obsolete. Just cut up the old stuff for rags and use them instead of paper towels. 

From many of the videos I've watched, however, I'm seeing a shift of motive toward environmental responsibility. The clothing industry is excessively wasteful and fueled by fads. Mending, repairing, re-using, and repurposing are ways the consumer can make a difference. And if the process can be creative and fun, so much the better! Hence the popularity of visible mending. 

Besides the cultural importance, what distinguishes sashiko from other forms of needlework?

  • Patterns are built with running stitches, which are stacked on the needle before pulling it through the fabric.
  • Traditionally, special needles, thread, and thimbles are used.
    • Sashiko thread is spun to make it sturdier for repair and longer-wearing than embroidery thread.
    • Needles are sharps and long enough to pick up several stitches before pulling through the fabric.
    • Needle eyes are narrow but long enough to accommodate multi-strand thread.
    • Thimble is a ring aka palm thimble. It's worn like a ring with a metal plate or leather flap on the palm side of the hand. It's used to push the needle through the many layers of fabric.
  • Traditional color is indigo blue, although nowadays, anything goes. 

Bibliography:

Okay, so now that I have my notes and links where I can find them again, I'll close this post with a link to what I've been working on → Winter Mending Project: Barn Jacket.

January 10, 2023

An Experiment in Making Jerky

Last month, I showed you my first experiment in off-grid meat preservation, making pemmican. That was definitely successful, so next, I wanted to try making jerky. 

Jerky and pemmican are both dehydrated meat products. What's the difference between the two? Jerky is mostly thought of as a snack food, while pemmican is thought of as a survival food. Jerky highly seasoned and dried until it's pliable. Pemmican is not seasoned and dried until crisp, so it can be powdered for the next step.

For my jerky experiment, I started with 1.62 pounds beef bottom roast from my local not-a-chain grocery store. They have really good meat prices, and I found this roast "reduced for quick sale" for $3.99 a pound. I got started on the jerky that afternoon.

There are probably hundreds of recipes for jerky. Many of them call for jerky seasoning mixes. Most of the other ingredient lists include soy sauce and often Worcestershire sauce. Sweetener is optional and may be sugar or honey. The seasonings and spices vary a bit, so I used what I had. Commonly called for ingredients that I didn't have were soy sauce, smoked paprika, red pepper flakes, and liquid smoke. I did have Bragg's liquid aminos, so I used that in place of soy sauce. I jotted down the ingredients and amounts, so I'll know what to adjust if I do it again!

Ingredients
  • 1/2 cup Worcestershire sauce
  • 1/2 cup liquid aminos
  • 2 tbsp honey
  • 1/2 tsp black pepper
  • 2 tsp onion powder
  • 1/2 tsp garlic powder

Marination time recommendations in the recipes varied from 3 to 24 hours. 


I marinated this batch for about 7 hours, drained it well, and put it in the dehydrator. It took about 8 hours to become slightly pliable and thoroughly dry.

Beef jerky

Then came the taste test. I'd never eaten jerky before and found it flavorful but chewy. Dan said it tasted just like the stuff from the store and declared the recipe perfect! (It's not often I get something right on the first try!)
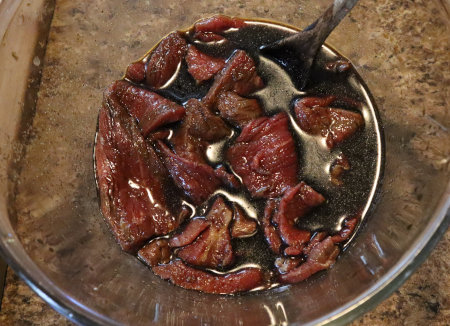
To store, I packed it into a wide mouth quart canning jar and vacuum sealed it.

So this experiment is declared a success! Who else makes jerky? I'd love your recipes!

January 6, 2023

Around The Homestead

This blog post started off as a winters project list update, but that wouldn't make for much of a post. It's been either too cold or too wet to tackle our outdoor projects, which make up the bulk of interesting things to blog about. Our project lists are never written in stone, anyway, and mostly used to prioritize. And that allows us a lot of flexibility to address whatever presents itself. 

One non-list project that took priority recently, was a cracked runoff debris clean-out tube, frozen and broken from our big winter freeze

Clean-out plug for the 1550-gallon tank catching rainwater off the goat barn.

We were quite fortunate that this was the only water pipe problem we had. Many others in the area had plumbing damage with their houses, but of our house and five rainwater collection tanks, this was the only breakage. Happily, Dan had another section of the right size pipe to replace it.

Of the winter project list, it's been too wet to work in the garden, but we've gotten a few nice days and  made a little progress on the greenhouse.

Hardi backer board was used as sheathing for the pony wall

The other item on the outdoor project list is fence maintenance and repair. Dan tends to tree thinning and limb trimming first, because these often create peril for existing fences.  

Tree thinning makes  a start on next year's firewood.

Branches and sticks end up in the wood chip piles.

On cold rainy days I've been tackling mending, which I've combined with my winter learning project. I've found numerous interesting videos on visible mending, and I'm especially impressed with Japanese mending, particularly boro and shashiko. These two techniques combine two of my favorite needlework arts—quilting and embroidery—with the utilitarian skill of mending. Here's an example.

Visible mending techniques are very fun because they add
a creative aspect to something needful. More on this soon.

I've taken notes and am gradually organizing them into a blog post (which I'll hopefully publish later this month). 

Not on the project list was an early start with spring cleaning. This came about because of the beautiful cross-stitch my wonderful daughter-in-law made me for Christmas.

You'll see this often in my upcoming kitchen photo blog posts.

I had to have it where I can admire it every day, and decided that my one free kitchen wall was the perfect spot. That meant taking down everything I had hanging there, and that meant that the wall needed washing, and one thing led to another, and so spring cleaning has begun. This, combined with my winter purge project is getting me off to a good start to an more organized, cleaner house. Once spring planting season hits, about all I can manage for housework is a lick and a promise until after the harvest is picked and preserved.

In critter news, I have four does all due in March.


Because the pasture was winter-killed last month, there is less grazing for the goats. So I try to take them down to the woods more often. 


The turkeys are now full grown, and unfortunately, all appear to be male.

I reckon we'll be looking to keep one and get a female for him.

I think that pretty much brings everything up to date. January looks like it will be relatively mild, so if we get a lot of sun to dry the ground out, we'll be able to tackle more on our winter project list.

Around The Homestead © January 2023