Showing posts with label freezing. Show all posts

November 14, 2018

Soup Season

Monday morning we got our first frost. The day was crisp and sunny, but it's been cold and rainy ever since. Time for soup!

I think most of us have a recipe or two for leftovers soup. I call mine "Scrap Soup."

Leftovers: mashed potato & cheese soup, pinto beans, oven-
roasted potatoes, and oven-fried sweet potatoes. Added:
chopped fresh daikon greens and a pint jar of bone broth.


Left to simmer all morning on the woodstove, the flavors meld wonderfully. It's deliciously warming and comforting.

Dan says I've made a soup lover out of him. :)

Usually there's enough leftover to become the starter for the next day's soup.

To leftovers of the soup shown above I added last night's lasagna
and another pint of bone broth for a more soup-like consistency.

I can soups too, often from small amounts of various garden produce when there isn't enough for a full canner load of any particular veggie.

Photo from my "Just Add Noodles" Chicken Soup blog post.

Home-canned soups are a wonderful convenience food, but this year I tried something different. We ate daily from the garden, but usually there were leftovers. The next day it seemed silly to heat up those leftovers when we had so many fresh vegetables to eat. So I got out one of the peanut butter jars I'd saved and started putting the leftovers in it. That jar went into the freezer.


Almost every day I'd add bits of leftover vegetables, meat, rice, pasta, cheese, beans, gravy, broth, etc. By summer's end I had a dozen jars full of frozen odds and ends for soup fixings. Perfect additions to keep that soup pot going.

Soup anyone?

Soup Season © November 2018 by Leigh  

January 29, 2017

Cold Weather Canning

As soon as it gets cold enough to want the wood cookstove going all day in the kitchen, it's time to start my cold weather canning. This is when I start emptying out the freezer, pulling out things that have been stored there for future canning.

First up was bone broth.

Bones with about half-a-cup cider vinegar, onions, & celery. It needs
a slow simmer over several days to extract minerals from the bones.

This takes the longest so I start it first. I just toss our bones into a bag in the freezer, and later pull them out to make the broth. After they're defrosted I pick off any bits of meat I can find. It was quite a lot, actually, almost 2 quarts of a mix of chicken, chevon, duck, pork, and squirrel. Usually I use this is soups, but I think I might make another batch of scrapple with this.

Once that got going, I started in on some strawberry jam.


After that it was peach jam.

Stirring in the sugar. I'm guessing most folks would consider mine
fruit spreads, because I only use about 1/3 the sugar of jelly and jam.

This was the first time I've made peach jam. I didn't get more than a pie's worth of peaches at any one picking, so besides eating fresh pies I froze peach pies, raspberry-peach, and blueberry-peach pies. Then three quarts were gradually collected in the freezer for the jam.

I used my frozen cushaw to make pumpkin butter.


The only problem is that this one isn't good for reclaiming fridge or freezer space with this product, because it is a huge no-no to can this stuff. It must be stored in the fridge or freezer according to government safety recommendations. I reckon there's a small gain because when it's cooked down it takes up less space, and it's worth it because I love this stuff! It won't last long.

Then blueberry jam

My canning kitchen (on the back porch) is not
 heated so the hot jars and jam were steaming.

I only used part of my frozen blueberries. There are still plenty in the freezer for blueberry pancakes and muffins.

Also elderberry jelly

Using a wine press to squeeze out every last drop.

I only got about a gallon of elderberries to freeze. The birds got the rest.

Fig-orange jam was next.

Fig combines nicely with several other fruits, but we particularly
like the orange-fig combination. This batch was made with my
 homemade apple pectin, so I'm cooking it down in my slow cooker.

Last up was raspberry jelly.

Love this cheerful color.

I didn't get quite enough juice for a batch of jelly so I mixed the raspberry with apple juice for the jelly. The raspberry flavor predominates, however, and it is so good.

This year's cold weather canning efforts.

Does that seem like a lot of jelly and jam? It's definitely more than a year's worth, but we had such a good fruit harvest that I took advantage of it. Also, one of our favorite breakfasts is peanut butter and jelly sandwiches with toast. So all that jam and jelly will be put to good use.

I did my pizza sauce last October, so that wraps up my cold weather canning for this winter.

Cold Weather Canning © January 2017 

November 19, 2016

Putting Eggs By

Winter is very unpredictable when it comes to eggs. Most winters I get an egg or two per day, but sometimes I get none. Chickens don't lay when they're molting, of course, and lay less when daylight hours get short. Our winter diet adjusts to having less eggs, but also I preserve as many as possible for when laying times are lean. I do this by freezing, dehydrating, and water glassing.

Freezing eggs is fast and easy. Simply beat them as for scrambled eggs, pour into ice cube trays or muffin cups and pop in the freezer. After they're frozen I put them in freezer bags to save on space. Frozen eggs are great for baking, scrambled eggs, or omelets; I just have to remember to allow time to defrost.

I use ice cubed eggs as small singles.
A muffin cup will hold close to two eggs.

I've only frozen about six dozen eggs so far. That's not a lot, but honestly, we eat one egg meal per day when laying is good and I'm a little tired of eggs! (scrambled, fried, egg salad, hard-boiled, deviled eggs, quiche, French toast, you name it.)

Dehydrating is the most intensive in terms of energy and labor, but powdered eggs are easiest to use, plus they take up the least amount of storage space (cool storage is recommended to prolong shelf life). They can be reconstituted with an equal amount of warm water or milk to make scrambled eggs or quiche. Or they can be added as powder to doughs and batters.


Dehydrating eggs is next on my to-do list. The basic process is to beat as for scrambled and dry in the dehydrator at 145°F (63°C). It must be noted, however, that this will not kill Salmonella (which is why commercially dried eggs are pasteurized.) Salmonella requires temperatures of 160°F (71°C), so you must either thoroughly cook anything containing your dried eggs, or dehydrate them scrambled.
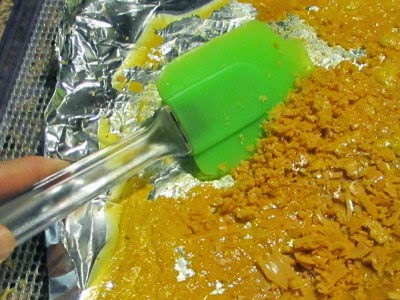
I use foil for the liquid eggs, but I read a fruit leather sheet works well. 

Break the sheet of dried eggs into smaller pieces and use a blender to powder. There are more details at the link above, or check out my offer below.

Water glassing is the other thing I've learned how to do.


What the heck is that? Well, it's on old-fashioned way of keeping eggs without refrigeration.


All that's needed is a crock, water (boiled and cooled), fresh unwashed eggs, and water glass.


The technical name for water glass is sodium silicate. Back in the day it was readily available at any hardware store, but nowadays it's difficult to find. It's also used to seal cement floors and glue cardboard boxes together, so you may be able to find it in one of those sections in your home improvement store. Most floor sealers, however, have other additives, which does not recommend them for egg preservation. Check the label! Pure water glass can be purchased online, at Amazon for example.

The eggs must be very fresh, clean, and unwashed. Washing the eggs removes their natural protective coating (the bloom) and decreases storage life.

The proportions are 11 parts water to 1 part water glass. That's a total of 12 parts, so I work with multiples equaling 12 when I mix this. For example:
3 cups = 12 quarter-cups
so use
2.75 cups (11 quarter-cups) water
to
0.25 cup (1 quarter-cup) water glass

For my one-gallon crock I tripled that. I used 8.25 cups water and 0.75 cups water glass. That generously covered two dozen eggs. The contents of the crock will evaporate over time, so it needs to be checked periodically and topped off with more water glass to keep the eggs submerged.

To use the eggs, simply rinse them off and use like fresh eggs. They will keep well for about 5 months with this method (longer in colder temps, shorter in warmer.)

For details about freezing and dehydrating eggs you can follow the links below
And thanks to comments for this post, I'm working on another technique - "More on Egg Preservation: Liming."

OR

Go grab a copy of my How To Preserve Eggs: freezing, pickling, dehydrating, larding, water glassing, & more. It's free at both Amazon and Smashwords.

July 26, 2015

Pizza Sauce

I had a couple of people ask for my recipe for pizza sauce (see "Too Many Tomatoes"). I thought I had it in a blog post, but only found comments about it scattered here and there. So here it is, all in one post.

Homegrown Pizza Sauce

There is actually no difference between my pizza sauce and ordinary spaghetti sauce. It's just that we eat more pizza than spaghetti, hence the name. Ingredients are simple:
  • tomatoes
  • sea salt
  • seasonings of your choice
  • lemon juice or citric acid

I usually freeze my tomatoes and make my sauce when the weather turns cooler.

Bags of tomatoes in the freezer for canning later. TIP: Frozen tomatoes
are easier to peel than with boiling water & ice baths. Just dunk the
frozen tomato in lukewarm water. The skins easily peel and slip right off.

To defrost and prepare for sauce making, you have two options. If you have something like a Squeezo Strainer or a Roma Sauce Maker, then the tomatoes can be defrosted and processed into juice with one of these.

The Roma removes seeds and skins easily

Alternatively, pop the frozen tomatoes into a large pot,

Frozen Amish Paste tomatoes 

and cook down until soft. Then run them through something like a Foley Food Mill to remove skins and seeds.

Processing them with my Foley food mill.
Pour all that lovely tomato juice into a crock pot or slow cooker and add your favorite herbs and spices.

Tomato juice cooking down with homegrown thyme, oregano, & rosemary

Cook down to the consistency you desire. I find it takes about two days to decrease the volume by half.

Crock pot tomato sauce
I can my sauce in pints, which is a couple weeks worth of pizzas for Dan and me.


I add one half teaspoon salt per pint, plus either one tablespoon lemon juice or one quarter teaspoon citric acid. They are processed in a boiling water bath for 35 minutes.


And there you have it.

Friday night special

January 30, 2015

January Jam & Jelly Making

Of Dan's and my various uses of electricity, I have to say that probably the most useful ones are the refrigerator and freezer, followed by the computer. (Power tools for building and repair would be next). I do a lot of jelly and jam making throughout the summer, but being able to freeze various fruits to make jam and jelly in January and February is a blessing indeed. This works particularly well with things that I have to harvest over a period of time, such as elderberries. Over the summer I was able to pick and freeze four gallons of them. Once the holidays were behind us, there was finally time to make that jelly.

Elderberries cooked down and crushed for the juice. 

While the juice was cooking out of the elderberries I pulled out a gallon of frozen strawberries and a gallon of frozen figs.

A combination of strawberries and figs from last summer's bounty.

These I cooked together to make strawberry - fig jam. Dan loves his strawberry jam but I never seem to be able to make enough. I thought I'd try the two fruits together to see what he thought.

I ended up with enough elderberry juice for a canner load of half-pint jars of jelly, and enough strawberries and figs for a canner load of pints of jam.

Elderberry jelly and strawberry-fig jam

Does anyone else squeeze out the juice when making jelly? I read somewhere we aren't supposed to do that because it makes the jelly cloudy. I do it anyway because I can't stand to leave any juice in the pulp. I want it all for jelly!

The other thing we aren't supposed to do is blend fruits for jam in the blender. I think the idea is to have chunks of fruit mixed in. I don't care about that either, because my fruit bits always end up at the top of the jar. I like them evenly dispersed. I suppose my jam is more of a jellied fruit puree.

The last one to make is my annual mixed fruit jelly.

Sand cherries and blackberries. Boy, is it red!

It's last because if there's any elderberry juice left, I'll add that to the mix. This year I had a couple handfuls of sand cherries and a handful of wild blackberries. Today I'll strain and measure it. If I need more juice I'll cook down some frozen blueberries too.

I think this year's batch of elder jelly was better than last year. I think that's because last year I got a fair but not abundant harvest. The competition with the birds is pretty stiff so I tended to pick them while a lot were still green. This year was more bountiful and there was plenty for everybody. Next year should be even better.

So that's how I spent the last several cold, damp days. How are you faring these last days of January?

August 30, 2014

Busy August Days

Where has the month gone to! August has been a busy month with more things to do than time to do them in. My days have been filled with picking and preserving. Here's the rundown.

Canning Green beans

Dehydrating Zuchetta summer squash

Canning figs

Curing and bagging multiplier onions

Canning pizza sauce

Freezing Green Nutmeg melon

Drying more dried blueberries

Mozzarella cheese for freezing

Black turtle beans for shelling

Frozen elderberries. So far I've filled two 2-gal freezer bags with more
to come. I'd like to make a medicinal syrup this year, and maybe jelly.

1st ever crabapple harvest. Only got 1 lb. Eventually I'll
use these to make my own pectin and apple cider vinegar.

And just coming in ...

Okra, green peppers, and our first pears!

So what's been happening at your place?

August 19, 2014

Melons Galore

I had such a poor harvest of everything last year that I reckon I went a bit overboard this year. For melons, I planted Green Nutmeg, a lovely heirloom variety that we like better than cantaloupe.

Green Nutmeg melons

Well, production hasn't disappointed. We've been eating one almost every day. There are a couple of things I like to do with the surplus. One is to cut thin slices and dehydrate them. This makes a very tasty, no sugar, fruit leather-like snack. My blog post about dehydrating watermelon (with instructions) can be read here.

The other thing I like to do is to freeze melon, especially the ones that get away from me, i.e. overripe. I don't find this works well for a bowlful of thawed melon chunks or a fruit salad, but we love them in smoothies.

Preparing melon for freezing. I'll transfer to freezer bags once frozen.

To make those smoothies, I add chunks of frozen melon along with whatever else is in the freezer: strawberries, blueberries, figs, bananas, and whir it up in the blender with some kefir. That makes an exceedingly refreshing frozen treat on a sweltering hot day.

As you can see from the above photo, there is no waste, not even for the compost pile. The rinds are fed to the goats and pigs, pulp to the chickens, and I save a few seeds too. For that I use the method for soft, pulpy foods (see "Seed Saving: Cucumbers"), but after the incident with the sweet potatoes, I use only filtered water!

Anyone else enjoying homegrown melon this summer?

January 26, 2014

Winter Freezer Canning: Elderberry Jelly

Of all the things we use electricity for, I think the most useful is for our refrigerators and freezer. I've wondered before how Southerners stored food before electricity; I have such problems with mold, mildew, and pantry moths that if it wasn't for these appliances, I'm not sure what I could keep that would be fit to eat. Another benefit is being able to toss in things like tomatoes, blueberries, and elderberries at the peak of harvest to process later. (For how to easily peel tomatoes by freezing them, scroll down to "Tomatoes" in this post.) With our temperatures being the coldest ever, I've needed a project that keeps me close to the stove. Emptying the freezer of all those fruits for jam and jelly making is the perfect project.

For the first time since I planted them, I have an abundance of elder- berries. This year, I wanted to try elderberry jelly. It was a first for me.

First batch of elderberry jelly. The recipe made 5 half-pints.

Besides that, I used Pomona's Universal Pectin for the first time. I've been aware of it for many years, but due to no local availability and cost, I've never used it. Recently, however, I had to make a trek to our area Whole Foods and saw it there. Considering how the cost of grocery store brands of pectin has skyrocketed, Pomona's was actually more economical because I can make up to four batches per box.

For those not familiar with Pomona's, it's desirability is because it can be used with any sweetener including honey, or it can be used with no sweetener at all. It can also be used with any amount of fruit or juice, and includes directions for adjusting recipes (unlike the popular commercial pectins which advise using their measurements only.) The only differences I found in working with it were that I had to mix calcium water separately (calcium packet included) and it jelled more slowly than other brands. Other than that, I'm happy to finally have found a local source (sort of local, I only make it to Whole Foods a couple times a year.)

I ended up with seven cups of elderberry juice. I made one batch (4 cups) with pure elderberry. I had to make up one cup for a second batch, and had enough muscadines and sand cherries in the freezer to make that much juice. The result was a mixed fruit jelly. Both jellies are very good, but won't replace straight muscadine jelly on my favorites list. Still, I like my jellies and I like keeping warm by the wood cookstove! It's a win-win for this kind of weather.