October 31, 2009

Rose Hip Jelly

I've gathered wild rose hips for herbal tea in the past, but I've never made jelly with them. This was the first thing I thought of when I realized that the place was covered with wild roses.

Rose hips in the wildOur wild southern Appalachian roses produce hips that small and seedy, but sweet. I had read that the best time to gather them for jelly is after first frost. Evidently this softens them a bit. However, when I went out a few weeks ago to check on them, I discovered that not only were they beginning to turn red, but some of them had also gone out to dry out and turn black. I decided I'd better harvest not, first frost or no. This turned out to be a wise decision because our first frost didn't phase them a bit.

Most of the recipes I found online call for two quarts (8 cups) of hips. It was time consuming collecting so many, so I did it over several days, choosing the ripest ones. Rose hips will ripen after picking, but I like to let things ripen on the plant. Eventually I got the amount called for.

Would make for a good "Guess The Number" contest.One thing that the recipes said that I didn't do, was to cut off all the blossom ends and stems. Good grief, I thought. Mine are so teeny and there must be a squillion of them. I figured these would strain out anyway, so most of them were left on.
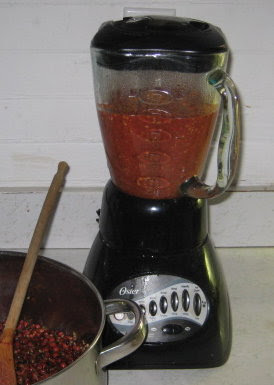
My blender was faster than my food mill would have been.I simmered them for about 15 minutes in enough water to cover them. They are supposed to be mashed to release the pulp, these were too small for my potato masher. I decided to pop it all into my blender and give it a whirl.

Actually some of them were still a little hard, so I probably should have simmered them longer. One recipe called for simmering for an hour.

Even so, the blender pulverized the whole thing pretty well. The color at this point looked more like a tomato sauce red than rose hip red.

It was pretty late by this time so I put the pulp into my jelly bag and let it drip drain over night.

In the morning, I was pleased that I had gotten the required four cups of rose hip juice for the recipe, but dismayed that the color wasn't any better. In fact it was worse. Definitely not a color one would associate with roses...
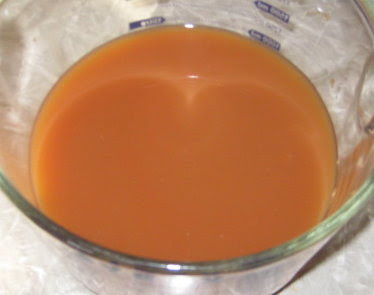
I am totally yucked out by this color!Why am I so concerned about the color? Because I've always been a "handmade for the holidays" person, though usually my gifts are sewn, embroidered, quilted, knitted, or handwoven. Due to all the work we've been doing on the homestead this year, I figured homemade jams and jellies would suit. Even so, I give to a few folks who consider me a health food nut. I could just imagine one of them opening this color jelly and thinking to themselves, "So. She's still at it with the bark and twigs, eh?"

Time for a true confession. This bothered me so much at first that I actually thought about cheating. For a brief second I contemplated adding red food coloring! Then I came to my senses.

I suspect it was those blossom ends and stems that affected the color. When I tasted the freshly squeezed juice, it was a bit bitter, which leads me to suspect that natural tannins may be the culprit. I was discouraged but I still pressed on, deciding to wait for the final product before declaring the whole thing a failure.

Yield?
Finished product not so bad after allSix half-pints and enough for me to sample on an almond butter and rose hip jelly sandwich made with toasted homemade whole wheat bread...

PB & r-h J sandwich. YumHappily, it turned out to be quite tasty. And the color isn't too bad either, so yes, I'll use them for gifts. I plan to wrap them in little drawstring bags sewn from my handwoven remnants.

I have since learned the rugosa roses are the most popular varieties for rose hip production. I'll have to consider a spot for a bush or two and maybe my rose hip ventures will be a little easier in the future.

Rose Hip Jelly photos & text copyright October 2009 

October 29, 2009

What I've Learned About Sauerkraut

This book is a keeperReading this book was like finding a missing puzzle piece. (Click the image for a closer look at the cover.) I've often wondered how people preserved foods without canners and freezers. Preserving Food without Freezing or Canning: Traditional Techniques Using Salt, Oil, Sugar, Alcohol, Vinegar, Drying, Cold Storage, and Lactic Fermentation explained why.

Some of these techniques were already familiar to me. The chapter that really caught my eye however, was chapter 3, "Preserving By Lactic Fermentation." In browsing through the recipes, I immediately noted that many of them were for sauerkraut. All the recipes I'd ever seen for sauerkraut included water bath canning. It never occurred to me that sauerkraut had been made for centuries before canning had ever been invented.

We live in an age when food preservation is done largely by sterilization. Destroying microbes and pathogens which are dangerous to us makes sense. On the other hand, we also understand that certain "cultured" foods are both healthful and nutritious, deriving benefit from friendly bacteria which sterilization would destroy. Take yogurt for example. Or sourdough bread.

So what exactly is lactic fermentation? (Also called lacto-fermentation). It is the process by which common, friendly bacteria called lactobacilli, convert the starches and sugars of vegetables and fruits into lactic acid. Lactic acid is a natural preservative which has the added benefit of increasing the vitamin and enzyme content of foods, as well as making them more digestible.

Sauerkraut is probably the most well known lacto-fermented food and it is easy and simple to make. From the book, I used the recipe "Sauerkraut in Glass Jars," (pg 68). The basic ingredients were cabbage and salt.

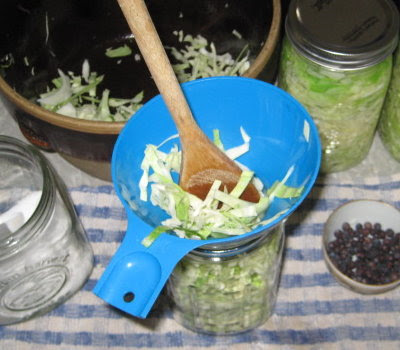
Step 1 - chopping the cabbageWhile I scalded several wide mouth, quart canning jars and lids, I chopped the cabbage.

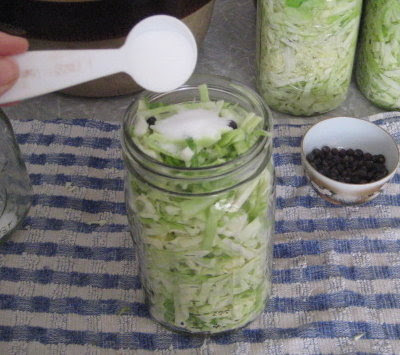
Step 2 - packing the jarsThis was packed firmly into the jars. The recipe called for either juniper berries or bay leaves for flavoring. I had dried juniper berries in my herb cabinet, so I used these, about 10 per quart.

Step 3 - adding sea salt and hot waterAfter the cabbage was packed in, one tablespoon sea salt was added to each quart. The sea salt prevents bad bacteria from putrefying the cabbage before enough lactic acid has been produced to do the job itself. Whey can also be used as a starter, but that's another post for another day.

The jars were then filled with hot water. The water needs to be non-chlorinated, so I let mine sit for 24 hours. (Chlorine evaporates out in 24 hours, something I learned when I used to keep tropical fish.)

Step 4 - wait 1 monthOne cabbage yielded three quarts jars. These must sit in the kitchen (room temp) for three days and then they can be put into storage. The directions said to wait one month before eating. For best keeping, storage should be cool and dark, like a root cellar or unheated room.

The fermentation process is anaerobic, so the important thing is that the cabbage is completely submerged in the liquid. However pressure builds up, so the jars must be opened daily to release it as the cabbage ferments. Traditional stoneware crocks do not have airtight lids and so this would not be a problem.

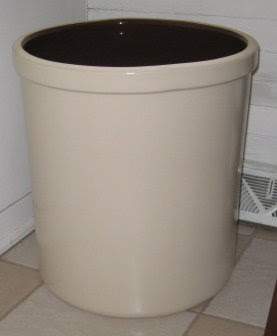
And it looks good tooSpeaking of stoneware crocks, my husband, who is ever supportive of all my endeavors, brought me home a ten gallon crock! I had been researching stoneware crocks online and found the best price at Pressure Cooker Outlet, though unfortunately, shipping doubled the cost. Ironically, the next week he traveled through Hillsville, VA, where their retail store (Red Hill General Store) is. Unfortunately they were sold out of everything but the ten gallon size. Guess who's going to be trying that recipe for whole cabbage sauerkraut! :)

And last but not least, because I love to share what I'm learning, following are some interesting links on this traditional food preservation technique (some with recipes):

Fermented & Raw - Food Renegade
Lacto-Fermentation: A Healthy Way to Preserve Your Harvest - DestinySurvival.com
Benefits of Lacto-Fermentation - The Nourishing Gourmet
Fermented Food for Beginners : Lacto-Fermented Vegetables - Nourishing Days
Vegetable Fermentation Further Simplified - Wild Fermentation
Comparison of Vegetable Fermentation Methods - The Nourishing Gourmet


What I've Learned About Sauerkraut photos & text copyright 


October 27, 2009

Re-Establishing A Food Storage

Opening the box UPS delivered and finding this...

Order of bulk goods from bulkfoods.com... was kinda like receiving an early Christmas present. What is it? It the beginnings of our re-established food storage: 5 lb raw hulled sunflower seeds, 5 lb natural process cocoa powder, 5 lb organic spelt flakes, 5 lb split green peas, 5 lb organic wheat bran, and 1 lb organic alfalfa seeds. To start.

As a long time gardener and food preserver, growing and storing a winter's worth of vegetables always made sense. It's what I enjoyed doing, it saved money, and we liked any aspect of being self sufficient. I suppose if we had raised animals for meat, butchering and storing at least a season's worth of meat would have made sense too. It wasn't until Y2K that I actually started to think of food storage in a broader sense.

It was in the mid 1990s that we first started hearing about Y2K as a potential impending disaster. You probably recall that there were many opinions about its expected effect as well as what to do; everything from the doomsdayers who claimed that civilization as we know it was coming to an end, to those who pooh-poohed the whole thing as utter nonsense.

Somewhere during that time, one of the local churches was going to show the C-SPAN video of the congressional hearings on Y2K. Dan and I had some questions; officially, our government was saying that there was no problem and that citizens need do nothing, but there were too many trustworthy sources voicing concerns. We decided to go. After a presentation of the facts, the congressional committee's conclusion was that Y2K was a real problem which required real answers. At the end of the video, the church's pastor got up to speak. I assumed he would take the opportunity to preach, but he didn't. All he said was, "If you want to know what to do next, read the book of Proverbs."

OK, I thought, I can do that. Proverbs is a book of sayings which contrast wise and foolish living. As I read through it, I thought about what to do in regards to Y2K. The wise, I read, are diligent, hard working, well prepared, self-controlled, generous, not given to get rich quick schemes, but gradually save and store up in preparation for winter. The example was the ant, neither influential nor prestigious, but hardworking and prepared. That made sense to me and I decided to start a serious food storage, including things that we couldn't grow for ourselves.

At the time I belonged to a food co-op (buying club), so it was easy to get good prices on good bulk food. I admit that I miss that. But I also stocked up on sales at stores, canned as much as I could get my hands on, and bought the food dehydrator too. We only had a few dollars each week to put toward food storage, but slowly we were able to store up several months worth of food.

Do you remember exactly what you did after the stoke of midnight on January 1, 2000? I do. After exclaiming that the lights were still on, we picked up the phone to see if there was still a dial tone! In the days that followed, I remember quite a few folks were angry because nothing had happened. These were the ones who felt "duped" after investing thousands of dollars in food supply kits and survival supplies. And then there were the I-told-you-so-ers, gleefully crowing because they hadn't bothered to prepare anything at all.

For myself, I thought it was a positive experience and I learned things which made me realize that we always needed a food storage. One was that Dan was out of work for a time and we were able to eat well without worrying about how to pay for groceries. The other was a friend whose husband was out of work. Now, I could never have afforded to buy her a week's worth of groceries, but I could easily give her a week's worth from our food storage, which I did.

Then came September 2004, when the western Carolinas were hit with the remnants of hurricanes Francis, Ivan, and Jeanne. By the time they reached us in the Appalachian foothills, they had been downgraded to tropical storms, so while we didn't get the hurricane force winds, we did get torrential rains, flooding, and extensive road and bridge damage. Like most others, our basement was ankle deep in water (and we did not live in a flood zone!) Even though we had a some damage, we were fortunate because many in our county had their basements cave in from all the water and ground saturation. Everyone was without electricity for a number of days and our food storage was a life saver. The grocery store shelves had long since been wiped out by folks buying up whatever they could get their hands on before the storms hit. We fared very well because in addition to food, I had been stocking up on matches, paper plates & napkins, toilet paper, and water. The biggest problem we had was because we had well water which required an electric pump; we had no running (nor flushing) water. We did have a 55 gallon drum filled with water, so by rationing we were alright.

In 2005 we had to move twice, great distances both times. Our food storage was already depleted, and we used up the rest of it getting reestablished. The next several years of apartment were basically storageless. When we first saw this place and I saw the pantry, I was delighted because it was one of the things on our "must have" list.

To me, buying food cheaply in bulk, preserving the harvest, or taking advantage of a good sale to stock up, just makes sense. Not only because of the economy, but because of my personal experience. So, we're in the process of re-establishing our stocks of foodstuffs. Happily, I recently found out that there is a food co-op in the area, which I plan to inquire about this week. I found it via the internet, and there are several sites you can check to see what's near you.

To find a local food co-op or buying club (includes international listings):
Food Co-ops & Other Co-op Resources
GreenPeople.org (Food Co-ops, Health Food stores, Natural Food Stores)
Co-op Directory Service

To find locally grown produce and products:
Local Harvest

To buy bulk online:
Bulk Foods Consumer Online Market (where my stuff came from)
Honeyville Food Products
Something Better Natural Foods
Walton Feed

Finally, for more information on food storage
Food Storage FAQ - Captain Dave's Survival Center
Food Storage Made Easy

Re-Establishing A Food Storage photos & text copyright 
27 October 2009 by Leigh at http://www.5acresandadream.com/

October 25, 2009

Last of the Green Peppers

Actually, they are bell peppers but I always call them green peppers no matter what color they are. I only had one plant this year, which gave me an occasional pepper for pizza or salads. This was okay because DH isn't particularly fond of peppers, though next year I plan to grow more. I picked the last big one the night before our first frost, and between it and the half a one left in the fridge, I thought it might be nice to freeze the rest.

The thing I like about freezing peppers is that they require no blanching. Just chop...

Preparing a bell pepper for freezing... and freeze. I do find them easiest to work with if I spread them out on a cookie sheet to freeze.

Chopped peppers on a cookie sheet in the freezer.Then they're easy to bag...

Ready for pizza or spaghetti sauce.... and I can just grab as many as I need for whatever. This quart bag contains a little shy of three cups. I'll have to keep track of how long it lasts me, so I'll know how much to freeze next year.

Last of the Green Peppers text & photos copyright 

October 23, 2009

2010 Garden Preparations

I am so glad to finally have completed our to-do list for next year's garden. You may recall that we first broke the ground for it back in August. At that time I also had a soil test done and sowed buckwheat as a green manure crop. Unfortunately (probably due to lack of rain) none of the buckwheat seemed to come up. Needless to say I was disappointed.

Without a green manure crop, I was anxious to plant another lest the weeds and unwanteds tried to take over again. September and October are a good time to plant annual rye here, but getting to the garden was delayed several times. Firstly, because I ordered 50 lbs of kelp meal to till in with the lime. I expected it to arrive within the week. What I didn't know, was that it was backordered. We waited and waited until finally I called the company. I was told that it should be in by September 24th. That date came and went and then we got a postcard telling us it was backordered a second time.

When we decided to go ahead and till without the kelp meal, it started to rain. We had almost 5 inches of rain during the last week and a half in September, and more than three by the middle of October. No tilling until the soil could dry out! Finally we got three beautifully mild, sunny days this week, so for the past two, we've been in the garden.

Oh-oh. Deer tracks in the gardenSomething I found though, concerned me. The day before yesterday, I went out to the garden to spread wood ashes from the woodstove. Lo and behold, I discovered deer tracks. I've seen deer on the property several times, but always in the back near the woods. I'm not sure what they were after, but they were back the next night as well. How do I know? Because I found more tracks in the ashes I had spread the day before. That's the photo on the left.

By the time we start spring planting, the goat fence will be up. Although it won't fence the garden in, it will block easy access to the garden from the woods. Even so, we are thinking we need to fence in next year's garden anyway.

Lone buckwheat plant.The other thing I discovered, was that a couple dozen buckwheat plants actually did grow! (Photo on right.) These weren't enough to do the soil much good, but I was happy to find them anyway. Next spring, when we till the rye in, I will plant buckwheat wherever a spring garden crop doesn't go. Buckwheat is supposed to be excellent at competing with and smothering out weeds, and is a great soil builder.

Over the past two days we've applied 355 lbs of dolomitic limestone, 12 lbs of muriate of potash, and a little over 38 lbs of triple phosphate. Ordinarily I wouldn't consider using chemical fertilizers, but the condition of our soil is pretty poor and these were the recommendations which came with the soil test. We will continue to improve upon the soil with green manure crops and compost, and in the spring, Dan will till the kelp meal in (assuming it's arrived by then!)

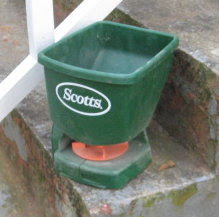
My bargain spreaderI found this little hand-held seed spreader at WalMart for about $8. Unfortunately it didn't work well for the fertilizers, as they were too chunky to go through the opening. I broadcast these by hand and then Dan tilled them in twice, once each way. The spreader worked great for the annual rye seed however. How evenly I got it spread remains to be seen!

The fruit of our labors? Shown in the photo below, which
actually doesn't look much different than the last production garden photo I showed you. That will change when the rye comes up!

All the fall chores are done for now.There are a few differences in the two photos though. The most obvious is the circles of tilled ground you see on the left of the above photo. There are five of these, ready and waiting for our orchard: two apple, two pears, and an almond tree. Even though we have plenty of pecan trees here, Dan prefers almonds so this tree will be for him. The trees should be delivered next month, so we're almost ready for them. We'll work the precious bit of compost we have into the soil before planting them, which will give them a good start.

The band of white you see in the photo is a large tarp, spread out to kill the weeds underneath. A lot of them are shrubby or viney, and we need a clear area to walk around the garden. One of the compost piles is also there on the right.

You can't see them in the above photo, are the corner and brace posts near the garden's back corner. In the photo below, you can see two posts for a gate.

Visualize a fence along here.What exactly is this a photo of? Well, it shows the way the ground drops off by the road. It's not a big drop, but it's steep, so Dan would like to dry in a short stone wall along there. Behind that on top of the embankment, we plan to put up a zig zag rail fence. I will plant bushes in the zigs on the garden side, and flowers in the zags on the road side. At the top of my planting list is elderberry bushes; what else, I haven't decided. This arrangement will provide privacy while working in the garden, which I am especially glad of.

So. As you can see it's been a very busy two days. Rain is forecast for tomorrow, and it can come without my having to worry about getting our garden preparations done. What a relief.

2010 Garden Preparations text & photos copyright October 2009 

October 21, 2009

Another "Find" For My Kitchen

I think about my kitchen plans a lot. Like, every time I'm in the kitchen. Now that I've had to bring my summer kitchen inside, I am more aware than ever of the work stations, work space, and storage I need. Still, we don't have all the details worked out yet, so I'll be living with it for awhile yet.

One thing for certain, is that the cabinets will need replacing. When I found this...

Green butcher block kitchen island on wheels... for a good price on Craigslist, I couldn't resist. It has a butcher board type top, a towel holder on the left, and a knife holder on the right. As you can see, it's on wheels, though it may end up becoming a cabinet base once we reno the kitchen. An added bonus is that the green matches the artwork on my Amish cabinets. (Photos and details about those in this post.)

It matches my Amish cabinets!Of course, this means I need to think this piece into the overall design. It's more of a challenge to do this with odd pieces, but on the other hand it's more economical to buy needed items when they can be found for a good price.

The biggest holdup in finalizing an overall plan is the stove. I passed up a vintage stove for a good deal, which I'm now kicking myself for. In my mind, I'm holding out for a wood cookstove (even more so now that the weather is turning colder and the back of the house is chilly).

Dan assures me when the time is right we'll find what we're looking for. Before we can get to the kitchen we need to add support to some of the floor joists and then clean out and winterize the crawl space. After that comes putting down the hardwood floor in the dining room and hallway. After that we plan to re-do the back bathroom, which has many problems. As you can see, we won't get to the kitchen immediately, so I have plenty of time to think, and plan, and dream, and look.

Another "Find" For My Kitchen copyright October 2009 


October 19, 2009

First Frost

First frost, right on scheduleWe woke up this morning to our first frost, but I was prepared. I used to get frost warnings from the TV weather forecasters, but we didn't make the switch to digital, so I've had to rely on the internet. Happily, I have Forecastfox installed on my web browser and it popped up an alert yesterday evening, enabling me to pick the last of my tomatoes...

Hopefully these tomatoes will ripen just fine... and cover my green pepper plant...

2 sheet frost coverThere are still some little peppers as well as flowers on the plant. Not sure how well these will actually do, but I thought I'd try to give them a chance.

In the morning, the fall garden tolerated the frost with no problems, but the leaves of the okra, tomatoes, and green beans were all frozen. The green pepper?

Green pepper plant survived with helpThe top sheet had a layer of frost on it, but the plant did just fine. We have a forecast for the low 70s by the middle of the week so, who knows? It just might give these guys a chance to grow a little bit more.

First Frost photos & text copyright October 2009 

October 17, 2009

The Fall Garden

After I wrote my onion post, I figured I'd better show you my fall garden, which is coming along nicely. I planted it in the same location as summer garden, and like it, this one was pretty spontaneous. But things are coming up and I'm looking forward to enjoying these cool weather vegetables.

Growing beetsThe beets (Detroit Dark Red - heirloom variety) are doing well but need to be mulched. Not as many came up as I hoped. This is actually the best I've ever had beets do. In the past they just never came up. I read though, that they need to be packed in firmly, which I made a point to do this year.


Little lettucesThis is Romaine lettuce (Paris White Cos - heirloom). It's also getting big enough to start to mulch. Romaine is the only lettuce Dan and I can agree on. I love the leafy green stuff while he prefers the iceberg types. With Romaine, I can have the leafy part and he gets the whiter, crisper stems and we're both happy.


Carrots & garlic doing wellI planted carrots (Danver's Half-Long - heirloom), also in need of mulching with garlic (from the grocery store) as companions. In the comments of my onion post, Danni mentioned the outrageous cost of buying garlic sets, which is exactly the reason I chose to simply use some from the store. They are coming up, so it should just be just fine, and at 69¢ for three bulbs, we can afford to plant as much as we want. And this is a good thing because we love garlic. Not only for it's culinary value, but it's medicinal value as well.


Speaking of that, these are onion plants that I found locally after I bought the mail order onion sets. These came 35 plants to a bundle for three bucks. We love onions too, so I don't know if I can plant enough. I'm not sure of the variety, all I had a choice of was white and yellow and I chose yellow. I think I should go back and get a bundle of white too.


Broccoli, yum!  I can hardly wait.I made several plantings of broccoli (De Cicco - heirloom) over the weeks. All of this is mulched! They are coming along beautifully.


These are recently planted Savoy cabbages, which were the only cabbage plants I could find when the cabbage plant buying impulse hit me. The only other thing they offered were collards. I'm not a cabbage aficionado, so I had to look this variety up when I got home. It is a flavorful, crinkled leaf variety, believed to have originated in Italy in the 1500s, Though not a good keeper, it can evidently survive our mild southern winters.

Dan isn't particularly keen on cabbage, but this variety is supposed to have the best cabbage flavor. Plus, I found a recipe for minestone soup I definitely plan to try. Since he's half Italian, he should like it! Scroll down at this site to see it.

1st radishesAlso, our first planting of radishes (Cherry Belle - heirloom) is ready! I've been planting a short row every couple of weeks, or actually sprinkling the seed in with other things. Hopefully we'll have a steady supply of fresh radishes for as long as weather permits.


The turnips (Purple Top White Globe - heirloom), unlike the beets and carrots, have made an enthusiastic appearance -

Turnips needing to be thinned.They were too thick in some spots, so I decided to try Dick Raymond's rake thinning method.

Dragging a rake through the tiny turnips.I have to admit that I wondered how well they would survive this treatment.

Turnips looking good.This shot was taken a couple of weeks later. I don't think I lost any tiny turnips, and some were actually spaced out better. There are still some clumpy spots however, so I'm planning on old fashioned thinning and eating some turnip greens soon.

Most recently planted were spinach, the onion sets, and more garlic. Also some pansies. I have peas but neglected to get them in the ground. Not sure if it's too late for them or not. I'll plant more radishes in the ground too.

My summer garden is still giving me tomatoes, green peppers, okra, and green beans, all of which will soon come to an end. I have to say that it's been a great gardening summer, and I'm thankful for it.


The Fall Garden photos and text copyright October 2009 


October 16, 2009

Good Grief, Why Are Onion Sets So Expensive?!?!?

In the first place, I discovered it's difficult to find onion sets for fall planting. No one seems to carry them locally. Of the two mail order places I did find, I was shocked at the price. Are they any cheaper in the spring, I wondered. After all, they're nothing more than baby onions and I can buy grown-up onions at the store for way less than that.

After they arrived (backordered at that), I was dismayed at how few there actually were.

Half a pound of onion sets is just a handfulThese were the cheapest I could find at $7.95 for half a pound, not counting shipping.

Fortunately, I found this article, "Growing Onions", at the National Gardening Association website. It describes how to grow your own onion sets from seed, which I am definitely planning to do next summer!

copyright October 2009 by Leigh at http://www.5acresandadream.com/

October 14, 2009

Honest Scrap

Awhile back, Benita awarded me the Honest Scrap. I confess that I havn't had much time to think about it, until Sharon mentioned that she would have awarded it to me if Benita hadn't.

Many of you have already received this award, but in case not, here are the rules:
1. Choose a minimum of 7 blogs to give this award to that you feel to be brilliant in content and design.
2. Show the 7 winner’s links on your blog and leave them a comment informing them that they have been given the “Honest Scrap.”
3. List 10 honest things about yourself that people may not know.

So, what ten honest unknown things about myself should I share? The answer to that came when I found this old photo of myself....

A long time ago ...This is of my dad and me, taken in the mid-1970s. What's it all about? That's where my ten honest things that folks don't know about me comes in!

1 - I used to be a hippie.

2 - My dream for a simpler lifestyle was born in the early 1970's. Back then, "homesteading" referred to something American pioneers did when they settled the west, and "footprints" were something left by one's feet. Terms like "sustainable" and "self-sufficiency" weren't part of the vocabulary. Back then, it was "going back to the land." My desire was to "live off the land" and that's what I wanted to work toward.

3 - After one year of college and three different majors, I dropped out and met a group of like minded folk. We each went our own way for about a year to make and save some money. Then we headed out together to find land to buy.

4 - Eventually about eight of us or so, bought 140 wooded acres deep in the Ozark Mountains. The closest paved road was 13 miles away. Since the land had no access, everything had to be backpacked in. We had no electricity, no clocks, and no keys.

Crossing the Little BuffaloThis second photo of me shows the only access when the river was up (unless one didn't mind wading). I am crossing a swinging bridge with my backpack and guitar.

5 - We made two tipis for shelter. One was sewn completely by hand, the other with a foot-treadle sewing machine. We lived in these year-round for several years.

6 - We cleared about an acre(?) of land on the side of the mountain and terraced a large garden.

7 - All of our cooking and canning was done over a campfire. The photo of my dad and me above shows the summer kitchen. It's not an especially good photo, but if you look closely, you see my dad standing near a pile of rocks, tending a coffee pot. The rocks made up the base for a fire, our "stove". Behind us you can see rough tables and shelves. There is a water faucet and basin there, furnishing cold running water which was gravity fed from a spring higher up on the land. In cold weather, we cooked over the fire in the tipi.

8 - I lived there for two, going on three years. Toward the end it was off and on, and problems started to develop. While the group was looking for the land, we had a common vision, a common goal. Once we got the land however, we had different ideas about what to do with it. Most of the problems and strife were stirred up by the women and eventually I was asked to leave.

9 - In spite of the interpersonal problems, this was in some ways, one of the happiest periods of my life. However, life doesn't always take us down the path we choose. Even so, the simple, hardworking, close to creation lifestyle suited me and I have carried much of it with me in the life I've lived since then.

10 - I am fortunate now to have a life partner who believes and feels the same way I do. Readers may wonder why we waited until we had an empty next to finally get our own piece of land, as though making a late entry into this lifestyle. That had much to do with the financial choices we made along the way. When we decided to homeschool, it meant living on only one income, and not a large one at that. We were fortunate to be able to rent in a fairly rural area however, and our children were raised in a much simpler lifestyle than most and with many homesteading values: raising and preserving our own food, food storage, utilizing what we had or doing without, not going into debt, chopping wood for that woodstove because who in the world could afford electric baseboard heat.

It is interesting to me that thirty years after those photos were taken, so many people are still longing for the same thing we did then. Oh, we couch it in different terms, but there is just something within some of us that sees the futility of the direction the world seems to want to go.

Hopefully, the years have made DH and me more realistic about our goals and how to obtain them. Sometimes it's hard not to think that if we'd only been able to start on our own homestead years ago, how much farther along we'd be. Still, neither of us regrets the choices we've made along the way. Being older and hopefully wiser now, I understand that there is more to life than simple reaching the finish line. There is joy and value in running the race as well.

Let's see, I'd better get back on track. To whom shall I award the Honest Scrap? That's a tough one to decide! Here are a few of my many regular reads, in no particular order. I benefit from reading them all. I invite you to visit each of them and see for yourself.

Homespun Fiber
Woolly Bits - Everything Textile
Camp Runamuck
A Handmade Life
Dot's Fibre To Fabric
Cottage Homestead
Flow of Love
MamaStories

Honest Scrap photos and text copyright October 2009 
October 12, 2009

Seed Saving: Cucumbers

I've done some seed saving in the past: green beans, pumpkins, sunflowers, marigolds, radishes, lettuce, things like that. But I have never tried to save cucumber seeds. After I unpacked my gardening books, I decided to give them a try.

This year I grew "National Pickling" cucumbers, an open pollinated variety (not sure if they've been around long enough to qualify as "heirloom" but probably.) I didn't plant a lot, just enough to keep us in fresh cukes this summer, because Dan loves cucumbers. Eventually I found a couple of overlooked ones, hidden under the leaves, so these became the ones I saved for seed.

Very ripe cucumber & my seed saving resource.My Saving Seeds book by Marc Rogers described an unusal way of obtaining cucumber seed for saving, so I thought I'd give it a try.

Scooping out the seed.Seeds are scooped from the mature fruit into a container.

These seeds would be difficult to pick out as is

I'm curious as to how well this will work.This is allowed to sit for five days, and stirred a couple of times a day to prevent mold from forming.

5 days later, it's a stinky goop.After five days it looked like a slimey goo, and it didn't smell too good either. I dumped the whole mess into a sieve and rinsed thoroughly.

Dried cuke seeds, ready to store until spring.Then I spread them out on a paper towel to dry. They did separate from the pulp easily and they look good now, but I have to admit I'm a big dubious as to how viable they'll be after all that. Well, we'll see.... next spring.

Seed Saving: Cucumbers photos and text copyright October 2009 
October 10, 2009

Woodstove In! Alcove Done! (Well, Almost)

(Continued from here.) Except for a few finishing details, the stove is in and the alcove is done.

Tah-dah!(You can click on most of these images to enlarge a little)
This is a Woodstock Soapstone woodstove, made of cast iron and soapstone.

Close-up of stove frontIt has a double paned ceramic glass "airwash" window in front for soot free fire watching.

Close-up of the side It is side loading.

Soapstone is commonly used for kitchen countertops and sinks, because it is stain resistant. It's also used in woodstoves and fireplaces because of it's ability to absorb and distribute heat evenly. It has natural heat retention, which means it can radiate heat even after the fire has gone out.

This stove is also equipped with a catalytic combustor ...

This is under the top-hinged door.... which burns particulate emissions from the wood, as well as exhaust gases such as carbon monoxide, methane, benzene, etc. Besides the environmental benefit of this, the catalytic combustor converts these to heat energy, increasing the stove's heating efficiency. A load of wood typically will burn for ten to twelve hours, meaning they only need to be loaded about twice a day! An added bonus is that with an EPA emission rating of only 1.3 grams/hour, these stoves qualify for an energy tax credit.

With soapstone cooktop in placeI also ordered a cooktop for it. This is an extra piece of soapstone which fits on top of the stove. You can see mine on the right. It cuts the temperature on top by approximately half, making it possible to cook directly on top of the stove.

We were fortunate to get this stove during a clearance sale, and also got a big shipping discount. This is our primary heat source, so the investment was worth it to us. It is replacing this....

Nasty oil burner... an oil burning furnace which neither of us likes the idea nor the smell of. And especially not it's using oil. It is combined with the AC unit, which we did use some this past summer.

The woodstove should heat most of the house, except perhaps the addition at the very back of the house (see floorplan). However, we are contemplating making that back room (currently the office) into a larger food storage area instead, which will benefit from cooler temperatures. Both bathrooms however, will probably require consideration for supplemental heat at times.

To see the living room "before," as well as a photo journal of how we got from there to here, you can check out the following links:
So, what's left to be done?
  • Put moulding on the very bottom to cover the concrete slab under the bricks. We decided to wait until after we refinished the living room floor to do that.
  • Fill in the "cracks" between the top row of bricks and cement board, and the bricks and moulding on the side.
  • Paint the living room walls and all moulding.
  • Sand and refinish the hardwood floor.
  • We also need to cure the stove, which we will do this weekend when the temperature dips
Thanks to the limbs that were trimmed from our two old oaks, we have plenty of firewood...

This is securityAs you can well imagine, getting to this point is quite a relief.