August 30, 2013

Oven Fried Okra

Oven fried okra with grilled chevon burger and homegrown tomato

Last summer I shared a favorite okra recipe with you, sauteed okra. I don't fry much and this was my alternative for a close-to-fried texture and taste. This year, I had another idea for oven frying okra. We tried roasting it a few times and that was good, but fried okra is a staple southern treat. Here's one way to make it without the bother of actually frying.

Oven Fried Okra

  • fresh okra, sliced
  • olive oil
  • cornmeal
  • seasonings to taste (we like salt, pepper, and garlic)
  • either more olive oil, or oil or melted fat of choice

In a bowl, mix sliced okra and enough olive oil to coat well. Sprinkle with cornmeal and seasonings, stirring and adding cornmeal until the "strings" are gone. Generously grease a cookie sheet with more olive oil, or whatever oil or fat you like. Spread okra out on pan and bake at 425° F / 220° C., stirring frequently, for about 20 - 25 minutes (or until golden brown). Enjoy hot out of the oven.

Oven Fried Okra © August 2013 

August 27, 2013

Fig Fail

Never let it be said I'm too proud to admit my mistakes! What did I do? I forgot to add the citric acid to this batch of canned figs...


I realized it when I was cleaning up after a fig canning session. I didn't see my container of citric acid and realized I'd forgotten to add it! As a double check, I noted that the liquid in the jars was light brown. Citric acid turns it a purplish color.

Figs are a low acid fruit, which means they require either the addition of lemon juice of citric acid (such as Fruit Fresh) to be canned in a water bath canner. Alternatively, they could be pressure canned.

So what did I do? I remembered a post I recently read at Stephanie's. She made fig sauce out of some of her figs. Talk about providential!

I added both figs and fig liquid to the blender & whirred them
up. Looks like applesauce, doesn't it? But it tastes pretty bland.

I dumped the contents of the jars into my blender, liquefied it, and because it was pretty liquidy, decided to cook it down a bit in my crock pot. For seven pints of figs I added half a cup of lemon juice and a tablespoon of cinnamon.

Cinnamon is a good addition to figs

Because it looks like applesauce, I mentally was expecting it to taste like applesauce. It doesn't. Not quite satisfied, I remembered my plums.

First plums, frozen.

My Stanley plum tree had produced a first ever offering of 14 plums. I'd popped them into the freezer until I could decide what to do with them. I put a little of the fig sauce in a sauce pan, added the plums, and cooked until the plums were soft. I ran is all through my foley food mill.

Plummy Fig Sauce


The yield was 6 pints of plummy fig sauce; 5 pints for us and one for a Christmas gift. I processed this batch in a boiling water bath as for figs, 45 minutes for pints.

My initial taste test was while the sauce was still warm but I think I'd prefer it chilled. At any rate, it was a good experiment for my abundance of figs and my few plums. It will be another enjoyable treat this winter.

Fig Fail © August 2013 

August 24, 2013

New Bedroom Windows

Continued from here. 

As rainy wet weather continues, so does progress on our bedroom. The project at hand? Replacing the windows.

The outer bedroom wall, ready to be torn out.

One thing Dan and I have found to make a big difference in the energy efficiency and comfort of our home, has been energy star windows. That, plus insulation, made a huge difference in the kitchen, so that we decided it was a must in the bedrooms as well. Our two bedrooms take the brunt of both blasting winter winds and blazing summer sun, so that they are the coldest rooms in winter and hottest rooms in summer.

The loose insulation was removed as the wall planks were taken down.

Happily, we have a builders surplus warehouse in the area. It has a large selection of salvage, leftovers from construction sites, unclaimed freight, and odd lots. For most things, you never know what you'll find except for an assortment of all kinds and sizes. It was here that I found the two windows we used in the kitchen for less than the cost of buying one at any regular retail home improvement store.

3, 4x4 posts were behind the wall; one on either side of the windows and one
where the closet wall used to be. The window header was made of 2, 2x4s. The
problem with this was that it couldn't support properly, resulting in sagging.

I asked Dan how much he wanted to spend on the windows, and after taking a look at the budget, he decided our limit was $300. We chose a day to do some window shopping at the surplus store.

Shot from the outside, removing the two bedroom windows.

When we got there, the fellow said he didn't have much of a selection. I had hoped to find vinyl clad wood windows, like I did for the kitchen. The only wood window was a way too large triple casement window, with no cladding. Window cladding is an exterior covering, either metal or vinyl, which protects the window from the weather. It means not having to worry about painting it every so many years.

Happily, the wood siding and rim joist were in pretty good shape
here, compared to what we've discovered elsewhere in the house. 

There was, however, a large selection of vinyl windows. I'm not too crazy about solid vinyl, but since we were there we decided to take a look.

Dan wanted to make a proper header for the new windows,
but also decided to support the ceiling while he made it.

I admit I wasn't very impressed with the selection but also didn't want to be too set in my idea of what I had to have. Then Dan noticed a brand new, double hung vinyl window which was about the size we were looking for. It even came with a screen, which is a plus, because our kitchen windows didn't have screens and it's been impossible to find new ones to fit. Next to it were two more just like it. And, they were energy star rated for all 50 states.

Framed out for the new windows.

These particular windows weren't priced so Dan asked how much one would be. $75. We took a few minutes to mull that over and I was able to find a 4th window just like the other three. If we bought all four, we would have two for the bedroom we're working on, plus two to replace the windows in the other bedroom (whenever we get around to that!)

Being vinyl, they can't be painted. That means I'll 
have to work white into my bedroom color scheme.

So we got four new windows for the price we were willing to pay for two. Talk about feeling blessed!

New windows are just a little bigger than the old (on the right). I like that we
got 2 sets so that the windows on this side of the house will look coordinated

They still need to be caulked and then we can insulate the wall. Since we can't put back the tongue and groove wall, we're still discussing what to replace it with. Right now, I'm thinking the window wall ought to look similar to the adjacent wall of closet and storage doors; a rich, custom paneled look perhaps? After that we can do the ceiling, then the floor. And who knows? If it keeps on raining, we may actually be able to move in by the time winter sets in.

Next - Progress On The House - new siding on the outside

New Bedroom Windows © August 2013 

August 21, 2013

Homestead Harvest: Fruits and Nuts

August has found me busy picking and preserving fruits.

Blueberries. I'm able to harvest these for about 4 or 5 weeks.

Figs all ripen over a couple of weeks.

Apples. Our first year to harvest!

The blueberry bushes and fig trees were well established by the time we bought the place. We planted the apple tree almost four years ago and this is the first year it's produced enough for even a small harvest.

Another first harvest is elderberries.

Elderberries beginning to ripen.

These bushes, too, were planted our first year here and, finally, I've gotten enough to pick. Well, I might have last year, but competition with birds is stiff, especially since they'll eat them green. I'm wanting to make elderberry jelly with this first harvest.

Peaches were ready earlier in the summer, but they produced only a pitiful few.


Peaches

Last year I was able to freeze three quarts in addition to eating them fresh. This year, barely enough for a bowl or two of cereal. Not even enough for ....

Peach pie, made with last year's frozen peaches. I used my whitest rendered
goat fat for the crust, and it was the tastiest and flakiest crust I ever made!

I got about a dozen plums for the first time, but almonds were a complete no-show although there were loads of blossoms. Neither did I get any hazelnuts, but those trees are still pretty small. Pears have yet to produce and I think my few cherries were eaten by the birds.

The other thing I've been harvesting is rose hips.

Rugosa rose hips

Still to come, wild persimmons and pecans. Maybe even some wild muscadines too. Last year I didn't get any persimmons or muscadines, but it was my best pecan year ever.

In the garden, melons have been a bust I reckon because of all the rain and so little sun. No matter, I'm thankful for whatever we get.

August 18, 2013

Rain + Rain + Rain = A Start on the Bedroom

14+ inches of rain in July and 7.8 inches so far this month have certainly put a damper on a lot of things; our summer list of outdoor projects has very few things crossed off. Plus, with so little sun things have been slow to ripen, such as the blueberries, tomatoes, and figs. Nor are things able to dry out, so it's hard to work much in the garden.

On the bright side, it's meant our summer highs have averaged about 10° cooler than normal. It's also meant we've gotten a lot done on inside projects such as the hall bathroom (which is no longer in the hall), and Dan's study. With more rain every time Dan has a day off, there was nothing for it but to start on what will eventually become our bedroom.

Closet door in the spare bedroom.

Above, is a photo of what we've been calling the spare room (photos of the entire room including the goofy closet, here). Initially, we used the room for storage while we worked on other rooms with the idea that it would eventually become a guest bedroom. Then we got another idea.

In my Dan's study post, I told you about our proposed master bedroom suite and showed you changes in the floor plan. Now that his study and the bathroom are done, the bedroom is the last room to finish the project. With all the rain, we figured we might as well give it a start.

Most of the walls (and ceilings) in our old house are oak tongue &
groove. The boards have to be individually removed to tear down a wall. 

We don't want to make this a complicated project (yeah, right), but we do want to revamp the closet. There's something like 188 cubic feet behind that wall, largely untapped because the old closet doors are an inadequate 24 by 72 inches. The first step was to tear down that wall.

Our ceilings are 8' 9"

There were actually two closets behind the wall, the one for the spare room on the right, and one for the bedroom we use now, my closet actually, on the left. The wall is not load bearing, so the studs can be removed to rebuild the space to make his and hers closets. Our ceilings are tall, 8' 9", so above the closets we plan to build storage cupboards for seasonal items, such as extra blankets and linens.

The next step will be to take down those studs, but before we begin to rebuild we need to gut the wall with the windows on it.

A view out the windows
The windows are original to the house.

The drafty, loose fitting windows need to be replaced and insulation must be added in the wall.

We'll just take it a step at a time depending on the weather and Dan's work schedule. And as much as we'd both love to be outdoors, we'll also both admit we can't wait to have our new bedroom done. At least we have a place to sleep in the meantime.

Next post: New Bedroom Windows

August 15, 2013

Flax For Seed

A June photo of flax flowers, forming seed pods, and marigolds.

One of the new things I planted this year was flax. Sometimes fiber artists grow it for the fiber to make linen; I grew it for the seed. Not for us, mind you; I don't care for flax no matter how much Omega-3 essential fatty acids it contains, I don't like the taste. I grew the seed for the chickens and goats.

Dried flax seed pods

After making a bed of beautiful, tiny blue flowers all summer, it was ready to harvest when most of the plants were dried and brown. Like many other things, all the pods aren't ready to harvest at the same time, but I wanted to get most of them before the pods shattered and scattered their seed onto the ground.


Still to come will be the job of threshing, although I may see what the goats think of them pods and all. They enjoy the cowpea pods and the extra roughage is healthy for them.

I planted one packet of seed which was enough for one bed, about 3 or 4 feet by 16 feet. Like other things, I consider this first harvest to be a seed crop. I'll save it to plant next year for a larger harvest. Eventually I'll figure out how much I need to plant to have a year's worth plus seed for sowing.

Flax For Seed © August 2013 by Leigh at 

August 12, 2013

Expanding the Rodent Control Department

After losing so many baby chicks to a rat, Dan and I discussed the possibility of getting another cat. There are certainly enough rats, mice, shrews, moles, rabbits, chipmunks, snakes, and squirrels to keep more than one cat busy. I looked at kittens on Craigslist, but never reached a decision. The other day, it occurred to me to look at one of our area animal shelters. No, they aren't free, but the adoption fee includes vaccinations plus spay or neuter. This not only makes acquiring a pet more affordable, but also gets them out of a cage and into a home. So, I went looking for a young adult cat and came home with...


They're about 6 or 7 weeks old, a little boy and a little girl. Of all the cats at the shelter, these were The Ones.


Little Girl Cat is friendly and purry; instant cuddle cat, just add lap.


She made herself at home in no time.


Little boy cat is timid and shy.


He was slow to coax out of the kitty carrier. If I try to pick him up he gives me a baby hiss and tries to run away, but doesn't growl, bite, or scratch once I've got him. The folks at the shelter said they were relieved that I took them both. They worried about Little Boy Cat being left behind because he's too scared to be friendly.


He's gradually getting adventuresome.

And Riley?


Not pleased. I put the kittens in the pantry and put up the baby gate to keep them in. This will give them some territory to get used to for now, plus, I hope, let Riley get used to the idea before being overrun with kittens.

Riley quickly hopped over the gate to investigate.

Riley smelled them before he saw them.

Of course Riley only hisses as them. The kittens are both quite fascinated with Riley, and will sit on their side of the baby gate watching him, while he lies on the kitchen floor and tosses hisses at them over his shoulder.

Little Boy Cat came out more the next day, but he still has his safety zone.


He loves to play and can easily be drawn out for that. He hasn't purred for me yet but likes having his chin scritched. I've noticed that if my hand is raised too high while I'm petting him, he flinches. I suspect something happened before he got to the shelter that has made him a little gun-shy; nothing that gentleness and love can't cure.


The baby gate barricade was breached after about 24 hours.


They have supervised access to other parts of the house.

Names? We'll have to live with them awhile to figure that out.

August 9, 2013

Dan's Study

Dan's study is done.  This shot was taken from our
newly remodeled hall (now master suite) bathroom.

Thanks to rainy weather (which gets tiresome but we try to be thankful in all things), Dan's study is pretty much done, except for finding homes for  a few more books and some odds and ends. This was a "found space" project which is part of a larger plan for a master suite.

The space was "found" at the end of the hallway. Originally, the floor plan looked like this....

Click here to see the floor plan for the entire house

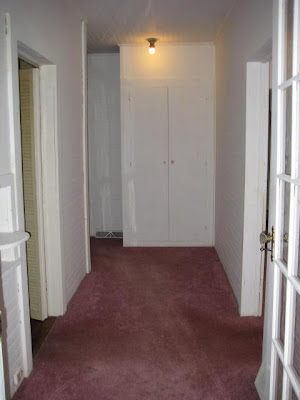
When we first bought the place the hallway looked like this...

Wide, pink hall.
Spacious 5 foot wide hallway with a linen closet.

We did some evaluating awhile back to see if we could make a master bedroom suite. We ended up with an alternate floor plan which used the back of the hallway to make a study for Dan.

The proposed plan for a master suite. 

We've made some progress on that project and now the hallway looks like this...

Details about building this bookcase can be found here.

Behind that bookcase is Dan's new room.

The wall behind the desk on the right
is the back of the bookcase in the hall. 

He build the desk and cubby shelves quite a few years ago
but had to cut down the desktop to fit the space. He elevated
the cubbies for more room & I glued corkboard in between.

On the opposite wall where the linen closet used to be
there was just enough room for his drafting table.

The soffit above his drafting table.  (Please don't
notice that the ceiling still needs to be painted)

The soffit solved several problems, the biggest being that the linen closet's builder cut out gaps in the crown molding to accommodate closet walls. Our choices were to either replace all the crown molding, or build the soffit. The soffit not only defines the space, but made it easier to install the mini-pendant lamp.

You can see all of Dan's woodburnings at his blog.

The last thing to be built was more bookshelves. Besides being utilitarian, they help define the space, making it more like a room. In the first photograph, that's the back of these bookshelves on the right, looking like a pony wall.

The built-in bookshelves are dual purpose, and also
strategically situated over a structural bump in the floor

Cost for the entire project was very nominal. Besides materials for the bookcase in the hallway, he purchased a few 2x4s for the soffit, the light, materials for the bookshelves, and a small rug to protect the new hardwood floor from the wheels on his chair. The room is small, just a tad under 5 foot by 8 foot, so he uses the one chair at both desk and drafting table. That rug, by the way, is *RILEY APPROVED* ....

Dan's study is now Riley's favorite napping spot. 

For the master suite, we have the bathroom done and now Dan's study, with the bedroom yet to get started on. This time of year, we'd rather be working outside on preliminary steps for the new barn, weather permitting. We'll probably do the bulk of the work on the bedroom this winter, unless it doesn't stop raining.

Dan's Study © August 2013 by Leigh