Showing posts with label food storage. Show all posts

November 20, 2023

Product Review: Fresh Keeper by Luxear

I don't often do product reviews, but when I was contacted by Luxear, I was really interested in doing this one.  Luxear is the same company that makes those fantastic Arc-Chill cooling blankets that I love. So I already have confidence in their products and this one, Fresh Keeper Refrigerator Storage Containers, sounded like a must have. With a garden like mine, something to help keep things fresh would be a real bonus!


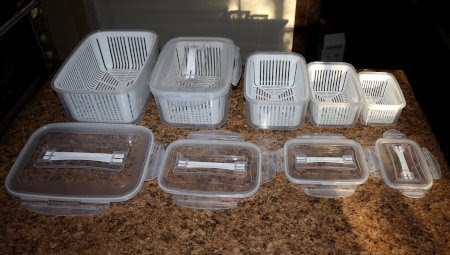
The box contained a set of five storage containers with lids.


These included a good range of sizes: 

196 oz, 129 oz, 78 oz, 46 oz, and 24 oz.

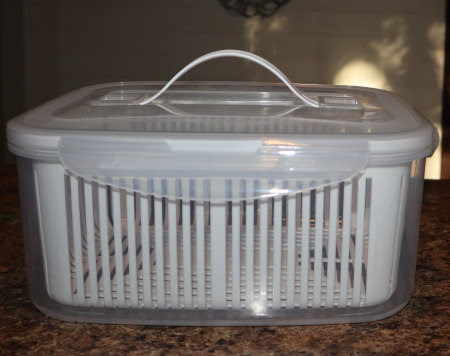
I like the lids, both the carrying handle and the way they snap on.

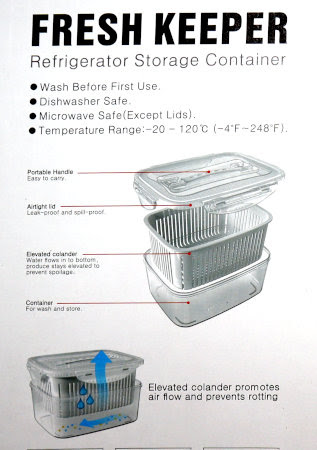
The removable colander is nice for rinsing produce before storage.

I'm going to confess here, that I wondered if the freshness wasn't due to some sort of chemical additive, but no. The fresh keeping is just simple common sense.

The inner colander lets moisture drip off
and allows for air flow to keep foods fresh.

These can be used for any fruit or vegetable, so for my test, I chose fresh picked garden greens. I washed them well, shook off the excess water,and divided them into thirds. One third went into the Fresh Keeper, one went into a ziplock bag, and the other will be wrapped in a paper towel to store.

Then I popped them all into the fridge. 

Day 1

I checked them daily. Of course, the greens on the paper towel wilted the quickest, so the real competition was between the greens in the plastic Ziploc bag and the Fresh Keeper. After 7 full days, the difference started to show.

Day 8

The greens in the ziploc were beginning to lose color and wilt. The greens in Fresh Keeper were just as fresh looking as the day I picked them.

Conclusion? Fresh Keeper is definitely a keeper! The Amazon link is here. And the good news is that Luxear has given me a 10% Amazon discount code to pass on to you. They're currently running a Black Friday Deal, so the discount will count on top of that!

Seller Rywell Direct:4QL428NE 
Seller LUXEAR Inc:ETUJOFJH
Expires 12/31/2028

(Not in the US? You can order directly from the Luxear website.)

With the discount, these would make great holiday gifts. 

December 12, 2022

Recipe: Rubaboo (Pemmican Soup)

As promised at the end of my Pemmican blog post, here's my first cooking experiment with my pemmican. This is rubaboo or pemmican soup. The recipe is based on a description in the book Forty Years in Canada by Col. Samuel B. Steele. It was published in the early 1900s, and of pemmican, he says,

"It was cooked in two ways in the west; one a stew of pemmican, water, flour and, if they could be secured, wild onions or preserved potatoes. This was called 'rubaboo.'"

That's not exactly a recipe, but it's description enough for a plain cook to figure out that it's made with a few basic ingredients plus whatever is at hand. I started mine with pemmican, potato, turnips, carrot, and onions.

Not pictured: flour and salt.

As a one-pot meal, it's easy to make; just simmer until the veggies are tender. Toward the end I took the notion to add some chopped fresh kale leaves too.


A more authentic meal would likely serve it with hardtack, but alas, hardtack is something I haven't tried my hand at making yet (but it's on the list). I served it for lunch with the closest modern equivalent - plain saltines.

What did we think? We liked it! Obviously, it's a very versatile recipe with endless possibilities. I think too, that this is the more prudent use of our pemmican, which is very dense in protein and calories. Rubaboo stretches out a small amount for many meals. Since pemmican is shelf-stable, it's an excellent way to preserve and store meat for hard times situations.

October 7, 2022

Dehydrated Potatoes For Instant Mashed

I grew up in meat and potato country, where potatoes were the standard starch for most meals: baked, mashed, boiled, scalloped, hashed, french fried, you name it, we ate potatoes that way. Now, I rotate the starches I serve—rice, pasta, potatoes, bread or rolls—but our favorite is always potatoes. Especially, mashed. With salt and butter. Or gravy.  Or my mock sour cream (ricotta with a little kefir stirred in until it's sour cream consistency). Yum. 

There are a lot of steps to making mashed potatoes, however, so I don't make them very often. There's store-bought instant, but somehow I don't think those taste very good. They supposedly use freeze drying to make it (which is said to be superior for retaining flavor and nutritional value), so maybe it's the other stuff they put in it: vegetable oil (soybean, cottonseed, sunflower or canola), corn syrup solids, maltodextrin, sodium caseinate, disodium phosphate, mono and diglycerides, calcium stearoyl lactylate, artificial flavors, artificial color, sodium acid pyrophosphate, sodium bisulfite, dipotassium phosphate, silicon dioxide, etc. Or maybe because I'm so used to eating real food, that store bought instant mashed potatoes just taste "off."

When I discovered several mashed potatoes dehydrating videos, I was interested! They were pretty easy to make.

Cut into chunks and boil as for mashed potatoes.

Mash when soft. Don't add milk or butter. If it 
needs thinning, use the potato boiling water.

As you can see, I didn't peel my potatoes, even when I'm mashing them. It adds nutrition, and neither of us minds the bits of peel. We're used to it.

Spread onto fruit leather trays or parchment paper. Set the dehydrator
to the vegetable setting and dry until crisp (for me, about 18 hrs)

I've tried both waxed paper and parchment paper for drying things like this. I don't find either works very well, so I'm thinking I need to invest in some fruit leather tray liners or maybe silicone baking sheets. (Which I did and they work great! My review is here.)

Break into pieces and put them into the blender.

Blend on high until it's powdered!

Store in a sealed, airtight jar (I vacuum pack mine).

I haven't tried making mashed potatoes with them yet, but I'll report back when I do. I'm going to follow the rehydrating recipe from Northstar Prepsteader.     

Heat to boiling
2/3 C water
1 T butter
1/4 tsp salt
Remove from heat and stir in
1/4 C milk
2/3 C potato flakes
Season to taste 

If these are as good as everybody says they are, we'll eat a lot more mashed potatoes this winter!

September 26, 2022

Preparedness Month Project

About two years ago, we upgraded our pantry (some of the photos below are from that post). We added insulation to the walls, installed energy efficient windows, and I rearranged the shelves in what I hoped was a good set-up. But, you know how it is; living with an idea sometimes isn't as good as it seemed. So, I spent some time this month (September is Preparedness Month, after all!) figuring out how to improve the pantry.  

My original set-up: one corner

This corner was the first problem. I thought I could work with L-shaped shelving, but it was more hassle than it was worth. The opposite corner was okay, so I left that side as is.

Original set-up, opposite corner

I cleared off the problem shelves, gave them a dusting, and set them up like library aisles. Then I used another shelving unit to add another shelf on top.

New shelf arrangement

The other side of the room was the same but a foot shorter because the pantry door isn't centered in the room. I have a five foot wall on one side of the door and a four foot wall on the other.

Original set-up on the other side of the room.

Original set-up, the other corner on that side.

If I rearranged the ell to make an aisle between the shelf units, there wouldn't be enough room to use the grain grinder on that side of the island. What to do? After a lot of thinking and measuring, my solution was to move the island cabinet to the four-foot wall instead of the table. That made enough room to turn the shelf, plus I can still get to the grinder. 

New arrangement. (The lean is due to the camera lens!)

However, I liked having the island for the Berkey water filter. And the countertop was handy to set down an armload of jars before shelving them.

Original set-up

So, I found something that takes up less space. 

New arrangement.

The Berkey is still easily accessible and I have a small surface for setting things down. Plus, I can get around the island to get to everything, and the cart shelves are perfect for things I use often, like my fermentation and cheese making accoutrements.

I think this room arrangement makes better use of available floor space. And it helps with another problem too, i.e. a place for empty canning jars. I've tried various ideas for jar storage, but none seem to work very well. With this arrangement, there's room between the wall shelves and the cabinet for boxes of jars. Empty boxes can go on top of the shelf units.

In addition to a set-up that I'll hopefully be happier with, this exercise gave me an opportunity to check dates and seals on canned and vacuum packed dry goods, dust jars, rotate, and reorganize. When I'm busy canning for a string of days, I tend to just pop the new jars into any empty space on the shelves just to get them out of the way. I like it better when everything has its designated space: fruits, veggies, soups, meats, jams and jellies, pickles, etc. 

How about you? Do you have particular challenges with your food storage? How have you tried to solve them? How do you manage empty jars? How do you keep things organized? What's worked? What hasn't? I'm open to ideas!

September 14, 2022

Dried Pear Sauce

Fruit and vegetable powders are very popular amongst folks who dry a lot of food. That intrigued me, so dehydrated pear sauce was the first thing I made using my new blender. I started with a quart of pear sauce that I didn't can.


I don't have fruit leather trays for my dehydrator, so I used waxed paper and spread it with a spoon. I tried to keep the thickness under a quarter inch.


After about a day in my dehydrator, the texture was similar to fruit leather.


It was pliable, and this is how people make fruit roll-ups. To powder it, however, I needed it drier. It was sticking to the wax paper, so I peeled it off and returned it for another day in the dehydrator.


It never got truly crisp, but it got dry enough to break into smaller pieces.


It only took a few seconds in the blender, using the tamper to push the pieces on top toward the blades.


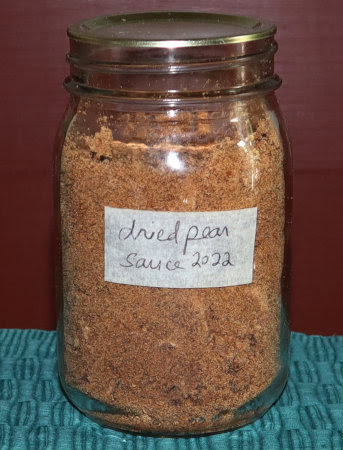
One quart of pear sauce yielded about a pint dried. It isn't like a true powder, it's moister than that and a little sticky. More like brown sugar but not.

Lastly, I vacuum sealed the jar with my little hand pump to protect it from pantry moths and humidity. (I don't trust ants either!)

I'm thinking this would be a fantastic thing for hikers and campers. It could be sealed in small-serving mylar bags to carry. For myself, I will probably rehydrate some just to see what it's like, but since I have plenty of pear sauce canned for serving right out of the jar, I'll mostly use the powder for baking. It can be added directly to baked-good batters without reconstituting. I foresee myself using it in cakes, muffins, cookies, pancakes, etc. I like pieces of dried fruit for our granola and oatmeal, or for baking like my Better Than Fig Newton Bars and Fruit Cake Cookies.

Dehydrating versus canning. Which is better?

I think where we fall in this debate depends on our preserving, cooking, and eating habits. Canning lends itself well to large quantities of an item and is usually the first way I preserve the harvest. Drying (and freezing) work well for small quantities that aren't enough to can. Both dehydrating and canning take time and a power source, although I'm pretty sure that my dehydrator uses less electricity than my stove, even though it takes longer. When necessary, I've canned on a wood cookstove and over a campfire. My dehydrator requires electricity, and while solar dehydrators do exist, I read they don't work well in humid climates like mine.

Dried foods definitely use fewer jars for the same fresh quantities and need less storage space, which are both pluses. Also, they can be stored in mylar bags, making them easier to transport than heavy, bulky jars. On the other hand, dried foods require some planning ahead to prepare, while canned goods are basically ready to use. Dried foods need to be protected from potential pest and moisture damage. Canned goods have the potential for a broken seal and spoilage. When properly stored, both have a good shelf life (see Grandpappy's "Five Different Shelf Life Studies" for some surprising information). 

No matter our habits and preferences, I think having both canned and dried on hand increases food security and versatility. Now, I have two forms of dried fruits and veggies - pieces and powder. And that means even more options.

Okay, you home food preservers out there, your turn. Favorite methods? What are they and why? Any ideas or tips to share with the rest of us? Anything new you've discovered? We want to know!

Dried Pear Sauce © September 2022

September 8, 2021

A Curious Case of Compromised Quality


I've used Tractor Supply Co.'s 5-gallon buckets for food storage before, but I've never had this happen! At least I know my 02 absorbers are working. 

😆😕😄😂😀😲😝

May 25, 2021

Book Review: A Year in an Off-Grid Kitchen

Last December, I told you about a Kickstarter I was participating in, for Kate Downham's then upcoming cookbook, A Year in an Off-Grid Kitchen. The Kickstarter was a success, and Kate's book is available starting today! I received a copy for my support and want to tell you about it, and about a giveaway. 

A Year in an Off-Grid Kitchen: Homestead Kitchen
Skills and Real Food Recipes for Resilient Health

What I really like about this particular cookbook, is that it is more than a recipe book. It's a manual of how to harmonize a healthy, seasonal diet with a healthy, natural lifestyle. The introduction is filled with valuable tips and information. It discusses the traditional foods approach to eating, tools for the off-grid kitchen, an excellent section on cooking on a wood cookstove, ways to keep food fresh without a fridge, and cooking with small-scale solar. All very practical!

The sections that follow are organized according to season. Each section includes recipes, how-tos, and preservation techniques. It should be noted that the author is Australian, and so follows Australian protocols for canning. She encourages those who follow USDA recommendations to do so. All recipes are easily adaptable to USDA guidelines.

Recipes are keyed so you can find gluten-free, paleo-friendly, grain-free, dairy free, vegetarian, and other options. Recipe notes and useful tips are scattered through-out the book. The recipes include both Celsius and Fahrenheit temperatures, and metric and imperial measurements. 

Winter begins and ends the book with a seasonal focus on root cellar vegetables. Recipes include bone broth, soups, and stews. Interesting, informative sections include developing your own soup and stew recipes, cooking a perfect roast on a wood cookstove, and getting started with home butchery. 

Early spring begins with eggs and greens (both garden grown and foraged); late spring adds dairy. Recipes include rice bowls, soups, casseroles. basic cheese making, plus other dairy goodies. Informational sections discuss nettles as a storable superfood, edible weeds and wild plants, and how to keep diary products fresh without a fridge. 

Summer moves into fresh vegetables with a variety of recipes for vegetable dishes, dips, and hummus. Late summer includes fruits and preserving the harvest. You’ll learn how to preserve fruit without cane sugar, how to make apple core cider, making jam the old way, and how to make herbal medicines. Summer preservation techniques include dehydrating, pickling, and water bath canning. 

Autumn introduces lacto-fermenting with techniques and recipes to try. The seasonal focus is on potatoes, fruits of the season, preserving tomatoes, and how to utilize all parts of the yearly pig. How-tos include butchering without a saw, stuffing sausages, rendering lard, and how to make your own ham, bacon, and sausages.

The last section, “Grains, Sourdough, and Year-Round Recipes,” is also excellent. It includes discussions on grain intolerance versus glyphosate intolerance, soaking and cooking grains, and whole grain baking. There are loads of tips, tricks, and recipes for sourdough, including gluten-free sourdough. I especially appreciated the off-grid approach for baking bread in both winter (when it’s too cold!) and summer (when it’s too hot!) Recipes include crispy Dutch oven bread, tortillas, pizza and foccacia crusts, pie crust, crackers, and sweet baked goods. Kombucha and condiments round out the year-round recipes.

As both a cookbook and reference manual, this one is comprehensive, well written, and interesting reading. Hardcover and paperback copies are available at Amazon, and the epub edition is available at Permies. Plus, Permies.com is hosting a giveaway. Between now and Friday, participants can enter to win one of four copies. Details here.

September 10, 2020

An Exotic Treat in the Mail

I received a lovely treat in the mail!


These lovely goodies came from Wholesale Nuts And Dried Fruit, sellers of bulk nut and dried fruit (obviously!).

They look and smell so good, popping with flavor. But what should I make? I toyed with the idea of fruitcake, which I've been thinking about ever since I read about Mama Pea's fruitcake. Dan, however, firmly states he doesn't like fruitcake, so I thought, well, why not start with small bites and see what he thinks. So here they are...


Fruitcake Cookies
  • 1 pound dried fruit
  • 6 ounces chopped nuts
  • ¼ cup apple juice*
  • ½ pound soft butter
  • ½ tsp ground ginger
  • ½ cup white sugar
  • ⅓ cup brown sugar
  • 2⅔ cup flour
  • 1 tsp salt
  • 1 tsp baking soda
  • 1 large egg

The night before, set the dried fruit to soak in the apple juice. Next morning, blend the butter and sugar, add and mix in the egg. Gradually stir in flour, soda, salt, and ginger. Mix in the fruit and soaking liquid. Mix in the nuts. Drop by spoonfuls onto a greased cookie sheet. Bake at 350°F (180°C) for about 15 minutes or until golden brown. Makes 3 doz.

*Traditional recipes call for brandy, rum, etc., but you can use any fruit juice you choose. Orange is common, but I used apple to keep the flavors of the cherries and mango true.

The verdict? Winner! So good. I think it was the dried, rather than candied, fruit that made these a success.

If you're looking for a nice variety of dried fruits and nuts, or are looking to do some stocking up or adding some special treats to your prepper pantry, you can check out Wholesale Nuts And Dried Fruit for yourself, just click on that link.

An Exotic Treat in the Mail © September 2020

August 17, 2020

An Experiment: Dehydrated Gnocchi

Adjustments. Some are easier to make than others! I knew I'd have to make adjustments in my food preservation routine when we replaced the upright fridge in my pantry with a chest fridge on the back porch. Even though there wasn't a lot of freezer space in that little upright, I packed it full nonetheless! No longer having it means my freezer space is more precious than ever. 

One problem that's led to an adjustment is that I can no longer save some of my canning for winter. I used to store summer pickings of fruit and tomatoes in the freezer and save the jam, jelly, and sauce making for winter, when the heat from the canning process was welcome. I can't do that anymore because I don't have the freezer space.

This has led to is more dehydrating; instead of freezing small amounts of some foods, I've been drying them. Also, I've been thinking about other things I can dry as well. Fruits, vegetables, and herbs are pretty routine to dehydrate, but as I was working on our winter supply of gnocchi, I started to wonder if I couldn't dehydrate it too, like pasta.

Gnocchi (Italian dumplings) can either be made with potatoes or ricotta cheese. I make mine with ricotta (recipe toward the bottom of this post) of which I have a lot when milk is plentiful and I'm in cheesemaking mode. Gnocchi freezes well and is a delicious side dish or addition to soup. But storing several gallons of it in the freezer takes up a lot of room. A dehydration experiment seemed worth a try!

Gnocchi dough is traditionally rolled into ropes and cut into bite-size
 pieces. Fresh, it's boiled and served with sauce, but it also freezes well.

I freeze it as fat little mini-dumplings, but to make sure it dried evenly in the dehydrator, I rolled out the dough to less than a quarter-inch and cut it into small pieces.

For dehydrating, I rolled it thin so it would dry all the way through.

I dried it at the "meat" setting on my dehydrator (145°F/68°C) until it was crispy. I have to say it quite tasty as "crackers!" Then I vacuum packed it in half-gallon jars.

Dehydrated gnocchi. Look like crackers, doesn't it?

I doubt I'll be able to rehydrate it to anywhere near fresh standing, but hopefully, it'll retain its shape and substance. I'll probably try it first as an addition to our daily winter soup pot (for which I'm still saving freezer real estate for my soup jars of frozen leftovers). Dehydrated additions are a nice touch when the soup goes into the pot. I'm looking forward to giving it a try, come winter!

Anyone else trying something new in the food preservation department?

May 15, 2020

The Pantry: Starting on Phase 2

Last summer, I blogged about my pantry problems and plans. The goal at the time was a "solar pantry," by which I meant putting the auxiliary fridge and freezer located in the pantry on solar power. After much analysis and planning, we moved the fridge and freezer onto the back porch and set them up on solar there (phase 1).

Phase 2 of this project focuses on the energy efficiency of the pantry itself. As part of my analysis last summer, I kept track of the pantry air temperature, and discovered it can get into the lower 90sF (upper 20sC) in the heat of summer. Not ideal for food storage.

The plan for phase 2 is to replace the old single-glazed windows with energy efficient windows, increase insulation in the walls, and experiment with passive cooling methods. It's going to be another pay-as-we-go project, so it won't happen overnight. But we've made a start.

Dan started with this wall.

My 4-foot chest freezer used to live along this wall.

Our first idea was to take down the paneling and put this stuff ↓ between the studs.


The 4-foot by 8-foot foam board sheets come in several thicknesses, with this 2-inch having the highest R-value. At roughly $30 a sheet it's pricey, but Home Depot carries it so we could buy a few sheets at a time and gradually work our way around the room. Unfortunately, Dan found it extremely frustrating to work with.


The ad video makes it look super easy to install. The sheets are pre-scored at 16-inch intervals, so just cut and pop in. Except, our studs are 16 inches on center, meaning that 16 inches is the measurement from the middle of one stud to the next. Our wall space between the studs is more like 14⅝ inches. On top of that, it was difficult to cut the foam cleanly, and Dan completely lost enthusiasm for the project after finally finishing that one wall.

So the project sat for awhile, until one recent rainy day, when we headed over to our discount builders supply warehouse to look for replacement windows.

One of two original pantry windows.

We found two brand new, still in the wrapping, energy star rated windows, the exact same size as the old windows, for $80 each. Perfect!

The first step was to remove the window trim and wall paneling.

Old window.

We had the old window removed and the new one installed in less than an hour! That's a first for this old house, where replacing windows usually takes several days from start to finish. Having the same size replacement helps!

New window. The first thing we noticed
was how quiet the room had become!

We have the other window to replace, but also, we have to decide what to do about the walls. Adding the 2-inch foam board is out for several reasons, the first because it was so difficult to work with. Even if we did want it, Home Depot is now out of stock, which no projected restocking date. Another deterrent is that the current batting insulation is stapled to the outer wall, which would make it a mess to remove.

So the plan under consideration right now is to apply 1-inch foam board directly on top of the studs. We'd lose a couple of inches of floor space, but it would still work. The batting is R-11 and the 1-inch sheets are R-5, which would give us and R-16 insulation value for the outer walls. Then we'd have to replace the old paneling, because it pretty much splintered when Dan pulled it off. (Ha! Not heart-broken over that!)

While we're mulling that over, Dan is replacing the window trim on the outside.

Old window out, new window in.
We had a beautiful day to do this!

Besides the walls, we still have to figure out a ventilation system and explore passive cooling ideas. More on that one of these days.

October 29, 2019

Homegrown Diet Diversity (And a Recipe)

An experiment - Ricotta Crust Fig Tarts - recipe below.

One of the challenges of relying on a diet of homegrown food is variety. Over the years I've tried to grow as diverse a garden as I can, but truth be told, some things are easier to grow in any given climate than others. If all I had to do was the garden, maybe I could succeed. As it is, we've got too many other things needing tending, so my gardening time and energy are limited. Instead, I focus on growing things that I can count on to do well in our region. Even then, there are no guarantees. I just have to take advantage of what produces well, and at the very least, hope I can get a seed crop out of what doesn't.

Mostly, our diet diversity is seasonal. Meals focus on whatever is producing well at the time. I do shop at the grocery store, but my shopping list is pretty basic. It sticks to staples we can't or don't produce ourselves such as olive oil and unbleached flour, a few particular favorites like black olives and bananas, and sometimes items to fill in a nutrient gap, like carrots for vitamin A after we've eaten up our own. I also shop for good deals for stocking up.

When it comes to meal planning, I focus on using what I have the most of. And that often means day after day of pretty much the same things to eat. When our chickens are laying well, we eat eggs every day, usually for lunch. But how many ways are there to eat eggs? A lot, actually, but before the summer is over, I still get tired of eating them. Zucchini is another "when it rains, it pours" kind of food. My solution to zucchini fatigue is to not plant it!

For the past several years I've been experimenting with trying to find diet diversity through creativity. I've also been trying to transition to substitutions for store-bought items with things I have readily available. Salad dressing, for example. I love ranch dressing, but dislike its ingredients. Dan likes oil and vinegar, but I have to buy those too. After experimenting a bit, I figured out that plain kefir on my green salads is just fine! Or I can easily add something like Cockeyed Jo's homemade Not "Lipton" Dry Onion Soup Mix for a flavored dressing if I wish. (And check out Jo's other recipes while you're there. She has a lot of homemade substitutes like that). Another dressing or dip we like is to mix kefir with salsa. Sometimes I add leftover home canned dried beans (black turtles are especially good). Former junky foods become tasty and healthy.

Kefir makes an acceptable substitute for sour cream on baked potatoes, and with baking soda for an excellent leavening agent. We also use it in smoothies, to top a bowl of canned fruit, and as a milk substitute on cold cereal (a rare treat, but when I find a good deal on Nature's Path organic cereals at the discount grocery store I stock up.) As you can see, we're finding a number of ways to incorporate a healthy probiotic food into our diet while eliminating several commercially processed foods.

Another one I've been experimenting with is ricotta. I have a lot of whey from cheesemaking, and making ricotta is one way to use it. It's usually used in lasagna, but I've experimented with other ways to use it.


It was the gnocchi dough that got me thinking about pastry crust. Since Dan likes pastries, that led to another experiment.

Ricotta Crust Tarts


For the crust:
  • 1 cup ricotta cheese
  • 1 cup flour
  • 1 egg
  • 1/4 cup sugar
  • 1/2 tsp salt

Mix with a fork. Roll out to about 1/4 inch thick and cut into 12 squares. Line muffin cups with pastry squares.

For the filling:

Use with your favorite pie filling. I used fig that I canned previously.

Bake at 350 for about 30 minutes or until crust is golden brown.

The crust wasn't flaky but it was good. I think I'll try it with baking soda and whey as leavening and see how that changes the texture. I'd also like to try these with a custard filling, for which I'd have to bake the crusts as empty shells. So, more experimenting and I'll have an update one of these days.

September 11, 2019

Solar Pantry Part 4: The Plan

At last we've come up with a plan! But before I jump into that, I'd like to summarize this blog series so far (for those just tuning in):

Solar Pantry Part 1: Feasibility
  • In which I count the cost of putting my pantry fridge and freezer on their own solar power system,
  • and learn that it's beyond our budget at the present time.
Solar Pantry Part 2: Analysis 
  • In which I analyze how and why I use my fridges and freezer,
  • and learn that 
    • many of the items I store in these appliances don't actually need refrigeration or freezing.
    • my pantry is simply too warm in summer for good food storage conditions.
  • In which I explore off-grid methods of keeping food without a fridge or freezer,
  • and get a couple of good ideas suitable for us. 

What I realized from these exercises is that my original goal was too narrow. We need to address not just freezing and refrigeration, also we need to improve our food storage conditions in general. In the light of that, Dan and I have come up with a three-phase plan:

Phase 1
  1. Move the freezer from the pantry to our enclosed back porch.
  2. Put the freezer only on solar power.
  3. Replace the old pantry refrigerator with a small chest freezer converted to a refrigerator. It will go on the back porch too.
Phase 2
  1. Update the pantry to make it more energy efficient:
    • better insulation in walls
    • replace old windows with energy efficient ones
  2. Work on ideas to cool the room in summer. Moving the fridge and freezer will certainly help with that. Other ideas:
    • ventilation, cool cupboard?
    • shade the window that gets afternoon sun
    • ice block "air conditioner?" (Ideas at Off Grid World.)
Phase 3
  • Make a root cellar.

Cost analysis for Phase 1 - I couldn't put both my old energy-guzzling fridge plus freezer on solar, but can I manage the freezer only? Based on the readings from my Kill-A-Watt meter, the freezer uses 1600 watts per day. If I've done my calculations correctly, here's what I've come up with. Remember, I only have $1500 for this project, but already have the solar panels.

2, 345-watt solar panels
   ✔
6, 235 AH 6-volt deep cycle batteries
$880
150-volt, 60-amp MPPT charge controller   
$431
1000-watt pure sine wave inverter    
$150  
TOTAL
$1461

Admittedly, there are still a number of other things like panel racks, wiring, connectors, fuses, battery box, etc., but it looks like we have the funds for the major components. Following are a few notes related to the above.

Solar panels. 345 watts, 57 volts each x 2 panels = 690 total watts for the solar panel array.

Wiring. Fortunately, we only have about 25 feet between the panels and battery bank. That will save both in amount and size of wire needed.

Batteries. Why 6-volt? Why not 12-volt? For a couple of reasons. Firstly, because so far I haven't been able to source 12-volt deep cycle batteries locally, and shipping for batteries is very high. Marine and RV batteries sold around here are dual purpose, listing cranking amps and low amp-hours (usually 35 to 55). They aren't cheaper and I'd need more to get more amp-hours. Plus cranking batteries won't take as many recharges as true deep cycle batteries.

The second reason is because 6-volt batteries are more heavy-duty. 6 and 12's are about the same time size. Why aren't the 6-volt smaller? Because they use heavier plates, which means more discharge cycles.

So, wiring two 250 AH 6-volt batteries in series will double the voltage to 12. Wiring the two pairs in parallel will double the amp-hours to 500. That's not quite two day's worth of energy storage, but that's more than I've got on the grid! Plus those four batteries are within my budget, although I'm still trying to shop around.

So far the only place I've been able to find 6-volt lead acid batteries is at Batteries+Bulbs, and I'm having a hard time finding other sources. I miss the days of phone books, when all local options were listed topically in the yellow pages. Search engines favor SEO (search engine optimization), paid ads, and political favoritism, which doesn't help one wanting to explore all the options. [UPDATE: I also found them at Interstate Batteries for the same price. Batteries+ is closer, however, and offers a 10% discount for ordering online.]

Charge controller.
  690 watt solar panel array (57.3 volts)
÷ 12 volt battery bank
= 57.5 amp minimum charge controller (rounded up to 60)
I'm looking at the Outback FLEXmax 60.

Inverter. This converts the DC (direct current) electricity produced by the system for my AC (alternating current) appliances. Thanks to my Kill-A-Watt meter, I know that the freezer uses about 185 watts when it starts up, then quickly drops to 100 to 102 watts and gradually decreases to 87 watts. The freezer light uses 24 watts. Recommendations for sizing inverters vary depending on the solar expert, so I finally decided on a 1000-watt inverter with a 2000-watt surge capacity.

Chest fridge. I first read about converting a chest freezer to a chest fridge in Prepper's Total Grid Failure Handbook. Several readers mentioned using them and how-tos can be found online. Two are at New Life on a Homestead and A Self-Sufficient Life. For now, the chest fridge would be plugged into the grid, until I get a better idea of exactly how much electricity it uses. As a freezer, the model I'm looking at is 5 cubic feet and has an energy rating of 219 kWh per year or roughly 0.6 per day. That translates to 600 watts per day, but surely as a fridge it should consume less(?). An experiment I plan to try is using it as an ice box. If I can freeze enough ice bottles in the freezer, it's possible that I can keep the chest fridge cold enough. We'll see.

5 cubic feet is not very big for a fridge. It will replace the fridge in the pantry, but I'll still have the fridge in the kitchen. I figure this situation will force me to change my habits and routine, plus implement more alternatives to refrigeration. The most perishable items I refrigerate are milk and meat. After that I would say leftovers and salad greens, but really, everything else could be stored elsewhere if I had cooler storage conditions. That's where a cooler pantry and root cellar will come in.

So that's the plan. The first order of business is to clear out the back porch and get ready to move the freezer. It's about due for a defrost anyway. After that we'll just take it one step at a time.

Next  → Solar Pantry Project Part 5: Back Porch Preparations

Solar Pantry Part 4: The Plan © September 2019

August 25, 2019

Solar Pantry Part 3: Alternatives

Continued from "Solar Pantry Part 2: Analysis."

Trying to solve my potential problem of losing refrigerated and frozen food during a prolonged power outage sent me scouring books and websites for affordable ideas. People preserved their food for millennia before they had electricity and refrigerators, but like other traditional knowledge and skills, the how-to has been forgotten, lost, or simply discarded in favor of high-tech alternatives. Unfortunately, not all of the technology we laud has been terribly smart: the processing and overuse of fossil fuels for example. The simpler the better, I say.

So while Dan and I are discussing options and forming a plan, I've been collecting ideas. This is what I've got so far, pretty much organized from lower tech to higher. Obviously, not all of them are feasable for everyone, because they depend on regional resources and conditions.

Spring house - If one is lucky enough to have a wellspring on their property, this would be an excellent option. A spring house is a small structure built over the spring to take advantage of its cold water. The water flows through shallow troughs into which food containers (usually milk cans) are placed.

Graphic from Barns, Sheds and Outbuildings by Byron D. Halsted.
Water enters under the window and drains at the ends of the troughs.

I had friends who used an old chest freezer in a similar way. Spring water flowed through it via inlet and outlet pipes. The chilly spring water kept their milk quite cool.

Ice house - For those living with long hard freezes, this is an idea. Ice is harvested in large blocks from solidly frozen lakes.

Photo: Library of Congress (https://www.loc.gov/resource/det.4a05655/)
There's an interesting ice harvesting photo story at A Continuous Lean.

Then it's packed in saw dust or straw in an ice house.

Indiana ice house. Photo from Library of Congress
https://www.loc.gov/pictures/item/in0268.photos.065885p/

Drawing of an ice house interior. Graphic from 
Barns, Sheds and Outbuildings by Byron D. Halsted.

The saw dust or straw acts as insulation and slows melting. Some farmers made their own forms to make their own ice blocks.

Cool chamber - A variation of the simple ice house.

Graphic from Barns, Sheds and Outbuildings by Byron D. Halsted.

The ice house is built into a hillside with a room underneath for storing milk, fruits, and vegetables.

Drips through pipe in ceiling and drains through pipe in floor.
From Barns, Sheds and Outbuildings by Byron D. Halsted.

Chamber Refrigerator - Similar to the cool chamber.

Graphic from Barns, Sheds and Outbuildings by Byron D. Halsted.

The chamber is built so that top, back, and both sides are surrounded by ice. The space under the ice is for ventilation.

Ice Box - No electricity required for those with a source for ice!

Israeli, I believe. Attribution: יעקב [CC BY-SA 4.0
(https://creativecommons.org/licenses/by-sa/4.0)]

The top compartment holds a large block of ice which cools the contents in the compartment below. Note the drip pan to catch melting water underneath. Ice tongs hang on the side.

Well shaft - For those who have an old-fashioned well!

LOC, https://www.loc.gov/pictures/item/2017782495/

A food box or bucket is lowered and tied off just above water level, where the contents stay cool.

Silos (trenches) - These aren't the grain silos we're familiar with. The French term means "underground excavation used to preserve foods."

Illustration from Preserving Food Without Freezing or Canning
by The Gardeners & Farmers of Terre Vivante

This example measures 16" x 32" and is 20" deep. A lining of brick keeps rodents out. Vegetables are packed in layers of dried leaves. The wood cover is heavy and air tight. A well-drained location is important.

Root cellar - A more familiar form of food storage. It is basically a handmade cave built into a hillside or of mounded earth. In modern lingo we could call it geothermal cooling.

Root cellar in Itasca County, Minnesota. Photo: LOC
https://www.loc.gov/pictures/item/mn0482.photos.342773p/

Root cellars tend to get damp and musty, however, so good ventilation is very important.

Windcatcher - This isn't for food storage, but rather a middle eastern house cooling system.that seems to lend itself to food preservation, providing one has wind and a qanat (underground water transportation channel). The basement would the perfect place for a root cellar.

Click to enlarge. Attribution: Wind-Tower-and-Qanat-Cooling-1.jpg:
Williamborgderivative work: Monsih [Public domain]

It's an example of evaporative cooling. The principle is that water absorbs heat in order to evaporate, cooling dry air significantly and with much less energy than refrigeration. It's best suited to dry climates, because it apparently gets very musty in humid climates, where it's earned the name "swamp cooler" because of the odor it produces.

Zeer Pot - Another ancient middle eastern technology that takes advantage of evaporative cooling. Also known as a pot-in-pot "refrigerator." A small clay pot is placed into a larger clay pot and the space between is filled with sand. The sand is kept damp and evaporation keeps the contents of the smaller pot cooler than the ambient temperature.

My experimental zeer pot.

I tried this method when I was researching off-grid eggs, cheese, and meat storage for Prepper's Livestock Handbook. Unfortunately, my experiment was a fail because of our humidity. The higher the humidity the slower the evaporation. There's a techy explanation of all that over at the Rebuilding Civilization blog. If you have a dry climate this won't actually refrigerate, but it will act as a cooler to increase longevity of some foods.

Cold shaft (a.k.a. cool cupboard or California cupboard). Heat rises and this is what the cool cupboard takes advantage of. The shaft is open at top and bottom to allow a cooling air flow. Wire shelves inside the shaft hold food items.

Illustration from How To Live Without
Electricity and Like It
by Anita Evangelista

Screens at top and bottom keep rodents out. These work best if they are built on interior rather than exterior walls. You can see a modern one in use at the Lewisham House and Farm blog.

DC (Direct Current) Refrigerators and Freezers

SunDanzer fridge or freezer.

These 12- or 24-volt appliances can be powered by solar, wind, fuel cells (hydrogen), or batteries; sources that deliver DC (direct current) electricity, as opposed to the alternating current (AC) we receive from the grid. They're pricey, however, ranging from $700 for a dorm-size 1.8-cubic-foot fridge or freezer, to $1600 for a 13-cubic-foot freezer or a 15-cubic-foot fridge. Solar panels or wind turbine and batteries not included.

Thermal mass refrigerator - From Earthship Volume 3 by Michael Reynolds.

Attribution: KVDP [CC BY-SA 4.0
(https://creativecommons.org/licenses/by-sa/4.0)]

It's designed around a DC refrigerator (above) run on solar panels. For the diagram key see the summary at Wikimedia Commons.

Solar ice maker - About ten years ago four engineering students at San Jose State University made a solar ice maker for about $100.

Solar ice maker. Photo © San Jose State University

It was an example of absorption chilling, not a new technology, but their project seemed to create a renewed interest in the process. Absorptive chillers use heat (like the sun) instead of a compressor. A refrigerant (like ammonia) is heated, cooled, and circulated to produce temperatures cold enough to make ice. Combine a solar ice maker with an ice box, and that would be a wonderful non-electric way to have refrigeration. I'm still looking for DIY plans. [UPDATE: How-to at Knowledgeable Ideas, although it's too big for an ordinary small family.]

The absorption refrigeration cycle was discovered in the mid-1800s by Ferdinand Carre. He invented and marketed the IcyBall around 1858 as a cooling device in homes.

IcaBall refrigerator. Graphic from the Crosley IcyBall Manual.

The device was sold during the 1920s and 30s, but apparently was discontinued when a number of them exploded. I suspect this was because it required the owner apply heat to activate it. Getting distracted for even a few moments could chance disaster! There's an interesting webpage on it's history here.

Solar Refrigerator - Was invented in the mid-1930s by Otto H. Mohr. It also uses absorption cooling technology, and was said to only need two hours of sunlight per day.

Source: Modern Mechanix Aug. 1935 issue. Click to enlarge.

Mr. Mohr received a patent for his design in 1940, but it doesn't seem to have ever made it into production.

Wood burning refrigerator -  Another example of absorption chilling.

Click to enlarge. Image from Mother
Earth News. Click here for full article.

Developed by Dale Degler (in the 1970s I think), he calls it an intermittent absorption refrigerator. It only needs a 20-minute fire every 24 hours! I'm not sure he ever actually made one, however.

There are other ideas out there, like propane and LP refrigerators and freezers, but I stuck with ideas that use renewable energy sources. I don't mind buying the materials to make and set up the system, but the idea is to not rely on buying the energy or fuel to run them.

Obviously not all of these ideas are applicable to Dan and me, but they do show how it's possible to preserve food without electricity. And they have kept me from being too discouraged after my solar pantry feasibility study.

Next → Solar Pantry Part 4: The Plan