Showing posts with label windows. Show all posts

April 16, 2024

Front Bedroom AKA Storage Room: Something's Happening

April is prep and planting month. Mostly, I've been busy outside, spot seeding pasture and doing final garden bed prep, but when we had a forecast for three days of rain, I reckoned it was a good time to work on one of my winter project goals, i.e. trying to make the front bedroom functional again. The motive for this is to begin setting up my Glimakra floor loom. 

There have been a lot of steps to reclaim that room as living space. The first (and a biggy) was unpacking, sorting and purging things we simply don't need. Next is figuring out what to do with items we want to keep: mostly seasonal things like space heaters, box fans, beekeeping equipment, soap making supplies, archery items, surplus tincture bottles, etc. With no basement or garage, and limited attic space, I'm thinking our old garden shed may be the storage answer. Except cleaning it out is another big project. 

When I finally managed to clear out the floor space, Dan and I took a look at the room once again. Initially, Dan had lots of plans for this room; he was going to replace floor, ceiling and walls. But after years of focusing on other things, his enthusiasm has become much more realistic. This is actually a relief for me, because I've already waited fifteen years and am not interested in waiting many more! The question now is, what absolutely has to be done?

The windows were replaced in 2016 (front windows) and 2020 (side windows). The exterior siding was finished then, but we left the interior walls for later.

front window

side windows

For comparison, you can see photos of the original room here.

Then there's the floor, which is in pretty bad shape.


If I'm remembering correctly, this is actually the sub-floor, which was probably intended to be covered. I would love to put a hardwood floor on top of it. Even wall-to-wall carpet would help. But for now, we don't have the funds to do anything with it. So I need a temporary solution.

Another problem, is this . . .

The house originally had two back-to-back fireplaces, one in the living room and one in this bedroom. Unfortunately, the mortar in the original chimney was soft enough to poke your finger through, so everything was torn out. You can see the interesting innards of a dual chimney here

It would also be nice to do something with this closet.

It's about 6-feet long and very shallow, just 17.5" deep, which is barely wide enough for clothes hangers. The shelves are on one side only. The door opening is 23 in. by 6 ft, so it's awkward to utilize the space. Making it deeper would mean building it out into the room; an idea we've discussed. I think an easier solution would be to tear out the door and wall to the left and hang a pair of by-pass doors. I keep off-season clothing in there, but mostly it's for storage.

Even in opting for the simplest solutions, the ability to actually do anything isn't imminent. In discussing what needs to be done, Dan said he'd be able to work around the loom, which gave me the go-ahead. The room will be finished eventually, but for now, I want to abandon the storage facility decor and make the room functional. I want to use my large loom again. 

For now, I decided to cover the floor with an area rug and there it is. This is actually my old dining room rug, which I replaced with a new, cleaner one. The loom is in the middle of the room, with space to walk around it and get to the windows. There's enough room to scoot it over if needed.

I still need to attach the texsolv cords, which is called "tying up." This connects all the moving parts (countermarch, shafts, lamms, and treadles).

It's a project in itself because everything must be even and level. 

Both Dan and I are pleased to see the loom assembled again. It certainly looks better than piles of boxes! I'd like to weave rugs, draperies, and yardage on this loom and use the table loom for smaller projects such as hand towels, table runners, scarves, etc. (My next planned project for the table loom is a small t-shirt yarn bathroom rug.)

After the windows are finished off, I can paint, which always freshens up a room. In the meantime, though, we can at least enjoy this room once again.

© April 2024 by Leigh at http://www.5acresandadream.com

February 4, 2024

Interior Greenhouse Door

For some reason, we always end up replacing doors and windows during winter, including this one! I reckon it's because the season is slower, so there's more time for bigger jobs like that. It's certainly not because of the weather! Happily, we got a string of mild days for Dan to tear out one of the windows in my sewing room and replace it with a door. 

We discussed door placement options on this wall of windows: the middle window, perhaps? Or maybe the one on the end?

Considering how the room is set up, this end window near the exterior greenhouse door made the most sense. In the photo below, the new door will replace the window on the left, next to the old, obsolete chimney flue.

This will make it a straight shot from the living room, through my office, and then to the greenhouse. We haven't finished the walls in this end of the room, anticipating the installation of the door.

The first step was to remove the window. In the photo below you can see the old-fashioned cast iron window weights that were behind the window trim. They require space to raise and lower, hence these "wells" are never insulated. That's one of the reasons old houses are so energy inefficient!


Dan had the usual challenges of updating a 100-year-old-house, such as different size building materials (for example, 2x4s were larger back then) and puzzling DIY construction techniques.

That's been the challenge with everything we've done! But Dan always manages and got the door opening framed out in no time.

Then the leveling, squaring, shimming, and securing. Here's his progress so far.


Next will be insulating the gaps and then putting up and painting the trims. And, of course, building some stairs. 

I have to say that it's truly convenient to have this door installed! No more going out the back door and around the back of the house to get to the greenhouse. I didn't mind, of course, but this is so much nicer.


July 5, 2023

Greenhouse: Windows In

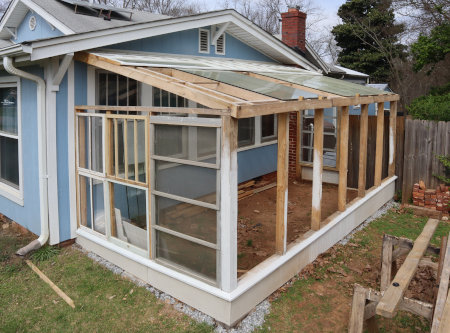
Finally, the greenhouse walls are in. Since the walls are actually windows, it's the same as saying the windows are in. 😺 None of the windows along this wall will open, so it was a straightforward job. It just needed time to dry out.

Window framing. Dan bought 2x4s and then ripped them to the size he wanted.

Installing the window framing. 

The windows we're using were all  original to the house. We saved them when we replaced them with energy efficient ones, with the idea of someday using them to build a greenhouse.

View from the inside.

View from the outside.

Still to do: exterior trim and paint. 

April 20, 2023

Greenhouse Roof Progress

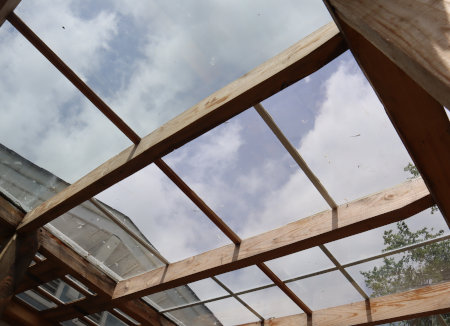
In my last greenhouse progress blog post, we were dealing with a setback because one of the roof windows was accidentally broken. Attempts to find a replacement were unsuccessful, but it was a double-paned window and only one of the pieces of glass shattered. I finally asked Dan if he could  use the remaining sheet of glass anyway? Here's what he did.

The remaining glass with frame and adhesives removed

With new trim

Happily, it worked quite well.

Installed. View from below.

It's the window in the middle.

Unfortunately, we had a hard rain before the sealants could cure, and much of it washed away. So, that has to be done again, plus trim between the windows needs to be added. It's a slow go at the moment because we're working on planting, but at least some progress has been made

March 12, 2023

Greenhouse Project: Roof Setback


Our greenhouse is pretty much a recycled materials project. That means we're using different types of windows for different parts of the structure. In my last greenhouse blog post, I showed you what Dan used for the upper portion of the greenhouse roof. For the lower portion, his plan is to use the $10 bargain windows he got from a builders surplus warehouse.

Picture from Greenhouse Project: Weather Permitting

Unlike the wood frame windows, these had vinyl frames, which he removed.

First one in place.

The roof rafters are spaced to accommodate these windows. 


The wood framed windows were installed leaving a gap at the lower edge, to allow simply slipping the lower window up and under the painted frame. Some adjusting has been necessary.


Dan using his grinder to tweak the slot for the window.

View from below.

Then, an accident. One of the windows broke! We went back to the builders surplus, albeit not very hopefully because Dan bought out all of this size when he first got them. We couldn't find anything similar, but it wasn't a wasted trip because we bought the interior greenhouse door.

So, the hunt is on for a replacement. Replacement glass of the same size and thickness was priced to us at $500 (!!!!!) Custom cut acrylic or plexiglass was similar. Sheets of acrylic or plexiglass aren't cheap either. 

As anxious as Dan is to get this project finished, it may take some time and hunting to find what we're looking for. The broken window is timely, however, because we need to work on soil prep for spring planting. 

Current status of the greenhouse.

Hopefully, we'll find a replacement soon.

November 16, 2022

Greenhouse Progress: Not Much

Photo taken November 4, 2022.

There are a couple of reasons for the slow-down on greenhouse progress. One is the weather (rain), and the other is that Dan's sawmill needed repair. And while he was at it, he decided to re-level it. Between growing tree roots and the ground shifting as it expands and contracts with varying degrees of dryness and moisture, the mill wasn't level anymore. So that took some time. Fortunately, there's no deadline for this project.

I mentioned in my greenhouse planning post, that we had saved all the old wood windows we took out when we upgraded them. Those will become the greenhouse walls. What we didn't think about at the time, was the old jalousie windows we saved when Dan remodeled the back porch. He replaced two of them, and of course, we kept them. 

Jalousie crank windows. Photo from September 2013.

My idea was that they could be incorporated into the greenhouse roof, because roof vents would be very helpful. Dan nixed that idea, however, so we decided we'll use them on either end of the greenhouse walls. We plan to install a solar attic fan to vent the greenhouse during hot weather, and the jalousie windows would be great for helping to facilitate air flow. 

With the sawmill up and running again, Dan is back to working on posts and rafters for the roof. Weather permitting, of course. Hopefully, I'll have construction progress to show you soon.

Photo taken November 14, 2022.

July 17, 2021

Window Pergola Finished

This is a continuation of my recent blog post "Dan's Latest Project." I reckon we could call it part two. Here's where we left off in that post...

The beginnings of a system to shade the windows
and grow deciduous muscadine grape vines.

The next step was to put up the trellis.

This was a matter of building a frame and cutting the lattice to size.

Here it is before staining. 

We talked about where the bottom of the trellis should be. Lower to the ground would block it off right now, but we need room to install the greywater system, build up the bed, and plant. We can fence off the bottom later if needs be.

Here it is in the sun! The lattice helps shade the
window too, even without vines growing on it.

An added bonus is the increased sense of privacy it offers. We put a box fan in the bedroom window at night, and while it doesn't face the road, I like the feeling this set-up offers. 

The shading, of course, will be even better once we get vines growing up the trellis. My thought has always been muscadines because they are native to this part of the country and make my favorite jelly! Happily, we already have some volunteers!

Volunteer muscadine vines already growing in the bed.

Now, Dan can move on to making the driveway gate. 

Window Pergola Finished © July 2021 by Leigh 

July 5, 2021

Dan's Latest Project

If you're a longtime reader of my blog or perhaps have read 5 Acres & A Dream The Book, then you may recall this sketch...

Idea for laundry greywater soil filtration bed & gate.
Pergolas would shade the windows & trellis grapes.

It was an idea we came up with years ago while analyzing water resources and brainstorming for our master plan. The washing machine is on the back porch, which is on the left-hand side of the house. This was one idea for how to use the wash water for irrigation rather than filling the septic tank with it.

Dan built the bed five years ago, and that was as far as we got. This year we've had increased problems with a roaming dog(s) visiting our property, killing our chickens, and pooping on the sidewalk. Our entire property is fenced, except the driveway. It was time to install a gate.

We might have just gone straight for the gate, except that we need to make sure dogs can't simply bypass the gate through the bed.

So before the gate, Dan decided to build the first pergola. He started by milling the lumber.

Dan's portable sawmill. One of the
best investments we ever made!!!

I have to mention that without that mill, we never could have bought the lumber! He used the pine that has either fallen down or been cut down at the back of the property.

Dan would be quick to say it isn't perfect, to which I say, 
neither is the overpriced stuff they sell at the big box store!


He started with the windows
closest to where the gate will be.


The nearest post will accommodate the gate latch.

It's already helping shade the windows
from the hot afternoon summer sun!

For the trellises on the sides of the pergola, Dan will use wood lattice. 

Amazingly, the price of wood lattice hasn't jumped through the roof.

These were $30-something each, a price he was willing to pay rather than the time and fuss of trying to make his own. Once the lattice is up he can move on to the gate. After that, we'll be looking at completing the laundry water system in the bed and then planting. 

I have to say that I wasn't sure we'd ever get this done. It's been on the planning list for almost nine years! It might have stayed as an idea on the list indefinitely, if it hadn't been for roaming dogs coming onto the property and killing our poultry. We hated to lose our birds, but there will be multiple benefits in completing this project, so there's our silver lining. I think it's been a good lesson in not lamenting the things we haven't completed, and being glad we put the forethought and planning into it when we did. That meant we didn't have to start from scratch trying to figure out what to do; we had a solution ready. All we've had to do is implement it.

Dan's Latest Project © July 2021 by Leigh