Showing posts with label water conservation. Show all posts

July 25, 2022

Greywater Project: A Very Basic Filtration Bed

We took time our first years here for observation, analysis, and planning. At that time, we had three areas for self-reliance that we wanted develop: food, energy, and water. Water conservation and stewardship included rainwater collection and greywater usage. For rainwater, we started with collection tanks. For greywater, we added a couple of ideas to our master plan, where we identified two potential areas to use it.

Greywater ideas from our 2012 Master Plan.

Greywater is a topic we researched carefully because there are precautions that must be taken. We bought Art Ludwig's Create an Oasis With Greywater (my book review here), and I researched dos and don'ts for household soaps, detergents, and cleaners (that blog post here.) We experimented some too, and used it to water tall plants like okra and corn. From those experiments, we felt that some sort of filtration would work best for us. 

When the summer rains became less frequent this month we got to talking about this. We got out our master plan (above) and discussed how we could construct a greywater wetland. Originally, the wetland idea was for a constructed filtration bed with rock, gravel, sand, and soil, plus water filtering plants. From there, it would drain out to the pasture. This would have required a lot of work, but we don't have the time or resources for an extensive project right now. Another commonly used idea for greywater, is a mulch pit. We got to wondering if we couldn't mulch pit that drained into our pasture swale. It would be  a first step experiment, just to see how it would do. 

This is how it fits into our swale plan. The filtration bed is the
little blue square between the house and pasture on the right.

The greywater drainage pipe was already in place. Dan installed it in 2016, complete with a bypass valve to direct the greywater either to the garden or to the septic tank. We haven't used it in several years, but this summer seemed the time to put it to use again. We brainstormed. For the mulch bed, we had a cracked water tote with five good sides. Dan cut it down and that made a start.

Filled with rain water!

He cut the existing drainage pipe and routed it through inlet and outlet holes cut into the tote. Because the cut tote walls aren't sturdy, he framed it out with some of his home-sawn lumber.

Our mulch medium is woodchips, because we make our own. To keep them out of the pipe, he used stone at the inlet, and screen at the outlet. The entire thing was then filled with woodchips. 

Completed project. You can see the greywater pipe coming from
the kitchen, and the mostly buried exit pipe going to the pasture.

View from another angle. The path leads to the garden.

Periodically, this will need to be cleaned out and fresh chips added. The old chips will get mixed into a new compost pile, and the bed refilled with fresh chips, or even better, a combination of wood chips and biochar. 

For now, we observe and take notes. We're already conservative with our water usage, and so far, the cut-down tote easily accommodates the amount.  There are no large amounts of water entering the swale, but if we see puddles, we use a shovel to shape the drainage path to the swale (we knew it wasn't level and would need to do this). Mostly, the water is absorbing quickly, slowly hydrating the ground as it makes its way to the swale. There is no odor and no debris in the water. It isn't potable, but it looks clear.

Eventually, the filtration bed could be expanded to a larger, more complex system incorporating plants. That will probably depend on how well this one handles the amount of greywater we produce and how long it takes for this one to need a change of woodchips. I'm glad we started with a smaller version of our original plan. That will make it easier to make adjustments as needed.

May 4, 2022

Swale Project: More Experiments

Digging swales is our big infrastructure project for 2022.

Proposed plan for approximate swale placement.

The first swale was for the kitchen and canning garden. We dug this one by hand. It was a lot of work, but not too bad with the two of us working on it.

Blog posts with more pictures here and here.

It still needs a bit of leveling, but it works well and captures a lot of rainwater.

Next, Dan hand dug a second small swale for the little production patch next to the driveway. No roots and soft soil, so it went pretty quickly.

After we get a good rain to see how
level it is, we'll fill with wood chips.

This spot is where we plant a plot of something, like corn or wheat, rather than a bed. But because it's located on a high point of our property, it dries out quickly once we hit our summer dry spell. Whatever  rainwater we can catch here will hydrate the soil more deeply than just rain. 

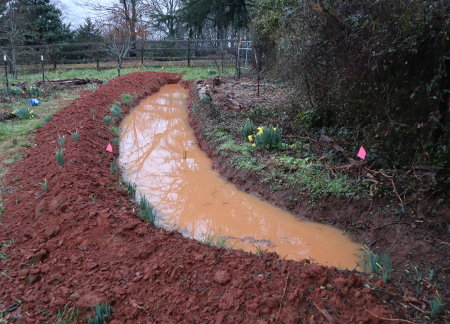
The more challenging swales are the ones for our pastures, because they are too big to dig by hand. But we've finally made a start! We started with the pasture closest to the garden, where we can use a spillway to direct garden swale overflow into the pasture swale.

After we moved that big mound of dirt, the next step was to find and flag a level line for the swale.

We used an inexpensive transit to find a level line for a swale.

Being level is key to a swale's effectiveness, because it ensures the water will be distributed evenly across the length of the swale.


Flags mark a level path for a future swale.

The how-to has been the big question. People often use large equipment such as a backhoe to make swales. But a lot of folk have been creative with what they have and have used turn plows or scraper blades. 

Dan decided to see what the scraper could do and made a start.

Then he ripped it and scraped it again.

Then the tractor called it quits and stopped running. At least we've made a start.

January 13, 2022

Swale Project: The Plan

I've experimented with small swales in the garden. My first was about five years ago (blog post here), but it was small and so had small effect. Then I started digging hugelkultur swale beds in the garden, since raised beds dried out too quickly (blog post here). Now, thanks to permaculture video lectures by Bill Mollison and Geoff Lawton, we've begun to understand how to incorporate swales into an overall homestead design. The goal is to keep our soil hydrated. This is a challenge because we typically have long, hot dry spells each summer. We collect rainwater for irrigation, but now understand that the best way to collect and store water is in the soil. 

One thing Bill and Geoff stressed is that permaculture focuses on design, rather than techniques. Specifically, permaculture is about energy design: identifying, collecting, retaining, and using energy as many times as possible, for as long as possible. Water is a key energy source. Without it, everything dies. Our design is our plan to collect and store as much water as we can before it flows off the property. Swales are a key element to accomplish this. (See my notes, here.)

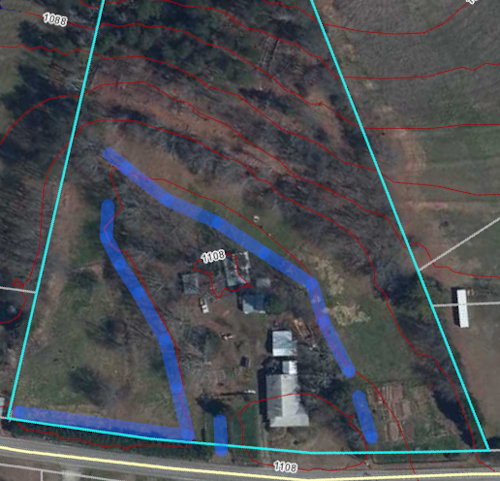
Since swales are built on contour, we used a topographical map to visualize a rough idea of where we should start. The topo map is pretty general, and shows our highest elevation at the top of the property, where the house, gardens, and outbuildings are. A series of descending ridges takes us to the bottom of the property, where it's densely wooded. This arrangement is actually opposite of an ideal permaculture property, where the house, gardens, and outbuildings are closer to the property's lower contours and can take advantage of water collected at higher elevations. But it is what it is, and that's our challenge. 

First stage: blue lines are proposed swales, red lines are contour lines.

I'm calling this stage 1 of our new water conservation plan. The proposed swales (in blue) will have the potential to catch most of the runoff from the highest points of the property: roofs, driveway, and parking areas. Stage 2 will be constructing spillways to direct swale overflow and more catchment at lower elevations. More on that after we've had a chance to mark the actual contour of the land. For that, we bought an inexpensive transit level, so we know exactly where to put the swales. Then it's on to digging, and after that, planting. We've made a start on the first one, so I'll have pics to show you soon.

September 4, 2021

The Status of My Other Experiments

One of the most valuable homesteading lessons Dan and I have learned is to think of new ideas and projects as experiments. Somehow, there is a difference between thinking "I'm going to do this," and "I'm going to experiment with this." The difference might seem subtle on the surface, but it's huge in terms of expectations. An experiment tests an idea, to see if it will or won't work and what aspects need to be tweaked or changed. With an experiment, we don't necessarily expect the outcome to be perfect the first time around; we expect to gain enough information either to make adjustments or decide that the idea wasn't as useful as we'd hoped. That's much less frustrating than seeing something as a failure. An added bonus to the trial-and-error mentality is that our imaginations have become freer to think outside the box. We no longer worry so much about failing because . . . it's an experiment!

I've recently shown you a couple of this year's experiments: using the hoop house as a trellis for a natural shade house, and my idea for trying sprawling cherry tomato plants as ground cover. Here's an update on some others.

Wicking pots

This is an example of something that hasn't worked out as I hoped.

Cherry tomato in wicking pot. Plenty
of sun and water, but still struggling.

I love that these are easy to water and with no evaporation of moisture, but I was disappointed that the tomato plants haven't grown well. I used good soil and plenty of compost, so what's the problem? I figured it out one recent sunny day when I put my hand on the pot. It was hot! Our summer shade temps are typically in the mid-90sF (mid-30sC), which puts them in the mid-100s (around 40°C) in the sun. I got out my soil thermometer and discovered that the soil temp in the pots was 100°F (38°C). So even though the plants had plenty of water, they were struggling with the heat.

Sunchokes for hopniss trellises

That link will take you to my first groundnut (hopniss) harvest post, and show you the smooth Jerusalem artichokes I planted in the bed. I read somewhere that sunchokes stalks make good supports for the hopniss vines.

Blooming sunchoke in the foreground,
hopniss on a trellis in the background.

Unfortunately, I didn't think this worked all that well. For starters, the hopniss started growing before the sunchokes, so I ended up using the trellises anyway. I have one or two hopniss vines growing up sunchokes, but mostly they've climbed the trellises. So, not exactly a fail, but not a success either.

Nitrogen fixers for the garden

In the past, I've sprinkled Dutch clover seed in my garden beds to supply nitrogen. This only works moderately well at best. Germination wasn't that great, plus clover tends to prefer cooler weather than our summers offer. So this year, I experimented with different nitrogen fixers - hopniss (ground nuts) and peanuts.

I can't remember if I mentioned planting my smallest hopniss tubers in the little garden bed on the side of the hoop house. I'm a big fan of diverse locations for perennials. I think it's a good idea to have a backup planting in case one location succumbs to something unintended. Anyway, they have happily used the hoop house as a trellis in companionable cooperation with the volunteer cherry tomatoes. They've helped my summer shade house be a success. 

Groundnut vines & cherry tomatoes have
completely taken over the hoop house.

In addition, the groundnuts have given the tomatoes a nitrogen boost, which they love. It hasn't protected them from late blight, but I'm getting tons of delicious cherry tomatoes.

The peanuts were planted in various garden beds, where they've done well.

Sweet potatoes with peanut plants (lower right corner),
with volunteer morning glories and cherry tomatoes.

Everything is thriving. The bonus will be harvesting a few peanuts, to boot! So this is definitely a success and will be standard gardening procedure for me in the future.

Landrace experiment

Before I give you my update, I'll refer you to two posts to explain what this is and why I'm doing it. 

I'll also preface it by clarifying that I just started this this year, so I won't have actual results at least until next year. I chose two species to start - winter squash and cucumbers.

Winter squash from landrace seeds.

Early this summer, I planted a landrace winter squash from seeds I received through Permies.com. It has struggled for most of the summer, but finally responded to lots of hurricane rain and is now looking pretty good. I'm guessing it struggled so much because it was bred in the Pacific Northwest, which has a very different climate than I have in the southeast. I'm also guessing that it survived because as a landrace, it had the genetic strength to not die. The squashes are small and pumpkin-like, but I will get quite a few.

Landrace winter squash.

I'm looking forward to tasting them and saving the seed. And their offspring will hopefully be interesting because in the bed next to them, I planted sweet potato squash. The vines have intermingled freely, so I'm pretty sure I got good cross-pollination.

Sweet potato squash (spotted leaves), tomatoes, and black turtle beans.
Can you see the 2 squashes? The spotless leaves are the landrace vines. 

The sweet potato squash has truly thrived for me. Early on, I found clusters of squash bug eggs on some of the leaves, but those were discarded and the plants now show no evidence of insect damage or disease. So to add that to my winter squash gene pool will be a real plus!

Of the cucumbers, I have mature fruits from a mix of about four varieties, mixed and planted in the same row.

Very mature cucumbers ready for seed extraction.

These will be the cuke seeds I'll plant next year. (For anyone interested, I have a cucumber seed saving tutorial here.)

I think that's it for my experiments this year. Anyone else do some experimenting? I'd be interested in what you did and how it's turning out.

August 7, 2021

Pattern in Permaculture Design

I've mentioned that I'm taking Bill Mollison's online Permaculture Design Course (PDC) at Udemy.com. But, I also had the opportunity to get Geoff Lawton's 2013 PDC on DVD for just the price of postage(!) So, Dan and I have been watching that one together, while I fit in the online course as spare time allows. I'm going to have to say here, that until these courses, I didn't understand what permaculture actually is. Most of what I knew about permaculture was various gardening and landscaping techniques, or a business with services to purchase. From Permies.com, I've started seeing permaculture as a lifestyle. But while there are many definitions to permaculture, it's always best to go to source material, in this case, Bill Mollison himself.

"Permaculture (permanent agriculture) is the conscious design and maintenance of agriculturally productive ecosystems which have the diversity, stability, and resilience of natural ecosystems. . . The philosophy behind permacultre is one of working with, rather than against, nature."
Bill Mollison, Permaculture: A Designer's Manual, page ix.

One of the key elements of conscience design, is pattern. Pattern exists everywhere in nature. Here are my notes from the PDC lectures:
  • Patterns are events of form.
  • We're surrounded by the natural patterns of the universe, from micro to macro.
  • Design that follows natural patterns is productive, design that doesn't, isn't.
  • There are very few pattern form types but infinite variations.
  • Partial list of pattern forms:
    • waves such as water waves and sand dune ripples
    • spirals - snail shells, whirlpools, sunflower seeds in the flower head
    • lobes - reefs, lichens
    • branches - rives and tributaries, tree branches or roots
    • nets - cracks in mud or skin, honeycombs
    • scatters - algae, lichen on rocks
    • cloud forms - clouds or tree crowns
    • tessellations - turtle shells
    • Fibonacci sequences - found in the number of sunflower seeds in a flower head or number of pine seeds in a pine cone.

So, some simple examples of using pattern in design would be an herb spiral, making swales that follow land contours, making an herb garden with branching pathways, or circular greywater mulch pits. I guess, contrast with this with how most farming and gardening is done - squares, rectangles, and rows of straight lines, none of which is found in nature!

One way of discovering pattern is with a topographical map. The contours can reveal a specific pattern of one's property.

Contour lines are in green and spaced every four feet.
Yellow X's mark the highest elevation on the property.

Our house and Dan's workshop are located at the highest elevation of our property. This will be important when we begin working on implementing permaculture water conservation. (More on that one of these days.) Interestingly, the tree lines follow the contours, and our existing fences follow the trees. What hasn't fit this pattern, however, has been my paddock system for rotating goat grazing. Here's the plan I came up with several years ago.


As I contemplate pattern, I've tried to re-envision this with what I'm learning about permaculture design. I started to play around a bit, to see what I could come up with. First, I superimposed the contour lines onto my drawing.

Not perfect, but close enough!

Then I drew in paddock fencelines that follow the contour lines.


Will we actually do this? For now, it's just an exercise in thinking. But what we're also considering is digging swales on contour. Capturing and retaining water is a primary permaculture goal, one that I really get. Most of our growing struggles point back to our long, hot, droughty spells most summers. Our current idea is that swales will follow the contour, we'll plant the swales with edible hedgerows, and grazing paddocks will follow these. 

All of this is in the contemplation stage at this point, with many details to work out. Like how to get/pay for the equipment to make the swales! However, one step at a time. First, we strive to understand the concept, then we explore ways to implement it. Hopefully, this is just the beginning. 

July 13, 2021

Book Review: Create an Oasis with Greywater

In a recent post, I shared Dan's latest project, the start on an idea we came up with years ago - a trellising shade and grape growing system that utilizes our laundry waste water. This prompted quite a conversation in the comments of that post, with a number of questions and concerns expressed. I can't answer those because I'm focused on meeting our goals in our context. But I can point you in the direction of some excellent resources that will give you the information you need to make a start on your own research and answer your own questions. 

Create an Oasis with Greywater: Integrated Design for Water Conservation

This book by Art Ludwig, plus his DVD, Laundry to Landscape, have answered our questions, addressed our concerns, and are helping us design a system that will enable us to be better stewards in our water conservation efforts. In this post, I'll tell you about the book. Here's what the author says about it.

"Create an Oasis with Greywater describes how to choose, build, and use 20 types of residential greywater reuse systems in just about any context: urban, rural, or village."
Art Ludwig, author
"What This Book Is About"

"How to Use This Book" and "What This Book Is About" introduce the subject matter. The book is geared toward helping the reader zero in on their personal goals, make an assessment specific to their property, and then design and implement a system that will best fit their situation.

Chapter 1: Greywater Basics. This chapter begins by defining greywater. Explains the differences between blackwater, dark greywater, clearwater, wastewater, and reclaimed water. It discusses what you can do with it and why it should be used, but also lists a substantial number of reasons when it shouldn't be used. The last section of the chapter introduces the reader to the elements of a greywater system.

Chapter 2: Goals and Context. This chapter helps the reader deal with the massive amount of information out there about greywater systems, especially, whether or not a greywater system is right for you. It offers clear-cut steps for analyzing one's goals, context (site, sources, needs, percolation rates, climate, etc.), and proposed site. A "site assessment form" worksheet in the appendix (and online here) helps the reader make a very thorough analysis.

Chapter 3: Design a Greywater System for Your Context. In chapter 3, the reader learns how to integrate a greywater system with their landscape plus other systems, how to address health considerations, and how to match greywater sources with irrigation and treatment or disposal areas. Includes general landscape design points and six factors for good natural purification of greywater or wastewater.

Chapter 4: Greywater Collection Plumbing. Discusses general greywater plumbing principles, planning for future flexibility, traps, vents, diverter and shutoff valves, surge capacity, easy maintenance and troubleshooting. Includes advice on choosing and finding parts, inspections, and when to get professional help. Lots of pictures, charts, and diagrams in this chapter.

Chapter 5: Greywater in the Landscape. This chapter details how to put greywater to work and how to handle it in the landscape. Discusses calculating the treatment/disposal area, greywater efficiency,  coordinating greywater with freshwater irrigation, and how to handle greywater when it rains. Discusses how to preserve soil quality, with a chart of key elements found in household cleaners. Also how to monitor and repair soil, and what to do about toxic waste. The section on plants lists possibilities for greywater reuse, as well as greywater treatment and disposal. Shows the reader how to build a mulch basin for greywater irrigation, with lots of illustrations.

Chapter 6: System Selection Chart. A 2-page easy reference chart for comparing simple, easy greywater systems, or complex systems.

Chapter 7: Simple, Easy Greywater Systems. Lots of ideas and illustrations in this chapter. Discusses direct landscape systems (such as a bathing garden), garden hoses, dishpan dumping, mulch basins, movable drains, greywater furrow irrigation, and laundry drums. It introduces the laundry to landscape system (which is detailed in Art Ludwig's Laundry to Landscape book or DVD).

Chapter 8: More Complex Greywater Systems. Covers effluent pumps, mini-leachfields, subsoil infiltration galleys, constructed wetlands, an automated sand filter system, a solar greywater greenhouse, green septic systems, and septic tank to subsurface drip. Lots of pictures, diagrams, and illustrations clarify the concepts.

Chapter 9: Branched Drain Design. How to improve the time-honored "drain out back" system with ways to split the flow (including a discussion and chart on parts), branching geometry options, cleanouts, inspection access, and rainwater inlets. The section on branched drain outlet design discusses free flow outlets, sub-mulch and subsoil infiltration, how to design for surge capacity, and outlet positioning. 

Chapter 10: Branched Drain Installation gets down to the nitty-gritty of installing a branched drain system. Covers checking the design, checking for buried utilities, digging trenches, connecting pipes and fittings, dealing with slope, and installing outlet shields. Final steps include testing the system, mapping it, and burying it. Also included are sections on branched drain maintenance, troubleshooting, and possible variations. 

Chapter 11: Common Greywater Errors. This very important chapter contains 20 common misconceptions about greywater and mistakes people routinely make. Each one explains problems that can result, preferred practices, and specific conditions for exceptions. 

Chapter 12: Real World Examples. Features six examples that are currently in use. Takes an interesting look at each user's goals, design and installation issues, costs and benefits, and opinion of the system after it had been in use for awhile. Pictures and diagrams help clarify the examples.

Appendices. Lots of helpful information in the eight appendices, including how to measure elevation and slope, cold climate adaptations, non-industrialized area considerations, plus pumps, filters, and disinfection.  

As you can see from scanning the chapter summaries, there are a lot of variables and a lot of options. So far, this is the best book I have found to explain them all. Dan and I have both this book and also the Laundry to Landscape DVD I mentioned. I trust the information because the author isn't trying to sell a pre-packaged greywater system. You can find some of the hard-to-find hardware at his website, but he isn't trying to guide the reader to buy what he prefers. He lays out all the options along with their pros, cons, and guidelines for choosing the best system for your circumstances.

Create an Oasis with Greywater is available at the author's website or at Amazon. Or, if you aren't sure that it deserves a place on your homestead bookshelf, request that your public library obtain a copy! That's the best way to get a hands-on look at a book, plus it becomes available for others to benefit from it too.

July 5, 2021

Dan's Latest Project

If you're a longtime reader of my blog or perhaps have read 5 Acres & A Dream The Book, then you may recall this sketch...

Idea for laundry greywater soil filtration bed & gate.
Pergolas would shade the windows & trellis grapes.

It was an idea we came up with years ago while analyzing water resources and brainstorming for our master plan. The washing machine is on the back porch, which is on the left-hand side of the house. This was one idea for how to use the wash water for irrigation rather than filling the septic tank with it.

Dan built the bed five years ago, and that was as far as we got. This year we've had increased problems with a roaming dog(s) visiting our property, killing our chickens, and pooping on the sidewalk. Our entire property is fenced, except the driveway. It was time to install a gate.

We might have just gone straight for the gate, except that we need to make sure dogs can't simply bypass the gate through the bed.

So before the gate, Dan decided to build the first pergola. He started by milling the lumber.

Dan's portable sawmill. One of the
best investments we ever made!!!

I have to mention that without that mill, we never could have bought the lumber! He used the pine that has either fallen down or been cut down at the back of the property.

Dan would be quick to say it isn't perfect, to which I say, 
neither is the overpriced stuff they sell at the big box store!


He started with the windows
closest to where the gate will be.


The nearest post will accommodate the gate latch.

It's already helping shade the windows
from the hot afternoon summer sun!

For the trellises on the sides of the pergola, Dan will use wood lattice. 

Amazingly, the price of wood lattice hasn't jumped through the roof.

These were $30-something each, a price he was willing to pay rather than the time and fuss of trying to make his own. Once the lattice is up he can move on to the gate. After that, we'll be looking at completing the laundry water system in the bed and then planting. 

I have to say that I wasn't sure we'd ever get this done. It's been on the planning list for almost nine years! It might have stayed as an idea on the list indefinitely, if it hadn't been for roaming dogs coming onto the property and killing our poultry. We hated to lose our birds, but there will be multiple benefits in completing this project, so there's our silver lining. I think it's been a good lesson in not lamenting the things we haven't completed, and being glad we put the forethought and planning into it when we did. That meant we didn't have to start from scratch trying to figure out what to do; we had a solution ready. All we've had to do is implement it.

Dan's Latest Project © July 2021 by Leigh 

June 19, 2021

Wicking Pots

I'm always on the look-out for ideas to conserve water. I've been happy with my ollas, and here is another nifty idea, wicking pots. Container plants usually need a lot of watering, and I find them difficult to keep properly hydrated. The wicking pot solves those problems. The idea is to create a water reservoir in the bottom of a pot. This allows for watering from the bottom with no evaporation loss. An air space above the reservoir keeps the roots from growing into the water and drowning the plant.  Here's how I made ours.

Pots and perforated drainage pipe.

Anything with no drainage holes can be used as a pot. I chose something fairly decorative, since these are going on the front porch. 5-gallon buckets are common, as are 55-gallon drums cut in half to make two containers. It needs to hold water in the bottom, so anything without drainage holes will work. The perforated drainage pipe will create the water reservoir and air space. Any kind of pipe could be used, or plastic bottles. They just need a diameter of 4 to 6 inches. 

Each pot also needs...

Watering tube.

It should be long enough to stick out of the pot, and a diameter so that a garden hose can be used to fill the pot. 1.5 to 2 inch PVC works well, with the bottom cut at an angle.This will keep it from sitting flat on the bottom of the pot and preventing water from filling the reservoir. 

Pot with drainage pipe and watering tube.

The next step is to drill a drainage hole. It needs to be one inch below the top of the drainage pipe. This will create the necessary air space and keep water from flooding the pot. 

Drilling the drainage hole.

Next, is to add a barrier to keep the soil out of the water reservoir. Most people use some sort of landscape cloth, but cotton fabric or old cotton t-shirt fabric can be used.

I used landscape cloth.

Then the pots are filled with soil.


The fabric is fitted around the contour of the drainage pipe, so some of the soil is in contact with the water.

I placed these wicking pots on either side of the front porch steps. The slabs were from pillars on the original front porch, which were torn down. Dan added the trellises when he finished rebuilding it.

Ready to plant.

We want the pots to contain vining plants that will look pretty and help shade the front porch. 

Wicking pots containing transplanted Matt's Wild Cherry Tomatoes.

From what people say, wicking pots only need to be watered once a week. Sounds like an excellent kind of container gardening, doesn't it?

April 18, 2021

Ollas Revisited

We're having an early summer April; one where many days already pop up into the lower 80sF (upper 20sC). A week of hot days like that with no rain remind me of how quickly things dry out. So one of my April gardening projects is to install more ollas. 

Potted tree collard with olla.

I first blogged about ollas last summer (Conserving Water in the Garden: The Olla). It's an idea I found in a book that I really like, Gardening with Less Water: Low-Tech, Low-Cost Techniques; Use up to 90% Less Water in Your Garden by David A. Bainbridge. A simple olla (oy' ya) can be made by plugging the hole in a terra cotta pot, sinking it in a garden bed, and keeping it filled with water. Water gradually wicks out and does a great job of keeping things from wilting. For my potted tree collard (above), I decided to try a different design.


I took two pots, plugged the hole in the bottom of one, then inverted the other and glued it as a top half to the olla. When I transplanted my tree collard, I put both it and the new olla into a larger pot. The olla is sunk so that only the top shows. An inverted terra cotter saucer serves as a lid to keep mosquitoes out.

The crimson clover & vetch are nitrogen-fixing volunteers.

It's narrower, so it fits better in the large pot, but holds more water than a single.

Easy to add water.

Next up is a several more for the raised beds in my hoop house.


Those raised beds tend to dry out quickly in hot weather, so hopefully these will help. 

How about you? Is your weather nice enough to work in your garden?

Ollas Revisited © April 2021 by Leigh