Showing posts with label drying. Show all posts

January 11, 2024

Dehydrating Cranberries

Right after the holidays, seasonal food items that we like go on clearance. There are several things that I look for and stock up on, like molasses and dried dates. This year I bought several bags of fresh cranberries for 99¢ each.


I especially enjoy dried cranberries on my breakfast granola when there's no fresh fruit in season, and I thought it would be nice to make some without the stuff commercial processors like to add.

I consulted my two books on dehydrating foods to compare instructions.

Mary Bell's Complete Dehydrator Cookbook and
Making & Using Dried Foods by Phyllis Hobson

I always like to look at more than one source for projects, to compare notes and possibly pick up unique tips. Their directions were similar and started with popping the raw cranberries into boiling water until the skins cracked. (No pic). Then they went into a bowl where I coated them with honey.


Then it was onto the mesh dehydrator screens.


Both sources recommended a low heat for 10 to 12 hours. What I found however, was that mine still weren't dried in that time. I had to repeat the drying several times. While it took a long time, I ran the dehydrator at night so we benefited from its little bit of heat in the kitchen come morning.


I removed the dried ones along the way and eventually got them all done! 

When I tasted them, however, I was dismayed that the honey didn't help sweeten them at all. So when I put them into a half-gallon jar, I sprinkled with unbleached sugar. 

My final yield was 5 cups.


Because of how long it took, I doubt I'll try these again. And I will probably save these for baking, rather than eating on my granola. But I'm glad I gave them a try anyway.

November 10, 2023

I Finally Had to Replace My Excalibur

Dehydrator, that is. 

Photo from August 2009

I knew this was coming because in September I tried to dehydrate pear sauce and never could get it crispy enough to powder. Considering that I bought my Excalibur in the late 1990s, I can't complain about its service life! Even so, in the past couple of years the plastic trays had begun to crack.


But that's typical of plastic and they were still usable. Having the heating element go, however, pretty much meant the end. 

I spent some time looking at various makes and models of new dehydrators. Even though I have no complaints with the Excalibur, being all plastic plus having a higher price point caused me to exclude that brand from consideration. Lots of the new ones are stainless steel and less expensive. I compared prices and reviews and finally decided on one that had a promotional discount as well.


The brand is Ultrean. You can get the specifics at that link. I wasn't especially keen on a digital control interface, but they're all made that way now.


Except for the control panel and viewing window, the entire unit is stainless steel, including the trays. I much prefer that to plastic. It's definitely heavier than the Excalibur. Also, this one uses 600 watts as opposed to the Excalibur's 400 watts for the 5-tray model.

It included one mesh liner and one fruit leather tray.


These are plastic. Also noteworthy, the Ultrean's trays are smaller than the Excalibur's but there are eight of them instead of five.


I gave it a try with the last of the green peppers, harvested in anticipation of our first frost. Because the peppers didn't have time to grow and mature, my pieces were small.


The necessity for the finer mesh trays is immediately obvious!


Since I only had the one to start, I put it on the bottom rack to catch pieces that fell through. 

Choosing the settings and getting it started aren't as intuitive as turning a knob, but that's just something I'll get used to with use. Of the plastic mesh liners, I plan to cut down the old ones from my Excalibur. Those plus the one included will give me six. I'll need to get more fruit leather trays, however. The silicone  ones I recently bought for the Excalibur are too large. 

All in all, I'm satisfied with my purchase. A food dehydrator is a staple piece of equipment for me, so it gets a lot of use. The bonus is that in winter I dehydrate overnight in the kitchen, to capture the heat generated during the drying process. Every little bit helps. Hopefully, this one will last as long as my Excalibur did.

January 10, 2023

An Experiment in Making Jerky

Last month, I showed you my first experiment in off-grid meat preservation, making pemmican. That was definitely successful, so next, I wanted to try making jerky. 

Jerky and pemmican are both dehydrated meat products. What's the difference between the two? Jerky is mostly thought of as a snack food, while pemmican is thought of as a survival food. Jerky highly seasoned and dried until it's pliable. Pemmican is not seasoned and dried until crisp, so it can be powdered for the next step.

For my jerky experiment, I started with 1.62 pounds beef bottom roast from my local not-a-chain grocery store. They have really good meat prices, and I found this roast "reduced for quick sale" for $3.99 a pound. I got started on the jerky that afternoon.

There are probably hundreds of recipes for jerky. Many of them call for jerky seasoning mixes. Most of the other ingredient lists include soy sauce and often Worcestershire sauce. Sweetener is optional and may be sugar or honey. The seasonings and spices vary a bit, so I used what I had. Commonly called for ingredients that I didn't have were soy sauce, smoked paprika, red pepper flakes, and liquid smoke. I did have Bragg's liquid aminos, so I used that in place of soy sauce. I jotted down the ingredients and amounts, so I'll know what to adjust if I do it again!

Ingredients
  • 1/2 cup Worcestershire sauce
  • 1/2 cup liquid aminos
  • 2 tbsp honey
  • 1/2 tsp black pepper
  • 2 tsp onion powder
  • 1/2 tsp garlic powder

Marination time recommendations in the recipes varied from 3 to 24 hours. 


I marinated this batch for about 7 hours, drained it well, and put it in the dehydrator. It took about 8 hours to become slightly pliable and thoroughly dry.

Beef jerky

Then came the taste test. I'd never eaten jerky before and found it flavorful but chewy. Dan said it tasted just like the stuff from the store and declared the recipe perfect! (It's not often I get something right on the first try!)

To store, I packed it into a wide mouth quart canning jar and vacuum sealed it.

So this experiment is declared a success! Who else makes jerky? I'd love your recipes!

November 5, 2022

Silicone Dehydrator Tray Liners

One of my learning projects this year has been learning how to make fruit and vegetable powders (like dried pear sauce and powdered tomatoes). The problem is that dehydrator trays are mesh. That works great for solid slices and pieces, but not so well for sauces and purees. I've tried both waxed and parchment paper, but they tend to stick to the food and need careful peeling off. This is a tedious extra step, so I finally decided to invest in some silicone tray liners for my dehydrator. The Excalibur brand is pretty expensive, but I bought some from Amazon for about $18 for a four-pack. 


They fit my Excalibur trays perfectly. I tested them out with more mashed potatoes for homemade instant mashed potatoes.


I really like that these have a rim on them. It made it easy to spread the pureed potatoes evenly.

When I checked on it after several hours, the top was dry but the underside was still wet. So I flipped the sheets of potatoes and dried them for several hours more.


The sheet of potatoes shrank, as dehydrated foods do, and the edges curled. But they didn't stick to the silicone tray liner! 

I broke them into chunks, powdered them in my blender, and transferred them to a storage jar.

I think this was a useful purchase for me because, unlike waxed or parchment paper, these are reusable, plus save frustration. I've slowly learned that not all purchases actually end up being useful, no matter how appealing the item was at the time. Learning to not succumb to impulse purchases has really helped in that department! A thoughtful purchase, on the other hand, is well worth it, even if the item is used only rarely. I don't mind putting time into any project, but being efficient with that time is important too.

October 7, 2022

Dehydrated Potatoes For Instant Mashed

I grew up in meat and potato country, where potatoes were the standard starch for most meals: baked, mashed, boiled, scalloped, hashed, french fried, you name it, we ate potatoes that way. Now, I rotate the starches I serve—rice, pasta, potatoes, bread or rolls—but our favorite is always potatoes. Especially, mashed. With salt and butter. Or gravy.  Or my mock sour cream (ricotta with a little kefir stirred in until it's sour cream consistency). Yum. 

There are a lot of steps to making mashed potatoes, however, so I don't make them very often. There's store-bought instant, but somehow I don't think those taste very good. They supposedly use freeze drying to make it (which is said to be superior for retaining flavor and nutritional value), so maybe it's the other stuff they put in it: vegetable oil (soybean, cottonseed, sunflower or canola), corn syrup solids, maltodextrin, sodium caseinate, disodium phosphate, mono and diglycerides, calcium stearoyl lactylate, artificial flavors, artificial color, sodium acid pyrophosphate, sodium bisulfite, dipotassium phosphate, silicon dioxide, etc. Or maybe because I'm so used to eating real food, that store bought instant mashed potatoes just taste "off."

When I discovered several mashed potatoes dehydrating videos, I was interested! They were pretty easy to make.

Cut into chunks and boil as for mashed potatoes.

Mash when soft. Don't add milk or butter. If it 
needs thinning, use the potato boiling water.

As you can see, I didn't peel my potatoes, even when I'm mashing them. It adds nutrition, and neither of us minds the bits of peel. We're used to it.

Spread onto fruit leather trays or parchment paper. Set the dehydrator
to the vegetable setting and dry until crisp (for me, about 18 hrs)

I've tried both waxed paper and parchment paper for drying things like this. I don't find either works very well, so I'm thinking I need to invest in some fruit leather tray liners or maybe silicone baking sheets. (Which I did and they work great! My review is here.)

Break into pieces and put them into the blender.

Blend on high until it's powdered!

Store in a sealed, airtight jar (I vacuum pack mine).

I haven't tried making mashed potatoes with them yet, but I'll report back when I do. I'm going to follow the rehydrating recipe from Northstar Prepsteader.     

Heat to boiling
2/3 C water
1 T butter
1/4 tsp salt
Remove from heat and stir in
1/4 C milk
2/3 C potato flakes
Season to taste 

If these are as good as everybody says they are, we'll eat a lot more mashed potatoes this winter!

September 22, 2022

Experiments in Ketchup Making

Chevon and grilled onion sandwich with oven fried potatoes, and homemade ketchup.

We don't eat a lot of ketchup. In fact, I'm the only one who eats it and that's just once a week on my grilled Sunday hamburger. But with all our extra cherry tomatoes, I wanted to give ketchup making a try. I'm calling this an experiment because there is still a little tweaking I want to do. I'm putting all my notes here, so I'll remember what I did, what I want to do differently, and why.

The recipe I used was based on a video by Living Traditions Homestead. What intrigued me was that she used whole tomatoes. She cored them, chopped them, and cooked them with with the other ingredients before running them through her Vitamix blender. What could be easier than that?

I had questions though, because I'd need to use frozen cherry tomatoes instead of large fresh ones. It seems like freezing them toughens the skins, plus, cherry tomatoes are seedier than regular size tomatoes. Would it work as well? I was willing to give it a try and see what I got.

The ingredients in the following recipe are based on the recipe in the video, but adjusted for the amount of tomatoes that I had (fresh plus thawed).

Ketchup

8½ lb  defrosted cherry tomatoes, drained 
1 cup chopped onion
1 cup vinegar (I used my pear vinegar)
3/4 cup sugar (originally 2/3 cup but increased after taste tasting)
1½ tbsp canning salt 
3 cloves chopped garlic
1/4 tsp black pepper
1/2 tsp celery seed
1/2 tsp mustard seed

I simmered it all together for several hours and then allowed it to cool. Then I blended batches of it in my new blender.

First batch before blending.

The skins blended quickly but the teeny tiny seeds took some time. The process might have been quick with regular tomatoes and regular tomato seeds, but the miniature seeds were more of a challenge (and I was impatient).

After blending. Smaller batches did a much better job on the seeds.

We sampled it that night for dinner with French fries. Our cherry tomatoes are more acidic than our slicing tomatoes, so one thing we agreed on was that it needed more sweetener (notated in my recipe above). Dan didn't mind the remaining seeds, but I didn't like them. So, before I canned the ketchup I removed the seeds with a fine sieve and spatula.

A lot of people make their ketchup this way. I found it quicker
 and less messy than using my hand juicer (especially clean up).

To can: hot back jars leaving 1/4" 1/2" headspace (I had too many failed seals with 1/4" and had to re-do those). Water bath process for 15 minutes for both pints and half-pints. My yield was 6 pints.

Noteworthy

About a week later, I put a picking of cherry tomatoes into the dehydrator for making tomato powder.

Dried cherry tomatoes.

Tomato powder. Do you see any seeds?

The dried seeds powdered right along with the skins and pulp. Hmm. Did cooking the whole tomatoes soften the seeds so that they didn't blend well? Or did drying them make them brittle enough to powder well? That lead to another experiment. What would happen to the seeds if I blended raw cherry tomatoes?
 
Fresh cherry tomatoes in the blender

After blending. Looks thick and creamy, doesn't it?

The real test was looking for seeds!

If any little seed fragments are there, I can live with it! Plus!!!
It's about thick enough to be sauce; just needs a little seasoning.

I'm guessing that the raw and dried seeds were firm enough to be pulverized in the blender, but the cooked down tomato seeds were too soft and slippery for some of them. Based on several videos that I watched, I don't think that's strictly true of larger tomatoes with larger seeds, but it seems to be true of the tiny, seedy, Matt's Wild Cherry Tomatoes.

Umm, so, why have I been spending hours and hours every summer juicing tomatoes, and days and days cooking down the juice to make sauce? NO MORE! This is completely changing the way I will make my pizza sauce next year! And all because I wasn't satisfied with the way my ketchup turned out. 

September 14, 2022

Dried Pear Sauce

Fruit and vegetable powders are very popular amongst folks who dry a lot of food. That intrigued me, so dehydrated pear sauce was the first thing I made using my new blender. I started with a quart of pear sauce that I didn't can.


I don't have fruit leather trays for my dehydrator, so I used waxed paper and spread it with a spoon. I tried to keep the thickness under a quarter inch.


After about a day in my dehydrator, the texture was similar to fruit leather.


It was pliable, and this is how people make fruit roll-ups. To powder it, however, I needed it drier. It was sticking to the wax paper, so I peeled it off and returned it for another day in the dehydrator.


It never got truly crisp, but it got dry enough to break into smaller pieces.


It only took a few seconds in the blender, using the tamper to push the pieces on top toward the blades.


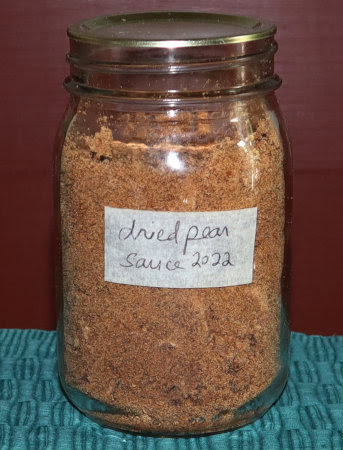
One quart of pear sauce yielded about a pint dried. It isn't like a true powder, it's moister than that and a little sticky. More like brown sugar but not.

Lastly, I vacuum sealed the jar with my little hand pump to protect it from pantry moths and humidity. (I don't trust ants either!)

I'm thinking this would be a fantastic thing for hikers and campers. It could be sealed in small-serving mylar bags to carry. For myself, I will probably rehydrate some just to see what it's like, but since I have plenty of pear sauce canned for serving right out of the jar, I'll mostly use the powder for baking. It can be added directly to baked-good batters without reconstituting. I foresee myself using it in cakes, muffins, cookies, pancakes, etc. I like pieces of dried fruit for our granola and oatmeal, or for baking like my Better Than Fig Newton Bars and Fruit Cake Cookies.

Dehydrating versus canning. Which is better?

I think where we fall in this debate depends on our preserving, cooking, and eating habits. Canning lends itself well to large quantities of an item and is usually the first way I preserve the harvest. Drying (and freezing) work well for small quantities that aren't enough to can. Both dehydrating and canning take time and a power source, although I'm pretty sure that my dehydrator uses less electricity than my stove, even though it takes longer. When necessary, I've canned on a wood cookstove and over a campfire. My dehydrator requires electricity, and while solar dehydrators do exist, I read they don't work well in humid climates like mine.

Dried foods definitely use fewer jars for the same fresh quantities and need less storage space, which are both pluses. Also, they can be stored in mylar bags, making them easier to transport than heavy, bulky jars. On the other hand, dried foods require some planning ahead to prepare, while canned goods are basically ready to use. Dried foods need to be protected from potential pest and moisture damage. Canned goods have the potential for a broken seal and spoilage. When properly stored, both have a good shelf life (see Grandpappy's "Five Different Shelf Life Studies" for some surprising information). 

No matter our habits and preferences, I think having both canned and dried on hand increases food security and versatility. Now, I have two forms of dried fruits and veggies - pieces and powder. And that means even more options.

Okay, you home food preservers out there, your turn. Favorite methods? What are they and why? Any ideas or tips to share with the rest of us? Anything new you've discovered? We want to know!

Dried Pear Sauce © September 2022

August 29, 2022

Garden Notes: August 2022

 Rainfall

  • 1st: 0.35"
  • 3rd: 0.125"
  • 4th: 1"
  • 7th: 0.8"
  • 11th: 0.9"
  • 17th: 0.1"
  • 19th: 0.5"
  • 21st: 0.7"
  • 26th: 0.1"
  • Total: 4.575"

Temperature

  • nighttime range: 68-75°F (20-24°C)
  • daytime range: 78-94°F (25.5-34.5°C)

No complaints about August weather. We had good rainfall and generally cooler daily temperatures than July. We only saw 90s during the first and last weeks of the month. On the other hand, the higher humidity meant that it felt just as bad as the 90s! What really helps is when it gets down to below 70°F (21°C) at night because we can cool the house down, making it more tolerable during the day.

State of the garden

All I can say is, beauty is in the eye of the beholder. Everything is overgrown and runaway so that it looks a mess. But almost everything in it is useful!

Here we have cherry tomatoes, watermelon, mangels, horseradish,
celery, lambs quarter, sweet potatoes, raspberries, cowpeas, landrace 
brassicas, morning glory, a couple of carrots, and a potato plant or two.
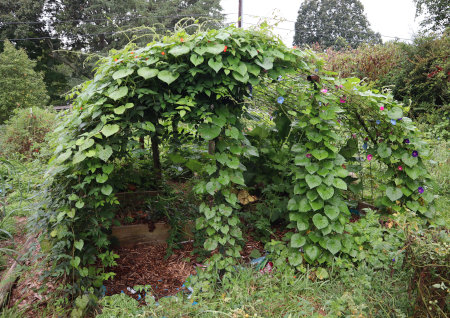
Hoophouse: The living shade you see is hopniss, cherry tomatoes, and morning glories.

Also a volunteer winter squash, cultivated grape, and Chinese yams.

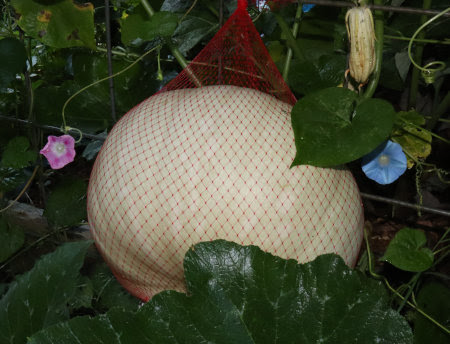
My largest sweet potato squash so far.

Inside the hoophouse are winter squash, Malabar spinach, violets,
strawberries (back right bed) and cultivated burdock (back left bed.)

Hugelkultur: winter squash, turtle beans, cherry tomatoes,
chicory, clover, morning glories, lambs quarter, & sunchokes.

Hugelkultur closeup featuring squash and chicory.

African keyhole garden: sweet potatoes and a survivor kale.
The porch trellis is growing green beans and cherry tomatoes.

I planted kale in the keyhole bed about a year ago. This is one of
two plants that survived both our cold winter and hot summer.

Picking and Preserving

Bucket full of cherry tomatoes, a few okra, and one lone pepper.

The cherry tomatoes are still going gangbusters. I got bored with making and canning pizza sauce, so I'm switching to tomato juice and ketchup.

The cucumbers are done, so our salads, now, are cherry tomatoes and kale.

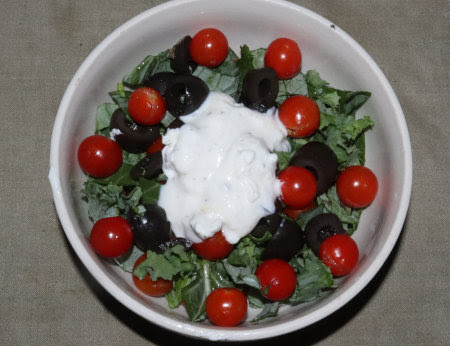
Tomato, kale, and black olive salad
with homemade ricotta ranch dressing.

The okra hasn't been very productive. 

Okra is a member of the hibiscus family.

I don't plant a lot, just enough to have oven-fried okra a couple times a week during growing season, with a little extra to freeze for a side dish during winter. It hasn't produced that much, although it's making a better effort now that our daily highs aren't so scorching and we're getting a little more rain.

August is fig month, and these are the largest figs we've ever seen on our trees.


They aren't all this size, but it's amazing to find them. Can't take any credit, though, because the fig trees are pretty much on their own! They are next to the goat barn, so perhaps they're getting some rich rain runoff.

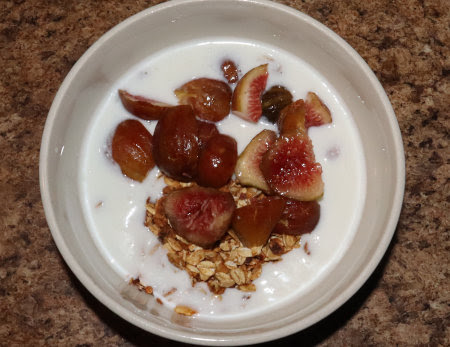
Breakfast: fresh figs on peanut butter granola with
kefir. Sometimes we swap the figs for diced pears.

There were lots to can.

And dessert!

Fresh fig cake with vanilla goat milk ice cream.

Pear harvest started in late July. The heaviest harvest was a couple weeks ago.

Bucket of pears.

One year, I spent days in the kitchen canning chunked pears, but Dan wasn't very enthusiastic about them. So now, I just make pear sauce. It's easier and faster to do, and we both like it.

Cinnamon pear sauce.

As pear picking slows and the pearsauce jars fill, I switch to drying them. Ditto for figs.
 
The cores and peels are being made into vinegar.

Elderberry harvest starts in late August.

First of the elderberries.

I used the first of them to flavor my canned figs and pearsauce. I also freeze them for jelly making this winter, and will make a couple batches of elderberry wine. This year I want to try an elderberry pear wine. I've experimented with adding other fruits for subtle flavor (of which some are more likable than others).

And a few parting shots.

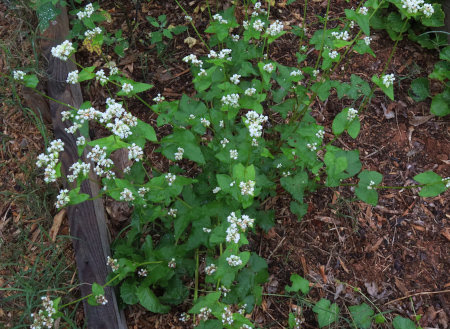
Buckwheat planted as a cover crop in my newest swale bed.
Only a few plants came up, so this will be my seed crop.

Marigolds and a winter squash blossom.

Our first Orange Glo watermelon of the summer.

I picked the watermelon just the other day. They were planted late, and only after my cantaloupe plants all died. I'm not sure what happened to them. They were doing well until our hot dry spell. I watered them faithfully, but they weren't happy and that was that. The watermelons have done much better and we're just starting to enjoy them.

So there are the pictures to go along with my Summer Mantra blog post. I liked hearing about what you all have been up to in your gardens, so keep the comments coming. 😀