Showing posts with label recipes. Show all posts

August 21, 2025

Irish Soda Bread: Experiments With the Recipe

Last St. Patrick' Day, I made Irish Brown Bread, a type of Irish Soda Bread. I had never made it before and found it easy, quick, and quite good. It was crumbly in texture, but the flavor was nice. Nice enough to experiment with.

The Irish Soda Bread recipe that I used for my St. Pat's dinner was the simplest and most traditional recipe I could find. This is because one of my study projects this year is trying to find recipes that are as historically authentic as possible. Part of my objective is to find simple techniques and ways to combine and cook the foods we have available to us. The next step is to see how I can adapt them. 

Basic Irish Soda Bread Recipe

Photo from St. Patrick's Day Dinner

  • 4 cups flour (mix of wheat and white as desired, I used 50/50)
  • 1 tsp baking soda
  • 1 tsp salt
  • 1¾ cups buttermilk (I used kefir)

Mix until ingredients are combined (over kneading will toughen the dough). Shape into a round, score a cross on top, and bake at 375°F (190°C) for 35-40 minutes. For a soft crust, wrap the hot bread in a tea towel while it cools.

Experiment #1

Summary: halved the recipe and added 1 duck egg and 1/4 cup less liquid. Baked in my smaller bread pans.

Egg salad on Irish soda bread and kimchi slaw with raisins.

Recipe
  • 2 cups flour (50/50 whole wheat and white)
  • 1/2 tsp baking soda
  • 1 tsp salt
  • 1 duck egg
  • 3/4 cup kefir
Mix until dough is workable but sticky. Pat into medium size bread pan and bake at 375°F (190°C) for 30 minutes. Cool in baking pan with damp towel over top.

Experiment #2

Summary: Went for a larger loaf using the original amounts of flour. Replaced 1/2 cup of liquid in original recipe with 2 duck eggs. Substituted part of the flour with oatmeal flour because it seems to be added to a lot of modern Irish soda bread recipes.


Recipe
  • 3.5 cups flour (50/50 whole wheat & white)
  • 1/2 C oatmeal flour
  • 1 tsp baking soda
  • 1.5 tsp salt
  • 2 duck eggs
  • 1 cup kefir
  • 1/4 cup milk
Mix dough until kneadable but sticky. Shape and put in large bread pan. Bake at 375°F (190°C) for 1 hour. Leave in pan and cover with damp kitchen towel to cool. 

Experiment #3

Summary: Similar to experiment #2, but I added butter. I didn't have duck eggs so I used chicken eggs. I also didn't have much kefir so I used whey for the full 1.25 cups liquid.


Recipe
  • 3.5 cups flour (50/50 whole wheat & white)
  • 1/2 C oatmeal flour
  • 1 tsp baking soda
  • 1.5 tsp salt
  • 2 (chicken) eggs
  • 1/4 cup softened butter
  • 1.25 cups whey
Mix all ingredients until dough is sticky but workable. Pat into medium size bread pan and bake at 375°F (190°C) for 30 minutes. Cool in baking pan covered with a damp towel.

What did we think?
  • All were good and we'd eat any of them again.
  • The soda bread texture is different from whole wheat yeast bread but they all sliced nicely.
  • My preferred recipe is #3 because the flavor was the best. I'm sure this is because of the butter, which will also likely help keep the loaf from drying out as quickly.

So, I'm calling this a very successful experiment. The best part is having a loaf bread recipe that can be made fairly quickly and with simple ingredients. If I ever run out of yeast, we can still have our toast and sandwiches. 

August 13, 2025

Nacho Salad


For summer meals I do as little cooking as possible. That means dinner salads are often on the menu. This one is a take-off on taco salads, but rather than buy taco salad shells, we just use tortilla chips. I lay out the prepared ingredients, and everyone builds theirs to taste. It's an easy to make summer favorite.

Nacho Salad
  • Ground meat or leftover chicken seasoned with taco seasoning (I brown mine with chopped onions and bell peppers.)
  • Chili beans
  • Chopped lettuce
  • Grated cheese 
  • Chopped tomatoes
  • Chopped avocado
  • Tortilla chips
  • Sauce: mine is ricotta cheese blended with salsa to taste
Start with the chips as the bottom layer and add ingredients to taste. Top with sauce and enjoy!

Recipe notes:
  • Obviously you can use any ingredients you want, these are just our favorites. 
  • For the sauce, sour cream or cream cheese could be substituted for the ricotta cheese. I use it because I make it from the leftover whey every time I make my goat milk cheeses. 

April 24, 2025

The Last Bowl of Soup

Soup season has come to an end. Soup is our favorite winter lunch, so all summer long I stick leftovers into a recycled peanut butter jar as "soup fixins." I defrost a jar every couple of days, add the previous days leftover soup and a pint jar of bone broth. Sometimes I'll toss in new leftovers. In the bowl pictured above, I tossed in a handful of freshly chopped kale from the garden. And there's lunch. But eventually, the weather starts to warm up and we have our last bowl of soup for the season. 

This year was the first time I think I managed an ongoing soup from the first bowl to the last. There's usually some left in the pot and this gets put back in the fridge until the next day, when it's added to for a "new" soup. 

Sometimes Dan asks what's in it, but I honestly can't be sure. The big bites are identifiable, but when I collect those summer leftovers, I scrape every last bit of tasty goodness into the soup jar. If the pot or pan is sticky with gravy or sauce, I glaze the pan and pour the liquid into the jar so that there are no air gaps. When I finish up a jar or bottle of sauce, ketchup, or tomato juice, I'll swish it with a little bit of water and add that to the jar too. I've even been known to add dumplings, stale tortilla chips, cheese, even leftover meat pie, crust and all. Everything but dessert goes into those jars. Nothing gets wasted! When it gets chilly out again in fall, I'll have at least a couple dozen jars of frozen soup fixins' for our winter lunches.

With the milder weather the chickens and ducks have started laying again, so our warm weather lunches revolve around eggs and salads. It's another way food helps mark our seasons. 

What about you? Do you have seasonal food favorites?

The Last Bowl of Soup © April 2025

March 17, 2025

St. Patrick's Day Dinner

 I don't usually post much about holidays, but you may recall my Christmas series last December, Christmas Songs of My Ancestors. That was so much fun that this year, I decided look at how my ancestors ate. I've been researching the traditional foods and recipes for the various branches of my family tree and making meals from recipes I find. For St. Patrick's day, it seemed a good time for our traditional Irish dinner.

The first foods that came to mind when I started out were Irish Stew and Corned Beef & Cabbage. Then I learned that corned beef was an Americanized version of a traditional Irish recipe of Bacon & Cabbage. After a little more research, I finally settled on Colcannon and Bangers.

Menu

Colcannon
Bangers
Irish Soda Bread
Guinness Stout
Irish Apple Cake with Custard Sauce
Irish Coffee

Colcannon
  • 4 lbs russet potatoes
  • 1 small head of green cabbage or kale
  • 1 cup milk (or cream)
  • 1/4 stick butter, divided into thirds
  • salt and pepper to taste
Peel potatoes and put them in a pot to boil. 

Remove the cabbage core, slice the leaves thinly, and put into a large saucepan. Cover with boiling water and keep at a slow rolling boil until the cabbage is just wilted, not overcooked. Drain and return to the pan, melting in one of the parts of butter. Leave covered in a warm place. 

When the potatoes are soft, drain and return them to the saucepan. On low, let any excess moisture  evaporate. Heat the milk and another section of butter in a small saucepan until warm but not boil – it is about right when the butter has fully melted and the pot is starting to steam and put them in a pot to boil. Add to the potatoes and mash with a potato masher. Add the cabbage, stir to mix, and serve.

Recipe Notes:
  • I halved the recipe and we still had leftovers.
  • Next time, I'll try it with kale, which grows better for me than cabbage.
Bangers

Bangers are sausages. But since genuine Irish sausages are something I can't find here, I substituted Bratwurst for them. Not as authentic, but definitely delicious with the colcannon. Mine were raw, so I browned them on both sides for about 5 minutes, and then poured half-a-cup of water to the pan, covered, and simmered till done, about 15 minutes.

Irish Brown Bread

You've probably heard of Irish Soda Bread. Irish Brown Bread is a variation using whole wheat flour. There are tons of recipes for it out there, with tons of variations. I wanted one as close to traditional as possible, and finally settled on this one from Secret Ireland. I also found a lot of good information there, such as the traditional recipe of old uses only four ingredients. Oatmeal, seeds, raisins, sweetener, etc., are all modern additions.

Traditional Irish Soda Bread Recipe
  • 4 cups flour (mix of wheat and white as desired)
  • 1 tsp baking soda
  • 1 tsp salt
  • 1¾ cups buttermilk 

Mix until ingredients are combined (over kneading will toughen the dough). Shape into a round, score a cross on top, and bake at 375°F (190°C) for 35-40 minutes. For a soft crust, wrap the hot bread in a tea towel while it cools.

Recipe Notes:
  • I was surprised at how much it rose. The texture was nice. Denser than biscuits, but good flavored.
  • I used 50/50 whole wheat flour to white because that's the combination Dan likes.
  • I didn't have buttermilk, so I used kefir instead.
  • Next time I would increase the salt. For bread, I typically use 1/2 teaspoon salt per cup of flour. 
  • The trick of covering the loaf with a towel worked, and helped keep the crust soft. 
  • It's a quick but lovely rustic bread

Irish Apple Cake with Custard Sauce


I found quite a few versions of this online, so mine is a blend of the ones that had ingredient amounts I liked. 

Cake
  • 3 cups all-purpose flour
  • 1 Tbsp baking powder
  • 1/2 tsp salt
  • 1/4 tsp of each ground ginger, nutmeg, & allspice
  • 3/4 cup soft butter 
  • 1 cup + 2 Tbsp granulated sugar, divided
  • 1 1/2 lbs baking apples 
  • 3/4 cup milk
  • 2 large eggs
  • 1 tsp vanilla extract
  • 1/2 tsp ground cinnamon

Peel, core, and slice apples. Toss with 1 tablespoon sugar and set aside. Cream butter and 1 cup sugar. Add eggs and blend. Mix dry ingredients and add to egg mixture along with milk and vanilla. Fold in apples and pour into greased and floured baking pan. Mix remaining tablespoon sugar and 1/2 teaspoon cinnamon and sprinkle over top. Bake at 350°F (180°C) in a 9-inch springform pan for 40 to 45 minutes. 

Custard sauce
  • 1⁄3 cup granulated sugar
  • 3 large egg yolks
  • 1⁄4 teaspoon salt
  • 3⁄4 cup whole milk
  • 3⁄4 cup heavy cream
  • 1 1⁄2 teaspoons vanilla 

In a bowl, whisk together sugar and egg yolks. Set aside. In a saucepan, mix together the milk, cream, and salt. Cook over medium heat, stirring constantly, until milk begins to steam. S-l-o-w-l-y dribble the heated milk mixture into the egg mixture, whisking continually to prevent curdling. Pour back into saucepan and heat until thick, it shouldn't take more than a few minutes. Stir in vanilla. 

At this point, the recipes say to strain the sauce, but I ran it through my blender, poured into a jar and refrigerated. 

Cake can be eaten warm or cool, with custard sauce poured over.

Recipe notes

  • For the baking powder, I used 2 teaspoons cream of tartar and 1 teaspoon baking soda.
  • I didn't have a springform pan, so I used a 9-inch regular cake pan. The batter spilled over the sides of the pan while baking! The recipe is excellent, so a springform pan will be a must before I make it again.
  • More apples would be nice.
  • I think my custard sauce was so golden in color because our spring eggs have such orange yolks.
  • Next time I'll omit the sugar/cinnamon topping. It made it too much like coffee cake. 

Irish Coffee

  • 4 oz freshly brewed coffee
  • 1.5-2 oz Irish whiskey (1 ounce = 2 tbsp)
  • 1-2 tsp sugar
  • 2-3 tbsp thick cream

Brew strong dark roast coffee and lightly whip fresh cream until slightly thickened. Pour hot coffee into the glass, add sugar and whiskey, and stir to dissolve. Pour cream over the back of a spoon into the cup to create a floating layer. Don't stir. Sip through the layer of cream to enjoy.

Recipe notes
  • I only added 1 tablespoon of the Irish whiskey, which made it more like a flavoring.

🍀🍀🍀

This traditional Irish meal is a great way to honor of my Irish ancestors. 

Are you Irish? Do you plan to celebrate St. Paddy's Day?

January 7, 2025

Recipe: Scalloped Apples

This time of year we have a number of seasonal dishes, all from Christmas leftovers! One of them is split pea soup. It's my favorite way to use that Christmas ham bone. Another is scalloped potatoes and ham. I use a basic scalloped potatoes recipe from my Betty Crocker cookbook, and add the bits of ham I cut off the bone before tossing it into the soup pot. It makes a wonderful casserole. But it needs a side dish, and yesterday, I made scalloped apples.


This is an old recipe from my grandmother, whom I believe got it from her mother. I always loved it as a kid because it was like eating dessert with dinner! (Plus we got "real" dessert too). 

The apples were a gift from our neighbor. He bought a huge box at the farmers market, ate his fill, and then passed some on to us. There was enough for a couple of apple pies (one for us and one as a thank you for our neighbor), a half-gallon of apple sauce, and plenty for eating. The scalloped apples were inspired by those apples.

Scalloped Apples

NOTE: being an old fashioned recipe, it assumes the cook knows that the apples are to be pared, cored, and chopped, and that the cooking time is until the crumbs are browned on top.

Cook together till tender:
  • 3 cups apples
  • 1/2 cup sugar
  • 1/4 tsp cinnamon
  • 1/4 tsp nutmeg
  • 1 cup water
Add: 
  • 1/2 lemon, juice and rind
  • 2 cups soft bread crumbs mixed with
  • 1 stick of butter, melted
Layer bread crumbs and apple mixture in a buttered baking dish. Have crumbs on top. Bake at 350° (180°C).

Everything is already cooked, so I find about 20 minutes browns the crumbs nicely.

Does anyone else make traditional dishes from their holiday leftovers? 

June 12, 2024

In Which I Learn How to Make Mayonnaise

A lot of people make their own mayonnaise, but for some reason, the idea always intimidated me. I have no idea why; maybe it was just the entrenched habit of using store-bought mayo. But then Dan and I got into another diet analysis discussion, and talked about more ways to improve our diet (there's always room for improvement). 

I had already changed the oils we cooked with. Nourishing Traditions by Sally Fallon was a real eye opener on that front, and I eliminated all edible oils except extra virgin olive and coconut from  our diet. The hold-out was mayo, which is typically made with soy oil. For awhile, I was able to buy coconut or avocado oil mayo from our discount grocery, until they closed shop. I switched to the commercial mayo with olive oil, but it still contains soy oil. But now, with mayo costing $6 to $8 a jar, it was time to do something else. 

My first step was to ask for recipes at Permies.com. I got a lot of good ones, so I chose the simplest, plopped the ingredients into my power blender, and whirred it up. Except no matter how long or at what speed I blended it, my "mayo" remained liquid. Because of the EVOO it solidified in the fridge and tasted okay, but it didn't have the creamy consistency I wanted. 

After we finished that jar, I was tempted to just buy a jar of mayo again, but decided to hunt for a DIY video instead. This one, The Easiest Homemade Mayonnaise Recipe!, told me what I needed to know. She had the same results as me with her blender mayo, and recommended a stick blender instead. I vaguely remembered buying one for soap making, but it was still unopened in the box. Somewhere. 

Also called a hand or immersion blender.

I found it, assembled it, and dumped the ingredients into a wide mouth pint jar. Within seconds I had mayo! I couldn't believe how fast and easy it was. 

The first thing it went into was sauerkraut slaw.

Sauerkraut slaw. Just add mayo to sauerkraut or kimchi.

The recipe is the standard one found around the internet. For my records, here it is again.

  • 1 cup oil of choice
  • 1 egg
  • juice of 1/2 lemon (or 1 tbsp lemon juice or vinegar)
  • pinch salt (or to taste)
  • 1 tbsp mustard (Dijon tastes best, but yellow will do)

Place all ingredients in a wide mouth jar. Insert blender all the way to the bottom and begin to blend. As the mixture blends, slowly lift the blender until the entire jar is mayo. 

Also, for mayonnaise lovers, here's another Permies thread with lots and lots of recipes and flavor variations for the stuff - Favorite kinds of mayonnaise and magic mayo method.

Who else makes their own mayonnaise?!?

January 23, 2024

Fermented Cole Slaw

This has become one of our favorite side dishes. 

It's tasty and another great way to get probiotics into our diet. And, it's quick to make.

Technically, it isn't fermented as the finally product, so the name may be somewhat misleading. I start with previously made kimchi or sauerkraut to which I've added shredded carrots.

Nowadays, I usually ferment a mixture of vegetables together in the same jar: cabbage, carrots, daikon, Jerusalem artichokes, turnips, onion, ginger, etc., whatever I have on hand. Of most fermented foods, Dan would eat some dutifully for health, but request only "a little bit." One day while I was draining some kimchi, I decided to add a little mayonnaise and serve it as cole slaw. 

After a taste, Dan wanted a larger helping and it's been a standard ever since. I find we eat more of it when prepared this way. 

A bonus is that it takes so much less mayo to make it this way. My original cole slaw recipe calls for mayonnaise and pickle juice, which we always found too tart and so I would add a small spoonful of honey or sugar. My sauerkraut, kimchi, etc., are rarely too sour. If it is, I simply rinse it some before serving. Another plus, this recipe is ready to eat after mixing, whereas my from-scratch cole slaw tasted better if it sat at least several hours or overnight in the fridge. And, of course, there are no probiotics in traditional cole slaw. 

In some ways, I think of this recipe as a transition food. If one doesn't grow up with particular foods, they often aren't cared for as much as what we're used to. For example, if we grow up on white bread, 100% homemade whole wheat isn't as enjoyable (which is probably why they add a ton of sugar to commercial whole wheat bakery products.) When I started making a 50/50 white and whole wheat flour bread, the family liked it. I've gradually shifted the amounts to favor more whole wheat, but still keeping it acceptable to Dan. The fermented cole slaw helps with the transition from traditional cole slaw to lacto-fermented foods. My old 'something is better than nothing' approach.

Does anyone else use transition foods for themselves or their families? I'd be interested in more ideas.

Fermented Cole Slaw © January 2024 by

May 23, 2023

Trying a New Technique for Making Sauerkraut

The best sauerkraut is said to be made in its own juices. The cabbage is shredded and pounded enough to bruise the juice out of it. The requires extremely fresh cabbage, which I don't often have, since cabbage moths make cabbage growing a real challenge for me. Cabbage is an inexpensive vegetable, so I don't mind buying it to make sauerkraut. The trade-off is that it's usually too old to pound out the juices. So, most often, I make sauerkraut by mixing and adding brine

Recently, I ran across a video with a different method for making sauerkraut. It's a four-part series with the first video here. Instead of shredding the cabbage and adding the brine, the cut cabbage was salted first and allowed to sit overnight. Salt pulls moisture from food (through osmosis, I reckon) and so helps the cabbage make it's own juice. I decided to give it a try.

The first step is shredding the cabbage.

After shredding, the cabbage was sprinkled with salt and mixed in. The video didn't mention an amount, so I used the same amount of salt as my old recipe, 2 tablespoons for a medium head of cabbage. I covered it with a clean dishcloth and let it sit on the counter overnight.

I use Himalayan pink salt for the minerals.

The next morning the cabbage shreds looked wet and I found that the salt had indeed pulled some juice from the cabbage.


The next step is pounding. In the video, the gal dumped her shredded cabbage into a 5-gallon bucket and stomped it like grapes. I opted to used my pounder.


That squished out more juice. Not enough to cover the cabbage, but the video said in that case, cover it with a light brine. The video used fresh dill and slices of horseradish for flavoring, but I used juniper berries and celery seeds.


After covering the crock contents with more brine, I submerged the cabbage shreds by covering them with a saucer and weighting it with a pint jar half filled with water. 

Then the crock is covered with a clean cloth an allowed to ferment.

I find that three days is good for our taste buds. Then I transferred it to a half-gallon jar with a lid to store in the fridge. 

Then the taste test. We both love sauerkraut and really liked this one. I especially like to use it as a relish on a good hamburger.

Bacon cheeseburger with sauerkraut.

One other really good tidbit I picked up from the video series is that sauerkraut can be frozen without destroying the probiotics. Canning will kill them, but I usually make it one cabbage at a time and refrigerate it after it's soured to the tartness we like. It does keep getting more sour, even in the fridge, so freezing sounds like a good way to go.

Conclusion? This method is a keeper! I'll have to try it with my other fermented vegetables as well.

December 19, 2022

Holiday Recipe: Tortilla Pinwheels

Tis' the season not only for soup, but now, for festive snack foods. Here's one I made recently, after years of forgetting about them.

Tortilla Pinwheels

I used to make these as a holiday appetizer when my kids were little. They were much requested for holiday family get-togethers. When I stopped buying cream cheese, I stopped making them. One day I found myself wondering what to do with my abundance of ricotta cheese. which I use it to make gnocchi, gelato, biscuits, and salad dressing (all of those links will take you to the recipes!) As I mulled it over, the pinwheels came to mind; why couldn't I substitute ricotta for the cream cheese? I could and I did, and it put this item back on the menu. Easy and tasty.

Tortilla Pinwheels

  • Cream cheese or ricotta, softened (could also use chevre)
  • Salsa or picante sauce
  • Flour tortillas
Blend the ricotta (or cream cheese) and salsa to a spreadable consistency. Spread onto the tortillas and roll them up. Refrigerate overnight. Before serving, slice into pinwheels and serve. A bowl of extra salsa on the side can be used for dipping if desired.

I used to serve them with toothpicks for an appetizer or snack food. They were always a hit.

December 12, 2022

Recipe: Rubaboo (Pemmican Soup)

As promised at the end of my Pemmican blog post, here's my first cooking experiment with my pemmican. This is rubaboo or pemmican soup. The recipe is based on a description in the book Forty Years in Canada by Col. Samuel B. Steele. It was published in the early 1900s, and of pemmican, he says,

"It was cooked in two ways in the west; one a stew of pemmican, water, flour and, if they could be secured, wild onions or preserved potatoes. This was called 'rubaboo.'"

That's not exactly a recipe, but it's description enough for a plain cook to figure out that it's made with a few basic ingredients plus whatever is at hand. I started mine with pemmican, potato, turnips, carrot, and onions.

Not pictured: flour and salt.

As a one-pot meal, it's easy to make; just simmer until the veggies are tender. Toward the end I took the notion to add some chopped fresh kale leaves too.


A more authentic meal would likely serve it with hardtack, but alas, hardtack is something I haven't tried my hand at making yet (but it's on the list). I served it for lunch with the closest modern equivalent - plain saltines.

What did we think? We liked it! Obviously, it's a very versatile recipe with endless possibilities. I think too, that this is the more prudent use of our pemmican, which is very dense in protein and calories. Rubaboo stretches out a small amount for many meals. Since pemmican is shelf-stable, it's an excellent way to preserve and store meat for hard times situations.

November 20, 2022

Recipe: Pumpkin Chocolate Chip Cake

This is not a combination I would have come up with by myself, but my daughter assured me it's a delicious combination. I always make a dessert for the weekend, so this weekend, we gave it a try.

I had a can of organic pumpkin in my pantry, and used that instead of winter squash (my usual substitute for pumpkin). I was surprised at how orange it made the batter!


Here's the recipe. It's an adaptation of several recipes I found online.

Pumpkin Chocolate Chip Cake

15-ounce can of pureed pumpkin
1 cup sugar
3 eggs
1/2 cup soft butter
2 cups flour
1/2 tbsp pumpkin pie spice
2 tsp baking soda
1 tsp salt
1/2 cup whey, buttermilk, yogurt, or kefir
1 and 1/2 cups chocolate chips

Blend pumpkin, sugar, eggs, and butter. Add flour, spices, soda, salt, and liquid. Mix well. Stir in chocolate chips and pour into a greased and floured bundt pan. Bake at 350°F (180°C) for 45 minutes or until done. Cool about 15 minutes and turn out of pan onto a cake plate.

Dan thought it was really good, but I thought it was just okay. I love chocolate chips, but I think pumpkin would go better with dried cranberries. Either way, I liked that it was definitely not just pumpkin spice!

Recipe Notes:
  • As mentioned above, I would try dried fruit as a substitute for the chocolate chips.
  • If I make it again, I'll use only one cup of chocolate chips.
  • Next time I'll try it with two eggs instead of three.

Is anyone else trying a new twist on traditional seasonal items? Care to share?

September 22, 2022

Experiments in Ketchup Making

Chevon and grilled onion sandwich with oven fried potatoes, and homemade ketchup.

We don't eat a lot of ketchup. In fact, I'm the only one who eats it and that's just once a week on my grilled Sunday hamburger. But with all our extra cherry tomatoes, I wanted to give ketchup making a try. I'm calling this an experiment because there is still a little tweaking I want to do. I'm putting all my notes here, so I'll remember what I did, what I want to do differently, and why.

The recipe I used was based on a video by Living Traditions Homestead. What intrigued me was that she used whole tomatoes. She cored them, chopped them, and cooked them with with the other ingredients before running them through her Vitamix blender. What could be easier than that?

I had questions though, because I'd need to use frozen cherry tomatoes instead of large fresh ones. It seems like freezing them toughens the skins, plus, cherry tomatoes are seedier than regular size tomatoes. Would it work as well? I was willing to give it a try and see what I got.

The ingredients in the following recipe are based on the recipe in the video, but adjusted for the amount of tomatoes that I had (fresh plus thawed).

Ketchup

8½ lb  defrosted cherry tomatoes, drained 
1 cup chopped onion
1 cup vinegar (I used my pear vinegar)
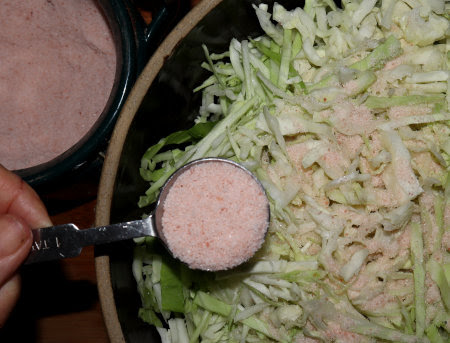
3/4 cup sugar (originally 2/3 cup but increased after taste tasting)
1½ tbsp canning salt 
3 cloves chopped garlic
1/4 tsp black pepper
1/2 tsp celery seed
1/2 tsp mustard seed

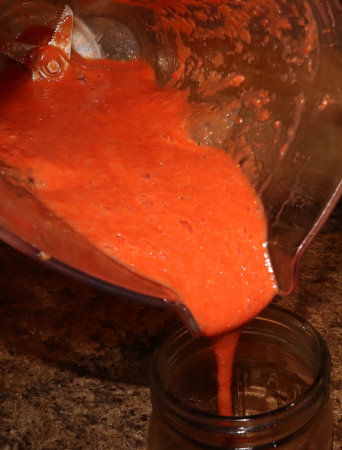
I simmered it all together for several hours and then allowed it to cool. Then I blended batches of it in my new blender.

First batch before blending.

The skins blended quickly but the teeny tiny seeds took some time. The process might have been quick with regular tomatoes and regular tomato seeds, but the miniature seeds were more of a challenge (and I was impatient).

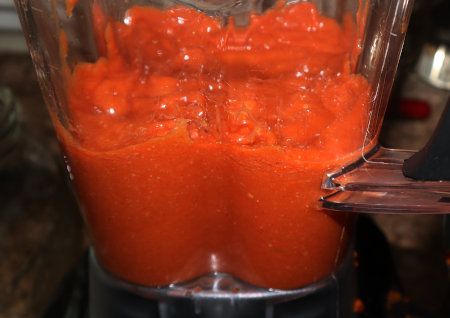
After blending. Smaller batches did a much better job on the seeds.

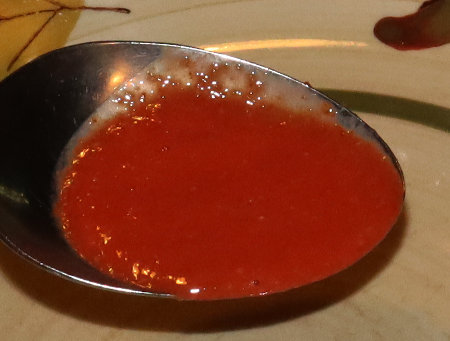
We sampled it that night for dinner with French fries. Our cherry tomatoes are more acidic than our slicing tomatoes, so one thing we agreed on was that it needed more sweetener (notated in my recipe above). Dan didn't mind the remaining seeds, but I didn't like them. So, before I canned the ketchup I removed the seeds with a fine sieve and spatula.

A lot of people make their ketchup this way. I found it quicker
 and less messy than using my hand juicer (especially clean up).

To can: hot back jars leaving 1/4" 1/2" headspace (I had too many failed seals with 1/4" and had to re-do those). Water bath process for 15 minutes for both pints and half-pints. My yield was 6 pints.

Noteworthy

About a week later, I put a picking of cherry tomatoes into the dehydrator for making tomato powder.

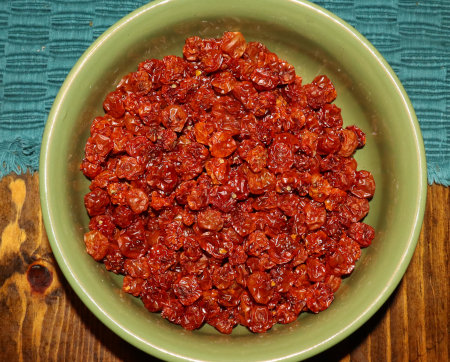
Dried cherry tomatoes.

Tomato powder. Do you see any seeds?

The dried seeds powdered right along with the skins and pulp. Hmm. Did cooking the whole tomatoes soften the seeds so that they didn't blend well? Or did drying them make them brittle enough to powder well? That lead to another experiment. What would happen to the seeds if I blended raw cherry tomatoes?
 
Fresh cherry tomatoes in the blender

After blending. Looks thick and creamy, doesn't it?

The real test was looking for seeds!

If any little seed fragments are there, I can live with it! Plus!!!
It's about thick enough to be sauce; just needs a little seasoning.

I'm guessing that the raw and dried seeds were firm enough to be pulverized in the blender, but the cooked down tomato seeds were too soft and slippery for some of them. Based on several videos that I watched, I don't think that's strictly true of larger tomatoes with larger seeds, but it seems to be true of the tiny, seedy, Matt's Wild Cherry Tomatoes.

Umm, so, why have I been spending hours and hours every summer juicing tomatoes, and days and days cooking down the juice to make sauce? NO MORE! This is completely changing the way I will make my pizza sauce next year! And all because I wasn't satisfied with the way my ketchup turned out. 

July 1, 2022

Homemade Popsicles :)

Dan and I love dessert. We grew up in different parts of the country, but both of our families considered dessert to be part of a proper meal. So, for years, I made and served dessert after our evening meal. I cut back on the sugar and fat in most recipes, so that was good, but eventually we felt that we were still eating too much sugar anyway. So dessert became a treat for the weekend. 

Last winter, I found popsicle molds when I was out Christmas shopping. I bought two and recently started to experiment. I found that I can make a no- to low-sugar dessert that wonderfully finishes out a summer meal. 

Pureed peach popsicle from canned peaches.

These can be as simple as one ingredient, or a combination of flavors. Making them is easy too, just smash or puree a favorite fruit, sweeten if desired, pour into the mold, add the stick, and freeze.

An actual recipe isn't necessary. It's a matter of amount and consistency. My molds hold 1/3 cup per popsicle, so for the tray of four, I need 1⅓ cups ingredients that can be poured into the mold. Possibilities:
  • fruit juice (including concentrates)
  • pureed fruit (fresh, frozen, or canned)
  • peanut butter (needs thinning - see below)
  • for creamsicles: mix fruit juice with yogurt, cream, cream cheese, ricotta cheese, kefir, or chevre
  • to thin if needed: cream, milk, juice
  • optional crunchies: chocolate chips, puffed rice, chopped nuts, granola, coconut flakes, crushed cookies or graham crackers, etc.
  • sweetening optional: maple syrup, chocolate sauce

Here are some of my experiments:

Banana peanut butter. (Dan's favorite).
It was thick, so I thinned it with cream.

Orange creamsicle: orange juice concentrate and ricotta cheese

Blueberry and peach (puree from frozen and canned fruit)

Peanut butter chocolate chip (I thinned the BP with cream & used mini-chips)

Grape creamsicle: grape juice concentrate and ricotta cheese

Chocolate banana: ripe banana & unsweetened cocoa powder

Banana, orange creamsicle, and peanut butter layered

Tutti Frutti - pureed fruit cocktail (the 100% juice kind)

Strawberry, banana, and blueberry layered

Recipe Notes:
  • Ripe bananas (with dark spots) are much sweeter than green or unspotted yellow bananas.
  • The chocolate banana popsicles required no extra sweetening, even with unsweetened cocoa powder added, because of the sweetness of the ripe bananas.
  • For a fruity power punch flavor, fruit juice concentrate can be used. For popsicles, we like it diluted at 2:1 (instead of the recommended 3:1). 
  • Pureed fruits can sometimes be a bit bland when frozen, because of ice (water) crystals. Sweetening can help, as can a tablespoon or so of undiluted fruit juice concentrate.
  • The possibilities are endless. You're only limited by your imagination!

Experimenting with flavors has been a lot of fun. So far they've all been good! For my next batch, I'm going to try a PB&J flavor, using grape juice concentrate to thin the peanut butter. 

I don't know why I didn't think about making these sooner. I guess it's because, when I think of popsicles, I usually think of the artificially flavored high fructose corn syrup type they sell at the store. But they are easy to make and can be as low sugar and healthy as I want. They satisfy the dessert habit, and make for a refreshing, hydrating treat after getting hot and sweaty outside. Another good way to beat the heat!