Showing posts with label electrical. Show all posts

May 8, 2023

Sewing Room: Electrical Outlets & Baseboards

You may recall from my last post, that electrical wiring in this room was an add-on, i.e. added after the room was built. Dan contemplated two options for the wiring: either drill holes through the studs and run the wiring behind the walls, or run it along the top of the baseboard and cover it with trim. Then he looked into how log home builders install wiring. In a log home, electrical wiring is run though holes which are drilled lengthwise in the logs. Dan adapted that idea using ready-made tongue-and-groove boards.

First, a hole was cut out for the electrical outlet box.

View from the bottom. The wiring fit perfectly in the board's groove!

Front wall before

After

Besides being the perfect width for a baseboard, the tongue-and-groove planks are much cheaper than the same size plain board. I'll just have to get a primer that will cover the knots.

2nd wall before

After: two sections of baseboard installed, new electrical outlets, and wiring safely hidden.

I now have electricity in my soon-to-be (at least I hope it's soon) sewing room! Then, due to the return of beautiful weather, we were back outdoors again. Hopefully, we'll finish the trimwork the next time it rains. After that, I can start painting.

Next, Sewing Room: Lots of Progress

May 5, 2023

Rainy Day Project: Sewing Room Walls

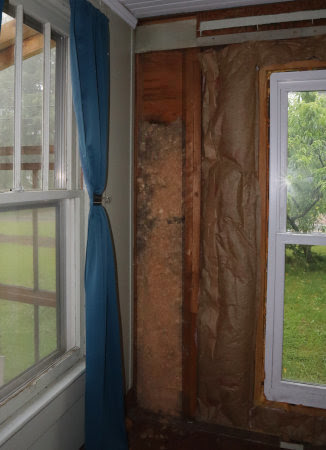
Last time, I showed you my cleared out space in the sunroom and told you what I want to do with it. Even though we're in the middle of spring planting and the greenhouse build, there's been time to make a start on the sewing room because everything outside is so wet and soggy from April's parting gift of extensive rain. The goal here is not major renovation, but simply cosmetic. The first step was covering the exposed insulation, starting with the old door. 

This door used to exit onto the front porch. 

We discussed tearing out the closet, but my preference was to leave it because it's useful for storage. It was added after the room was built, we think because the family had three children, two girls and a boy. The house was built with two bedrooms, so adding a closet in this room gave them three bedrooms. 

In some ways, the entire room seems like an afterthought. All the walls in the house are either plaster or tongue-and-groove, but the walls in the this room (dubbed "the sunroom" by the realtors) are plywood. Also, it wasn't built with the electrical wiring in the walls; rather, electricity was added later using exterior outlets and a conduit along the baseboard to cover the wire.

Electrical wiring must have been added after construction.
You can see all the photos of the original room - here.

The foundation and roof give no clues, as they seem to have been built the same time as the rest of the house. Our best guess is that this room was originally part of a wraparound porch. If an additional room was needed, it seems logical to convert part of the porch. The floor was probably replaced when central heating was installed. The house's original heat source was coal stoves in each room, so the ductwork would have been part of an upgrade. There are only inches of clearance under the floor in this room, making it impossible to crawl around under there. So it seems logical that they tore up the old porch floor, put in the ductwork, then installed the floor we have now. 

Anyway, our options for covering the old porch door ranged from tearing off the door trim and trying to match a new wall to the old one, to an inset within the door trim. Dan asked my preference, but since this wall is going to be covered with storage units and shelves anyway, I voted to do whatever was easiest. Maybe one day we'll do a proper renovation on this room and can make a different choice then. For now, here's what he did:

Dan filled in a few gaps with foamboard, then
added a vapor barrier and a board for nailing to.

We priced wall options and chose the least expensive - more plywood. 

Ready for trim and paint.

Then the front wall. It was a little more challenging because the last of the original plywood wall had to be removed. We couldn't match its thickness, and the other option would have been a bunch of shims to try to build it up.

That one strip of remaining wall on the left had to be torn out too.

It was probably just as well, because the old blown-in insulation in that covered corner had settled a lot over the years. Dan managed to not disturb it.

Energy leak at the top where the insulation had settled.

We didn't want to buy an entire new roll of insulation just to cut off a small narrow strip, so Dan filled the gap with a scrap piece of 2-inch form board. 

The foam board was leftover from our pantry upgrade.

Then the new plywood wall.

Ready for trim and paint.

I'll wait to do the painting until after Dan's done with his part. Baseboards and electrical wiring are in this next post, Sewing Room: Electrical Outlets and Baseboards

January 9, 2020

Solar Project: Grounding the System


Earth ground symbol
Electricity follows pathways. Typically, that's the wiring between the source and whatever requires electricity to operate. If there's a problem, it can jump the wiring and electrify nearby metal. This could be deadly to someone who touches it. Physically connecting the wiring to the earth gives the electricity an alternate pathway, if needed. Called grounding or earthing, this is an important safety feature.

Many solar setups tie all the components together and ground them as a unit. If we had been thinking several steps ahead we could have done that too. Because we were doing this one step at a time, Dan grounded the solar panels separately, as specified in their installation manual.

The grounding holes in the solar panels' aluminum
frames are marked with the earth ground symbol.

Lay-in lugs connect the neutral grounding wire to the panels.

This photo makes it look like the wire loop on the right is
touching itself. It's not! It's just the angle of the photograph.

The grounding wire is connected to a grounding rod.


Alternatively, the ground wire could have run
through the underground conduit (white
pipe sticking out of the ground)
 to the battery box.

At the battery bank box, the charge controller and inverter are grounded together. Each clearly shows where the ground wire attaches.

Charge controller innards. Ground wire on the right.

Inverter ground wire on the right.

The ground wires from the charge controller and inverter are connected in the battery box with a thingy called a busbar.

Busbar with two of the three ground wires attached.

The third wire above (yet to be attached) will connect the busbar to the grounding rod. The ground wire from the panel array could have been connected here too. The busbar is a conductor and will direct wayward currents from either the controller or the inverter to the ground rod.

Our second ground rod near the battery bank box.

That's a very important step accomplished!

Most of the cables are in place, but they aren't connected yet. There are a few more things to do first, and then we can put the system together.

January 5, 2020

Solar Project: Figuring Out the Wiring

In my last solar project update, I showed you the battery box Dan came up with. The batteries and charge controller are now installed in the box, so the next step will be connecting all the components together.


For that, we need various sizes of cables and circuit breakers.


To understand how it all fits together, I drew a diagram.

You should be able to click to biggify.

Cable size is based on current (amperage), so they become progressively larger as the electricity travels from source to use.


I used the sizes recommended by Prepper's Total Grid Failure Handbook and the charge controller user manual.
  • 10 AWG from solar panels to charge controller
  • 2 AWG from charge controller to battery bank
  • 4 AWG golf cart battery interconnect cables between batteries
  • 1/0 AWG from the battery bank to the inverter

The manuals helped me size the circuit breakers too.


Solar is a direct current (DC) system, so all of these are DC circuit breakers. Household (AC) circuit breakers are not recommended.
  • 30 amp (12-72 volts) between solar panels and charge controller. The formula is the PV array's short-circuit current (LSC) multiplied by 1.56. The LSC is listed on the back of the panels. For us, that was 6.39 x 3 panels = 19.17 x 1.56 = 29.9 or 30 amps.
  • 60 amp circuit breaker between the charge controller and battery bank was recommended in the charge controller manufacturer.
  • 175 amp circuit breaker between batteries and inverter was recommended in the inverter manual.
They are marine breakers, so they are waterproof. Even though they will be installed in the battery box, that still seemed like a good idea.

All of that is probably more technical than you're interested in, but I want to have all the information where I can find it. That's in case we need it for future reference. A blog comes in handy for things like that!

The next step will be grounding the system.

October 30, 2013

Reflections on the Slow Life

One thing most homesteaders seem to have in common is the desire to slow down. There seems to be a universal recognition that modern life is just too fast paced, too hectic, and too complicated. Have you ever wondered to where everyone is in such a hurry to get? The next stoplight? I don't know about you, but having been around enough decades, it seems to me that the pace has picked up. It seems more frantic and more desperate than before. It's as though our inner clocks are being wound tighter and tighter as time goes by.

Hand crank blender
There are theories regarding this. One I call the electromagnetic frequency theory. The frequency of the human body ranges from about 62-68 Hertz (Hz). The human brain is said to be lower, 1 to 30 Hz, depending upon one's state of sleep or wakefulness. Electric and electronic devices operate in megahertz (MHz with mega = million), for example, cell phones at 824 to 849 MHz, AM radio at 535 KHz (kilo = 1000) to 1.7 MHz, FM radio at 88 to 108 MHz, television at 54 to 220 MHz, microwave ovens at 2.45 GHz (giga = billion), even baby monitors at 49 MHz.

Does being in constant contact with modern electronic devices have an effect on our nervous systems? Is it true that as the usage of such devices increases, so do things like road rage, violence, insomnia, anxiety, short tempers, impatience, depression, a basic dissatisfaction with life, etc.? I'm sure some will debate the premise, but it is interesting to note that in addressing insomnia, sleep therapists recommend disengaging oneself from all electronic device activity at least an hour before going to bed and doing something old-fashioned like read an honest to goodness paper based book. Some go so far as to suggest moving the clock radio off the night stand. And a new field of medical science is researching the electromagnetic frequencies at which disease microorganisms activate within the human body.

My favorite mixing tools - an egg beater & a Polish whisk

Have you ever noticed how quite your house becomes if the electricity is down for some reason? All the things we keep plugged in vibrate and hum. We hear it all day and never seem to notice. Does that effect us too? Off-griders, you probably have some interesting things to say about this.

Whether it's true or not, it certainly does seem a plausible explanation as to why society has its foot on the lifestyle accelerator. I can't help but wonder that if we took an electric/electronic sabbatical, could we "reset" ourselves, if we wouldn't feel calmer and less stressed out. I know it seems one more good reason to pull the plug and find manual alternatives to so many of the things we do. The trade-off is that it takes more time to do things by hand, so that I feel like I'm getting less done.

 My manual food processor

I can't help but wonder that if one of my goals is to slow down, then why am I so impatient to get there? What do you think?

Reflections on the Slow Life © October 2013 by Leigh

February 17, 2013

January kWh Report

Last month's trend continues; we used more kilowatt hours than the previous month, but significantly less than the same month a year ago. Our daily average usage is up 5 kilowatt hours from December. In January 2013, we averaged 22.35 kWh per day.

I can pinpoint the reasons for this. January was cold and rainy (over 12 inches), plus the work we're doing in the bathroom requires minimum room and surface temps. All of this meant using the space heater to keep the bathroom warm, and not being able to line dry the laundry. I don't suppose it helps, either, that my washer and dryer are old. The spin cycle on the washer doesn't spin out the water very well, and sometimes I have to run the dryer on two cycles to get the clothes dry.

To help conserve our wood supply, I have been turning on the heat pump during the day, whenever the outside temperature is warm enough to produce heat without the auxiliary heat strips. In the evening we heat the front of the house with the wood heater, and the heat pump is turned off. It's cold in the morning, but we've learned to close up the kitchen to stay warm by the wood cookstove for breakfast.

Our house was built before central, forced air heating, so all the rooms in our house have doors. Each room had either a coal fireplace or coal burning heater. The doors kept the heat inside whatever room it was wanted in. One suggestion, when we remodeled the kitchen, was to open the wall between the kitchen and dining room. At the time, I didn't entertain this because that wall was the only wall I had for cabinets and shelves, which my small kitchen needed badly. Now, I realize how much harder that would have made it to keep the kitchen warm. The open concept design is a popular modern floor plan, but this winter I realized why it isn't conducive to zone heating. Or cooling. In summer I can contain  heat generated by canning, and keep it from spreading throughout the house. The wood cookstove though, provides glorious heat and since I use it for all meals, the kitchen stays warm. The insulation and energy star windows we added help with that!

I've also been shutting the doors to my studio at night, to prevent heat loss from the rest of the house. My studio has nine, single glazed windows, all as old as the house is. Nor does the room have insulation. I love the light but it's hot in summer and cold in winter, except on a sunny day when the sun warms the room nicely. My regret is that we do not have enough sunny days! Closing the studio doors at night really help keep warmth in the living room and bedroom. Unfortunately, my desk and  internet connection are in the studio, so I often use a small radiator type space heater to keep my fingers warm enough to type.

Blankets over the windows and doors helps! Eventually
we'll replace the drafty, ill-fitting door with an energy
star one. The energy efficient windows really help too. 

Still, last month we used less than half the electricity we used in January 2012, when we averaged 54 kWh per day. Dan says next year we should do even better, assuming we get the bedrooms done. The corner bedroom, where we sleep, in particular is cold for the same reasons as my studio: old windows and no insulation. Once these rooms have better insulation and better windows, we will stay warmer with less energy output. Then, too, we won't be using power tools and space heaters to get repair and remodeling jobs done.

On a practical level I am not dissatisfied with this month's electric usage.  January's electric bill was $83, and we can live with that. We have enough alternatives that we can make choices about when and how to use electricity. The important thing is that we are learning and implementing lifestyle changes that will better suit us for whatever the future may bring.

January 16, 2013

December kWh Report

Our electric bill for December arrived the other day. I have to admit I wasn't too sure what to expect when I pulled it out of the mailbox. While it wasn't quite as good as last month, it was incredibly better than December 2011.

Our daily average for last month, December 2012, was 17.35 kWh. That's a little more than November's 15 kWh per day average, but compared to last year, it is an amazing difference. Last December, we averaged 47 kWh per day. That's a 63% decrease one year later.

We continue to do all the electricity saving measures I mentioned in my November kWh report. A space heater likely accounts for the increase from November. For the most part December was fairly mild, until the temperatures took a nosedive the weekend after Christmas. It was rainy too, which meant I used the electric dryer more than I like.

I credit the decrease from 2011 primarily to our wood heat stove and wood cookstove (for both cooking and heating.) In addition to not having to use the electric range and heat pump much, we also no longer have to use the electric heater in the kitchen bathroom, because the cookstove heats the back of the house so beautifully.

Cooking potato pancakes & applesauce on the wood cookstove.

Last year I tried to figure out a way to balance using the heat pump and the wood heater, but our electric bills were still way too high. This winter, we have been using wood for heating and cooking, and you can see the difference.

Our electric heat pump is our biggest energy gobbler. In 2011 for example, we used the heat pump during both summer and winter. During the spring and fall of that year, when it wasn't used, we averaged about 18 kWh per day. That was before we installed the wood cookstove, so usage of my electric stove is included in that average. In summer, with the air conditioning and thermostat set at 82° F, average usage jumped to about 30 kWh per day. In winter, with the heat pump on and thermostat set in the low 60s, we averaged about 50 kWh per day. And that's with an energy star qualified unit! And as if to rub salt on the wound, we were still cold!

Riley sprawled in front of the wood heat stove, warming his belly.

I do not do all my cooking on the cookstove. "Big" baking is done with the electric oven. Friday night pizza for example, because my pizza stone does not fit in my cookstove's small oven. Also baking projects where I have two baking sheets in the oven at the same time.

I admit I don't expect January's average usage to be so good. This will mostly be due to keeping a space heater in the hall bathroom while we work with things like wall paint, stain, ceiling tile adhesives, thinset, floor tile mortar, etc. All these materials require a minimum temperature that the room cannot achieve without a heat source. Still, this is an example of choosing to use electricity as a tool, not as a necessary dependency. Because of that I'll feel like it was money usefully spent. I'll also be please with whatever savings we can manage.

December kWh Report © January 2013 

December 26, 2012

Bathroom Remodel: The Unseen Stuff

If it hadn't been for plumbing problems in our hall bathroom, we probably would have done nothing more to the room than a coat of paint, new flooring to replace the poorly installed, curling vinyl, and possible a water efficient toilet.

Our hall bathroom when we first moved in.

Oh, and I probably would have replaced that medicine cabinet too. And Dan would have wanted to refinish the tub and sink, with their pitted, badly worn, and stained enamel surfaces. That, some new towel racks and a curtain, and we could have lived with the rest.

When we bought the place, the hot water faucet on the sink didn't work and we had recurring drainage problems with that sink. Nothing seemed to be able to permanently unclog it until at last, it quit draining altogether. We also discovered there was a leak in the toilet and that there had been enough water damage there at one time, to make the floor mushy and the toilet lean a bit. The final straw was when the tub faucet started to leak and couldn't be fixed. Dan turned off the water to that bathroom about ten months ago and the room has been nonfunctional ever since.

So far we've repaired the floor and replaced the window. The next step was plumbing repairs and electrical work.

Medicine cabinet will be replaced with a mirror

Plumbing upgrades have included replacing the cast iron drain pipes with PVC, and replacing the cast iron supply lines with copper tubing. Dan also added a vent for the sink.

Electrical work has been moving the outlet so that it's not directly over the sink, and an exhaust fan.

Beginnings of the framework for the drop ceiling

We lived almost nine years in a house with no air conditioning and no bathroom exhaust fan. I battled mildew on the ceiling and walls the entire time we lived there. Dan said never again, so both bathrooms have better ventilation.

The fan was the primary reason he wanted to drop the ceiling; it made it easier to install. All the ceilings in the house are tall, 8'9", so this one will now be a standard 8 foot height.

The fan in the kitchen bath included a light and heater, but this one is an exhaust fan only. The lights we installed on either side of the mirror are adequate, and we're doing to do something else about heat - more on that later.

Next we'll finish the ceiling and do the walls. After that, the floor. Then we can start putting things back together.


March 7, 2012

Energy Self-Sufficiency? Still Just A Dream

One of our goals is to someday get off-grid by becoming energy self-sufficient. Of course, the term off grid typically implies electricity, so I suppose it would be possible to be off grid but not entirely energy self-sufficient. I could make my own electricity but still purchase kerosene, propane, natural gas, home heating oil, even candles. Our home is all electric however, so for us, making our own would make us basically energy self-sufficient as well.

About the only things we've done toward this goal (in all our spare time ;), has to been to observe sun and wind patterns throughout the year, and keep track of our electric usage. We've observed enough to know that there would be some limitations with either of these systems. We've kept track of our electrical usage long enough to know that even though we consider ourselves frugal in that area, we still have a long way to go.

One thing that's puzzled me, is how to figure out what size alternative energy system would meet our needs. Most things are rated in watts. For things like solar panels or wind turbines, this tells me how much electricity they can generate. But how do I know how much I'll need? When I look at my electric bill, it tells me how much I've used in terms of kilowatt hours. Things like appliances and light bulbs are also rated in watts. In this case, the wattage tells me tells me how much electricity is needed for the device to operate. However, I can run a 60 watt light bulb for 3 minutes, or for 3 hours. Obviously the amount of electricity I use won't be the same. Kilowatt hours are the actual amount of electricity I use to run that light bulb. I pay for what I use, so my electric bill specifies charges for kilowatt hours.

So how do I get to there from here? After a little research, here's what I've learned about using my electric bill to determine the size solar system I would need.

First I need to know how many kilowatt hours I use on a daily average. Last year we used a total of 10,751 kilowatt hours.

10,751 kWh / 12 months = 896 average kilowatt hours per month

896 kWh / 30 days in a month = 30 kilowatt hours per day

As an aside, I have to say that averages do have their limitations. The actual range for daily use was from 16 to 54 kWh in a given month, depending on the time of year (remember, we have an all electric home. The worst culprit are the auxiliary electric heat strips in our air source heat pump, which come on when the outside temperature it too low. Now that we have the wood cookstove to heat the back of the house, we can further decrease our electric during winter months. )

By looking at a solar insolation chart like this one, I know my area is rated at 4.5 solar hours per day. I divide that into my average daily kWh consumption

30 kWh / 4.5 solar hours = 6.67 kilowatts

Because solar panels are only about 20% efficient, that must be factored in as well. Actually, its the inefficiency that's factored in, so for this example, 80% or 0.8. This could be more accurately calculated from the information provided with a specific brand and model of solar panel.

6.67 / 0.8 = 8.3 kW

That gives me an idea of the size solar system I would actually need, assuming we made no other changes to our lifestyle.

There are numerous online calculators to determine the cost of installing solar systems. I used this one. It estimated my cost would be $71,040 for a system to cover 100% of our electric usage. The good news was that because of the government solar energy rebate, I'd be reimbursed $21,312, so that the system would actually only cost me $49,728. The problem with rebates of course, is that one must pay the entire cost upfront and then wait until tax time to get the rebate. That's great if one can afford it in the first place, but for those of us who can't, it would be more helpful to receive a grant to cover the $21K. Of course that's assuming I'd have the remaining $50K. Even at that, I figured it would take 42 years for the thing to pay for itself, assuming my electric bill remained the same. We don't do loans, but hypothetically, if I took one out to purchase the system, the additional interest would mean my energy self-sufficiency would cost me more than simply buying electricity from the power company. That of course was just one estimate, and if one can DIY, especially with used parts, the cost would be far more manageable.

Wind energy for us is even less feasible. According to the US Wind Resource Map, we live in a virtually zero wind resource area. From my observations I know that this is not specifically true, but I do know that the only time it gets truly windy here, is this time of year, in spring, or late summer, when we get hit with the remnants of a hurricane. In fact it's been so windy the past few days, that the chickens won't even go out. They all stay huddled on the lee side of the goat shed. Even so, this is not enough to justify spending tens of thousands of dollars on a wind turbine that would only be productive   a few weeks out of the year. (Unless of course I used my solar tax rebate ;)

So how close are we to actualizing energy independence? About as close as the man in the moon.

October 24, 2011

Electrical Upgrade, Done!

This is one of those projects that was absolutely necessary, took a lot of time to do, cost more than we might have wished, and has largely unseen results. Needless to say, there is something to show you, because we've gone from this....

Our old electric meter used to be
on a telephone pole out by the road.

... and this ...

Power lines as they used to enter the house from overhead.

.... to this ......

New electric meter. Cables come
up to the box from underground.

Dan chose this type so that he can run a line for his welding machine, and eventually we can run electricity to a workshop and barn if we want.

We also upgraded from this...

Old circuit breaker panel located behind the stove.

... to this ....

New circuit breaker panel located in utility room

Besides upgrading all the equipment, power to the house has also been upgraded, from 60 to 200 amps. The immediate effect is that our light bulbs burn brighter.

Dan did most of the work himself. He got the specs from the power company, consulted an electrician, got his permit, installed the new boxes, and then called out the county building inspector. His work passed with flying colors, so all that remained was for the utility company to move the lines.

Burying them....

View of the action from my kitchen window

... was the expensive part, but since the old lines ran through a tangle of tree branches it was either that or cut down the trees. Actually, it's a minor miracle that tearing winds or ice storms hadn't already knocked those lines out at some point, because according to the power company, they are only responsible for the lines up to the meter. The home owner is responsible for everything from the meter on.

So, my yard's a bit torn up but a big job is out of the way. It actually started two years ago, when we discovered that we still had some knob and tube wiring that needed to be replaced. The only thing that's left now, is installing the fixtures, switches, and outlets we will want in the new kitchen.

The irony of all this is that really and truly, we'd like to get off the grid altogether. Why didn't we do that instead? The answer to that isn't simple, except to say that we live in an area where neither solar nor wind are consistent enough to be utilized as an energy source on a regular basis. We've been researching other alternatives, but have no definitive answers yet.

The faithful observant among you may have happened to notice that the house color behind the new meter box was blue instead of white. I'll show you why soon. ;)

September 25, 2011

Kitchen Remodel: Progress Inside & Out

Progress since my last kitchen remodel post.....


Inside:
  • wiring completed for light switch by door: outside light, porch light, & soon to be ceiling light over dining nook
  • installed lockset in kitchen door
  • cut out subfloor for HVAC vent (beneath window)
  • added insulation to walls
  • foam insulation in cracks around door & window


Outside:
  • removed old vinyl siding
  • put new siding on rebuilt kitchen wall & adjacent wall
  • caulked windows
  • coat of primer on new siding and trim
  • installed outside electrical outlet on back porch
  • doorbell transformer replaced & new bell button installed

We had hoped to get the trimwork up last week, but it rained every day Dan was off. Below is an exterior "before" shot of the new kitchen window, when he just started taking down the vinyl siding.

Removing the vinyl siding

Under that were some sort of pressboard siding planks. The paint was chipping, but they weren't in bad shape actually. Dan took a peek under one of these and while there wasn't any sheathing, the walls did have insulation. Because of that we left the planks to serve as sheathing and simply nailed the new paneling right on top of them.

Dan wanted to do at least this much....

Starting to put the new panels up

... getting siding up to cover at least the newly rebuilt window wall and the corner. How far to go with it and how many panels to put up, is one of those things that could lead us on a house project rabbit trail. We finished out the adjacent wall, but still need to install trim around the new window and horizontal panel seams.

We looked at a lot of siding options. I like the look of planks, while Dan always liked the look of T1-11. In the end we chose a manufactured barn board look panel, because we like the rustic look and it was more economical. I've got a coat of primer on it and at this point, still plan to go with my original color scheme for the exterior of the house. Of course, trim work and paint are "weather permitting," and this time of year, who knows.

I admit I'm anxious to get back to work on the kitchen interior. Yet all these kinds of things that have to be done too. It's the old one-thing-leads-to-another, and another, and another. Because of the weather this time of year, we've started keeping both an "inside" project list and an "outside" project list. Now no matter what, we've ready to go.

Related Posts:
Window Shopping
Preparing For The New Kitchen Window
Installing The New Kitchen Window

August 21, 2011

Around The Homestead

Well, the calm has arrived after the storm but we're not back online. Our internet came back up four days later, but we have been unable to connect due to ethernet problems. Research to correct this has been slow, especially since I have a time limit on the county library computers. Even so I can't stop writing and documenting our homestead adventure. Until I resolve my computer issues, posts will be done at the library, and will probably be less frequent. Also I won't be able to respond to comments very quickly, nor make many return blog visits. I have always tried to do these things because I value my readers, your comments, and the sense of community we share through blogging.

As a catch up post to my week offline, here's what's been going on since my last Around The Homestead....

~ Storm Damage. Besides the computer, the other damage we had was when two of those diseased pines fell onto the new fence in our new buck browse.

Dead pine on the fence
The ones Dan didn't take down, right? Damage was not severe, fortunately.

~ Buck Browse. Speaking of, finished!

Gruffy in the new buck browse

There's about a half acre in there, enough to keep the boys happy for awhile.

~ Weather. The storm not only brought much needed rain, but also cooler, drier air. Unusual around here for August, but very welcome.

~ Rain Catchment. Though technically, we no longer have drought status, those long, hot dry spells every summer are a concern. Because of that, we've taken first steps toward our rainwater catchment system.


We bought four, food grade, 250 gallon containers. These will eventually be hooked up to two of our downspouts. Dan thinks they look kind of ugly and should be covered. I'm thinking they'd be perfect for vining plants I'd like to grow: muscadine, hops, hardy kiwi, etc. Hopefully they'll be installed by next summer so I can irrigate the areas that get the driest.

~ Chipper. Some sad news, we lost Chipper. The vet's best guess was that he had internal bleeding, but I didn't spring for an autopsy, so I don't know for sure, nor what could have caused it. Heartbreaking to be sure, but I have decided I cannot dwell on it. It's so easy to look back and think "if only I'd..." I have to keep in mind that in the natural world, death is as real as life. We can nurture life, we can support life, but in the end, we cannot control it. Dan and I believe that our job as stewards, is to give our animals the absolute best care we can, and allow them to live as natural of lives as possible, for as long as they're with us. This does not require emotional involvement, it requires a choice of will, it requires commitment.

~ Kinder breeding plans. The loss of Chipper changes these, to be sure. There aren't enough pennies in the piggy bank to buy another registered Pygmy buck, even if one were locally available. We'll just use Gruffy for both does, and see what we can work out in the future.

~ Chicks. Are growing!

Buff Orpington chicks

I've expanded their nursery area, and am gradually allowing them to mingle at will with the rest of the flock. Initially, the adults were all up at arms and chased the chicks around. Now, they just go on about their chicken business, even our rooster, with the stipulation that he will chase them away from anything his hens might want to eat.

Mama & her brood

Several of the hens have challenged Mama, but only once each. Apparently she has to reestablish her rank in the pecking order. I'm not sure what will happen when I actually try to mix the two groups permanently. I'm not sure how territorial Lord B actually is, though all the older chickens (Himself included) seem to be getting used to the chicks.

~ Oil Tank. Remember the fuel oil tank we were in the process of digging out of the ground?

Oil tank as we left it last June

Well, we racked our brains for the longest time, trying to think if the unused oil and tank itself could be useful for something else. Dan finally decided to find someone to pump it, dig it out, and haul it away. He called all the local heating oil delivery companies, spoke with secretaries, was told someone would call him back with infomation, only to never hear from any of them again. We finally saw a hand painted sign by the side of the road that said, "We pump and remove oil tanks." Dan gave them a call and they came out to take a look. They told him they'd pump the estimated 200 gallons of oil for free, because they could sell it for $1 a gallon. For the tank, they could cut it open, fill it with gravel, and fill in the hole for $500. We listened to him, both thinking, we could do those things ourselves. It was getting it out of the ground that we wanted, but he didn't want to do that. We were hoping the value of the oil would offset the cost of digging it out, but he didn't want to do that either. We parted with, "don't call us, we'll call you."

He called the next day anyway, with an "oops, I accidentally dialed the wrong number". But while he had Dan on the line, he tried to talk him into giving him that oil. Guess who didn't budge. Needless to say, the tank is still in the ground and the oil is still in the tank. We had an interested potential buyer for the oil via Craigslist, and then the storm came and the computer went out.

~ Electrical Project. We've made a little progress. Dan got the new circuit panel installed in the utility room.


We aren't ready for the circuits yet because of the wiring that has to be done for the kitchen remodel. After that we can get the power company to come out and do their thing, getting us hooked up and getting the meter moved, this time with proper amperage to the house (which is currently 60 instead of the customary 200).

~ Chicken Waders. I finally had another volunteer venture into the chicken wading pool!

Wading Ameraucana

This is one of my two Ameraucana hens. She didn't do it to cool off, nor because she saw the Delaware and Barred Holland do it. She did it because some grain was in the bottom and she wanted it! She decided she didn't like getting her feet wet however, and abandoned her grain recovery mission. With cooler temps, even the water dish doesn't get waded in these days.

Off the top of my head, that's about all I can think of. I'll try to get some garden, harvest, and preservation updates up. Also, we've started working on the kitchen! I'm very excited about that and can't wait to show you. More on that soon.