Showing posts with label mulch. Show all posts

January 29, 2023

Garden Notes: January 2023

Rainfall 

  • 3rd-4th: 3.2"
  • 8th: 0.5" 
  • 12th: 0.65"
  • 17th: 0.75"
  • 18th: 0.3"
  • 22nd 1.2"
  • 25th: 1.6"
  • 29th: 0.3"
  • Total: 8.5 inches
Temperature
  • range of nighttime lows: 22 to 57°F (-5 to 14°C)
  • range of daytime high: 42 to 68°F (5 to 20°C)

Not much to report garden-wise this month. We lost our winter garden during the December winter kill, and it's been too cold, windy, or rainy to do much outdoors. But the daffodils are blooming, and that's a happy sight.

With all the rain and cold temps, the ground's too wet to work on swales and swale beds. My garden project on nice days has been to finish bed clean-up and mulching. I'm working on re-mulching some of the aisles too. 

The beds are mulched with leaves and the aisles are scraped with a shovel. Then I put down a layer of cardboard and top with woodchips. That will last for about two years, until the weeds start popping through. Then I scrape up the decomposing wood chips, mix them with compost, and spread them in a vacant garden bed to age a bit more.

Next month, I'll sort through my seeds and make a garden plan. 

Anyone have anything going on in their garden?

June 28, 2022

Garden Notes: June 2022

Oh my. The month has flown by. I need to get my June garden post up before July gets here!
 
June rainfall
  •  3rd: 0.25"
  •  9th: 0.5"
  • 16th: 1.125"
  • 27th: 0.25"
  • 29th: 0.125"
  • Total: 2.25"
Temperature
  • nighttime range: 58-80°F (14.4-26.6°C)
  • daytime range: 80-100°F (26.6-37.7°C)

Tasks

Things I'm trying to get done before picking and preserving take all my time. 

Tying up tomato plants.

We must have 50+ cherry tomato volunteer plants. 

Mulching. I have a pretty good routine for this.

Afternoons are mulch gathering time because I can do it n the shade.

Early the following morning. I work on mulching my garden beds.

Ideally, I think mulching should be done right after a rain, to prevent the moisture from quickly evaporating out of the ground. With no rain, I water the bed thoroughly before putting down mulch.

After I finish with the beds, I need to re-do the wood chip mulch in the aisles, if I have time.

Harvesting, Preserving, and Eating

Strawberries, red raspberries, and mulberries

Mulberry pancakes

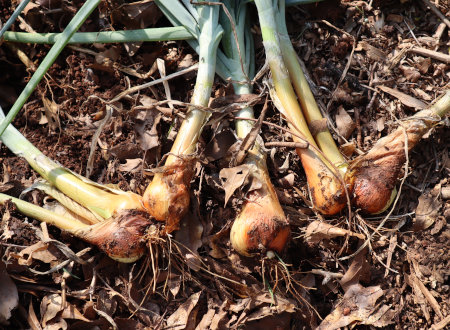
Multiplier onions

Garlic

Potatoes

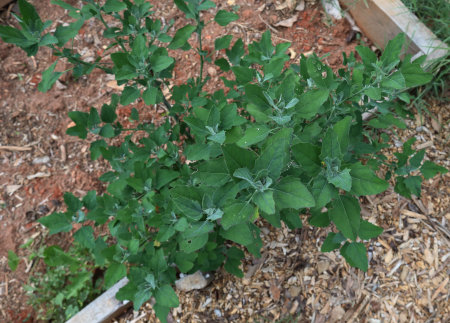
Volunteer lamb's quarter

Lamb's quarter

Lamb's quarter

The lettuce started to bolt earlier this month, but I
find that Jericho doesn't get terribly bitter, even then.

Landrace cucumbers and Matt's Wild Cherry tomatoes.

What are landrace cucumbers? They are my experiment to develop a locally adapted yet genetically diverse variety of cucumber for my garden.

So far, the cucumbers are growing very well and producing tasty cucumbers.

Lots of flowers hopefully means lots of cukes. That's
good, because I need to can pickles & relish this year.


100% homegrown salad, even the salad dressing! (Recipe here.)

Seed saving

So far, I've collected seed from:
  • Collards
  • Kale
  • Edible pod peas
  • Garlic (bulbils)
One thing I don't want to cross-pollinate, is my lettuce. I have three types of lettuce growing: Jericho Romaine,  a ruffly loose leaf type, and wild lettuce. 

The loose leaf lettuce bolted in early June.
Jericho didn't start until a few weeks later.

As mentioned above, the variety I grow is Jericho, which is the most heat tolerant variety I've tried. I don't want it cross-pollinating because I don't want to lose that. According to Joseph Lofthouse in his Landrace Gardening: Food Security through Biodiversity and Promiscuous Pollination, lettuce doesn't easily cross-pollinate. It still can, however, so to keep my strain pure, I took measures to prevent it.

Jericho lettuce. Flower heads covered to prevent cross-pollination.

I covered the flowering heads with the mesh bags I got to keep the birds from eating all my elderberries. Time will tell if this works!

Growing

Georgia Jet sweet potato vines and flower

Slicing tomatoes. Dan got four plants from a flea market.

Chicory

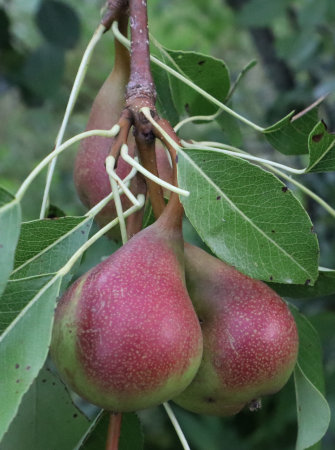
Moonglow pears. 

Sweet potato winter squash in the foreground (speckled leaves).

Late planting (replanting/transplanting). 

Ordinarily, I try to have all my planting done by now. Summer for us is a season where the days are hot and rain can be elusive. The sooner I can get my plants established and mulched, the less watering I have to do. We did have to replant some things that made a poor showing: melons, corn, and sunflowers. I made a second planting of summer squash and cucumbers as well.

Also, I was late on getting my homegrown sweet potato slips in the ground. I finally finished that the other day. These were planted in the African keyhole garden.

I had two types to plant. My trusty Vardamans and some from
a purple sweet potato that I originally got from Misfits Market.

The kale is a lone survivor of our cold winter.

I wanted to protect the newly planted slips from wilting, so
I watered and covered with shade cloth. That helped a lot!

Okay, that was long. But I had a lot I wanted to make note of. How about you? How does your garden grow?

June 1, 2020

Masanobu Fukuoka Was Right

On Monday last week, it wasn't supposed to rain until afternoon, so I got started on a bed to plant black turtle beans.

Blackberry vines popping up in a huge leaf pile.

Years ago this bed was an experiment in growing perennials with a few annuals and naturalized forage plants. It contained multiplier onions, chicory, lettuce, violets, heartsease, and 4 o'clocks. It looked pretty for awhile. But from that experiment I learned an important lesson. Masanobu Fukuoka was right!

"My conviction was that crops grow themselves and should not have to be grown. I had acted in the belief that everything should be left in its natural course, but I found that if you apply this way of thinking all at once, before long things do not go so well."
Masanobu Fukuoka
The One-Straw Revolution

Blackberries, honeysuckle, horse nettle, grasses, and other unwanteds gradually took over that bed until it was a mess. Last fall, I dumped wheelbarrow load after wheelbarrow load of leaves on it in an attempt to smother everything so I could start over. That worked fairly well until the blackberries began to bravely push through.


One of my "between raindrops" projects has been to dig out all those blackberries and plant black turtle beans. I used the shovel to loosen the blackberry roots and pull the vines. I realize I won't get all the root and they'll still come back, but it's a start. I did the same for honeysuckle roots I found. The violets got to stay. I noticed that doing nothing for the past several years did zero to improve the soil.

Blackberries removed, multiplier onions harvested, and turtle beans planted.

To plant the beans, I simply pushed the leaf mulch aside in three rows and poked the beans into the ground.

I've battled blackberry brambles ever since we first chose this spot for our garden. It was originally a neglected field that grew them readily. Even though I've been trying to eradicate them, this year in a "if you can't beat 'em, join 'em" moment I decided to let them grow in another bed in the garden.

Old asparagus/new blackberry bed.

Behind this bed is where I dug my very first garden swale three years ago (that story with photos here.) I filled it with sticks, stalks, and corn cobs, leaving the removed soil as a berm. I planted the berm with clover and later transplanted my asparagus there. I never got much asparagus, but instead got blackberry brambles and wiregrass. I battled those for several years and this year decided, heck with it. I'll just let the blackberries grow in hopes I'll get some berries. I've been pulling the wiregrass and horse nettle and cutting back the daffodil leaves. Then putting down wood chips for mulch.

Volunteer blackberries with a little bit of the clover I originally planted.

Well, I'm picking about a pint per day. They look pretty good too.

They aren't all this size, but a lot of them are.

I have to add that they aren't terribly sweet, and that they have large seeds. Dan doesn't care for blackberries because of the seeds, but as volunteers these are a gift. And they pack a power-punch of flavor, so I'll use them to make blackberry jelly. They will definitely need a trellis, but that will have to wait.

So gradually I'm learning to cooperate with nature and what my garden wants to grow. I realize I can't do nothing and leave it to chance, but I can continue to observe and work to meet the needs of what wants to grow there. It's all a process, isn't it?

June 5, 2019

Stewardship, Sustainability, and Woodchips

One of our homestead goals is stewardship. I know that word is tossed about in various ways, so to clarify, when I speak of stewardship this is what I mean.

"Stewardship evokes a sense of responsibility ... It implies the supervision or management of something entrusted to one's care. It implies not only responsibility but also accountability. We believe that one day, we will be accountable for how we lived our lives and for what we did with the things in our possession."
5 Acres & A Dream The Book, Chapter 2 "Defining Our Goals,"
pages 23 to 24

One of the things we feel responsible for is the renewable resources on our property; in this case trees. I recently blogged about how we manage our trees ("Spring Chores: Trees"). In that post I mentioned that twigs and small branches from downed trees are chipped. Thanks to having our own source of chips, we've been able to address several problems we've had with a "work smarter not harder" solution.

Initially, I used our wood chips as mulch in the garden but found that they work better as long-term mulch for perennials. For annuals, they must be raked away when it's time to plant again, because they are slow to decompose. That's not necessarily a problem, but it made me wonder if there wasn't a work-smarter way to mulch. This past year we've worked out a routine that is that and more.

That routine starts with a chipping day. I started to use fresh wood chips in the goat corral, because when it rains a lot, the corral gets very muddy. Add manure and urine and it becomes a mucky mess. The chips really help with that, plus keep the dust down during a dry spell.

The goats' hang-out area.

Eventually, the chips accumulate manure and absorb urine, so they must be removed. When that happens, it's time to make fresh wood chips. Chipping day begins with shoveling out the old urine soaked chips and manure, and then dumping them into the compost bins.

The chickens love chipping day. 

I've found that woodchips make a very nice compost. They supply carbon for the compost, and the manure and urine supply nitrogen. We regularly add kitchen, canning, and garden scraps too. What the chickens don't eat adds to the compost.

While I'm doing that, Dan fires up the chipper.

WoodMaxx WM8M PTO-powered wood chipper.

Our chipper was a good investment because we have so many trees. Definitely not cheap but indispensably worth it. Our first year here we bought one of those little YardMachine chippers-shredders off Craigslist. It proved to be worthless for our need: slow, limited to twigs and leaves, and sprayed the chips all over the place. (Dan later converted it to a wheat thresher.) So every year we would rent a large industrial chipper for several hundreds of dollars per day to deal with our numerous brush piles. Obviously, that wasn't cheap either!

The fresh chips are spread out in the cleaned-out goat corral.

New wood chips

For garden mulch, I now use composted wood chips. After the chickens have done their magic on the old chips in the compost bin, it's gorgeous.

Wood chip compost

The chips aren't completely decomposed, but I like it that way because I've observed that mycorrhizal fungi love wood chips on or in the soil.

Mycorrhizal fungi growing on wood chips.

Mycorrhizae are the subterranean nutrient delivery system of the plant world. They form symbiotic relationships with plant roots, exchanging liquid carbon from the plants for nutrients harvested from other areas. The nutrients are transported to the plant because the mycorrhizae extend the root system with filaments known as hyphae. Through the hyphae, the fungi network with one another to extend their resource harvesting to areas covering acres and miles.

Composted wood chips mulching pumpkin seedlings.

Partially composted wood chips not only work better than uncomposted wood chips, they also work better than compost made from dirty straw and wasted hay from the goat barn. That's because the old straw and hay are loaded with seeds (even though technically they shouldn't be.) Too many of those seeds survive the heat of composting and invariably start growing in my garden - as more weeds. (Ditto using old straw or hay as mulch). Counterproductive! This wood chip composting and mulching system is definitely work-smarter-not-harder gardening.

What do I do with the old straw and wasted hay I clean out of the barn? Now, I put all that directly out on the pasture where it can build pasture soil there. (Read about my modified Fukuoka method of soil building here.) Let the straw and hay seeds sprout where the goats can benefit!

Obviously, our system isn't feasible for everyone, because everyone's practical specifics aren't the same as ours. But my takeaway point isn't so much what we're doing and how, but that we've worked out a system that works for us. We analyzed our problems in the light of our goals and available resources, and then experimented until we worked out satisfactory solutions.

Problems:
  • alternately muddy or dusty goat yard
  • compost loaded with weed seeds
  • poor soil needing improvement
  • never enough mulch 

Goals:
  • stewardship
  • sustainability

Resources:
  • tree "waste" (overabundant twigs and branches) turned into
  • wood chips
  • chickens (for composting)
  • goats (for manure)
  • humans (for the work of making and moving the woodchips)

No waste, just multiple uses of a renewable resource in a sustainable cycle. What could be better than that?

July 1, 2018

Mulch Days

While I was on blog break last month, I was busy mulching the garden. Our summers can be  hot and dry, so it's imperative to preserve as much moisture in the soil as possible. We had quite a few rainy evenings toward the end of June, so with the soil moist, it was the perfect time to mulch.

Most years I seem to run out of mulch before I run out of garden. This summer, I made a commitment to myself to get the entire garden mulched. That has meant using whatever mulch materials I can get my hands on. Here's my rundown on mulching materials for the hot, muggy, no-tellin'-when-it's-gonna-rain South. I've listed a few things I avoid at the end of the post.

Dried Leaves

Dried leaves mulching corn.

Dried leaves are my old standby, mostly because we have a lot of them! They do make a good mulch, but they aren't perfect.

Pros:
  • plentiful (if you have deciduous trees)
  • a good way to recycle them
  • decompose quickly (build soil quickly)
  • not as ugly as a few other things
Cons:
  • have to be raked and hauled (time consuming)
  • usually full of acorns, pecans, etc (which sprout and grow)
  • also usually full of sticks
  • can harbor fire (and other biting) ants
  • usually needs a 2nd layer later in the season
  • doesn't deter wiregrass

Summary: Dried leaves have been my primary mulch for a long time. They are the traditional earth mulch and build beautiful soil in the forests! Because we have lots of trees, they are plentiful here and using the leaves as mulch is certainly better than stuffing them in plastic bags to be thrown away.

To simplify the two-part process of raking/hauling and mulching, we've taken to doing the raking in the fall and winter and storing them in our future laundry water recycling bed.

Convenient for leaf storage.

Paper Feed or Seed Bags

Paper feed bags mulching aisles between rows of okra.

I showed you how I was using these to mulch aisles in my "What's Growing in the Garden" post last month. Like everything else, they have their good points and bad.

Pros:
  • excellent way to recycle them
  • if plentiful, can cover an area quickly
  • last the entire summer 
  • smothers grasses 
  • help conserve other mulches like wood chips if not plentiful
Cons:
  • can blow away in a strong wind (have to be weighted)
  • needs a covering layer of fine mulch
  • not good for mulching small areas, such as between plants
  • can be hard to find. Many feedbags are either plastic or plastic lined
  • far from aesthetic!

Summary: I like these for mulching aisles. They go down first and then the plants are mulched with dried leaves or wood chips. The top layer of mulch helps hold them down and hide them.

Wood Chips

Wood chips mulching beans with feed bags in the aisles. They
are deepest around the plants, with a light layer over the bags.


If you've watched the Back To Eden video, then you may think wood chips are the perfect mulch. Maybe that's true in some parts of the country, but in other parts it has both good points and bad.

Pros:
  • can be readily available for free
  • slow to decompose
  • attractive
Cons:
  • if you can't find them for free, they are expensive to buy
  • slow to decompose
  • harbor fire ants and black widow spiders
  • doesn't deter wiregrass

Summary: Wait a minute. Did I put "slow to decompose" under both pros and cons? Yes I did. I like that they last an entire gardening season (or longer), but if the soil must be worked at the end of the season they are in the way. I usually rake them into the aisles until I need to use them for mulch again. Wiregrass growing in wood chips is particularly annoying, and if it isn't removed it will continue to grow until it covers and consumes the wood chips. At the end of the season I rake them into a pile so I can pull the wiregrass. This is why I like first putting down a layer of feed bags or ...

Cardboard

Cardboard between rows of tomatoes

Pros:
  • readily available (usually)
  • slow to decompose
  • can quickly cover a large area
  • smothers grasses 
  • earthworm friendly (used in compost worm beds) 
  • help conserve other mulches like wood chips if not plentiful 
Cons
  • have to remove tape, labels, and staples
  • can't fit them around individual plants
  • can blow away in a strong wind, must be weighted
  • not aesthetic 
  • needs a top layer of mulch to cover
  • flaps can create slits for weeds to grow through

Summary: I really like cardboard for covering walkways or large areas, because cardboard smothers well and helps me conserve my other mulching materials. Large corrugated cardboard boxes works best. I don't use cardboard with glossy color pictures on the box. Most stores are willing to give it away, but sometimes they have contracts with a company that collects and hauls off their boxes.

Straw

Wheat straw mulching tomatoes.

I don't often use straw, because I don't have a free source for it. But I had some leftover after we used it as bedding when hauling goats. So it made its way into the garden as mulch.

Pros:
  • easy to handle and work with
  • quick to mulch with
  • not usually free, but can be cheap
Cons:
  • can contain seeds which introduce more weeds
  • doesn't deter wiregrass
  • price has been going up and can be expensive to buy from a garden center.

Summary: I first used straw for mulch when I had rabbits. In winter I'd stuff their hutches with straw, which would fall out the wire cage bottom along with their manure. What I learned, however, is that all the grain seed is rarely removed. I inadvertently introduced oat grass all over my garden and had a heck of a time getting rid of that!

Newspaper

I admit I haven't used newspaper in a long time, because I don't have a free source for it. Most of our newspaper is saved for fire starting.

Pros
  • decomposes quickly
  • good way to recycle it
  • can be readily available for free
Cons
  • must be sorted to remove glossy ads
  • requires a lot to get a good thick layer 
  • needs less fine mulch materials for a covering layer

Summary: Newspaper works best in a thick layer. A couple of sheets decompose quickly in moisture which means it doesn't keep weeds down for long.

Living Mulch

This photo of clover as living mulch was taken last year.

AKA ground cover, I call it living mulch if it's growing in garden beds and aisles.

Pros:
  • builds the soil
  • aesthetic 
  • can be used as green manure after harvest
Cons:
  • have to buy seed every year
  • not always dense enough suppress weeds
  • has to be timed properly so that ground cover and crop grow together and weed seeds don't get a head start and dominate 
  • seasonal, i.e. grows either during warm or cool weather
  • hard to maintain in perennial beds. For example, my chicory bed is mulched with violets, but I've had blackberry and honeysuckle vines coming up there.

Summary: I love the idea of living mulch but have had mixed success. If it grows densely, like in the above photo of my melon bed last year, then it works well. If the seed doesn't germinate well, then I only get a sparse covering which isn't much help as mulch. Timing is important too, and that's something I'm still learning. If the seed isn't planted at the right time it can either interfere with crop seed growth, or can be overtaken by weeds first. I think it's best use is with field crops where the area is too large to mulch, but I'm still negotiating a learning curve with that.

My biggest mulch mistake...

... was using landscape cloth. It was expensive to buy and time-consuming to put down. Then, even with a good thick layer of wood chips the wiregrass grew right on up through it. And if that wasn't bad enough, the wiregrass secured the cloth to the ground! It was impossible to remove. Dan finally put the tiller to it to chop it up, but four years later I'm still picking up bits of the stuff. You can read all about that fiasco in this post, but needless to say I do not recommend landscape cloth!

Plastic is another one I don't recommend. I know commercial organic growers use it, but it IMO it has more counts against than pluses to outweigh them.
  • It's a petroleum product
  • It doesn't decompose, it deteriorates
  • Must be discarded when replaced (not good repurposing material)
  • It doesn't breathe so when it heats up, I can only imagine that it kills every soil organism beneath it. 
  • Rain can't penetrate it so
    • can't renew soil moisture
    • where does a gullywasher go when the ground can't absorb it???

So that's the rundown on my experience with mulch. Now it's your turn. What's your favorite way to mulch? Any lessons learned? Any tips for the rest of us?

Mulch Days © July 2018 by Leigh 

June 6, 2018

What's Growing in the Garden

Thanks to subtropical storm Alberto, everything! Both wanted and unwanted. It was time to get weeding!

Before: not a pretty sight, is it?

My rain gauge froze and broke last winter, so I don't know how much rain we got, but it went on for days and days and flooded all the low places on the property. It also left the soil we'd prepared for planting very, very muddy and sink-to-your-ankles soft. Earlier this week I was finally able to get back into the garden and start weeding. With the ground soft and the weeds young and tender, it was an easy job.

After: one section of the garden done and ready for mulch.

I'm almost ashamed to say that in my very earliest days of gardening I threw all of the weeds away. Weeds were bad and bad things were gotten rid of.  Eventually I figured out to add them to the compost pile. Then I read Sepp Holzer's Permaculture and was surprised to find out that he just tossed the weeds back onto the ground. Having goats changed my perception of weeds as well, because some of them are obviously great delicacies! So now when I weed the garden, I do different things with different weeds.
  • Anything that the goats will like is put in a basket and then dried to toss onto the hay pile. These tidbits add variety and interest to their hay plus extra vitamins and minerals.
  • Anything that hasn't gone to seed I leave in the garden to die and decompose back into the soil. Every plant takes up nutrients as it grows and when it's removed from the garden those nutrients are removed as well. I'd rather keep them in my garden.
  • Anything that's gone to seed is piled in the chicken yard. They love to scratch through the pile to find fresh greens, bugs, and seeds to snack on.
  • The exceptions are things like horse nettle and nutsedge. The goats can't eat them and their painful little thorns put them on my get-rid-of list. 
  • Anything that is edible, medicinal, or that acts as a ground cover gets to stay: marigolds, chicory, clover, violets, lambs quarter, heartsease, etc.

I also have learned to leave one or two wild amaranth plants.

Wild amaranth

Their young leaves and seeds are edible, but also, I've observed that cucumber beetles really like them!

Wild amaranth and cucumber beetles

Amaranth grows abundantly, so I pull most of them, but if I leave one or two they serve as trap plants to attract the beetles away from things I don't want them to eat!

Also, volunteers get to stay!

Volunteer tomato plant

Volunteer cucumber plant. Already blooming!

Once in awhile something is transplant-worthy.

4 o'clocks

I planted 4 o'clocks a number of years ago. I don't even remember why now. They are an attractive plant with beautiful flowers that bloom all summer long. They grow thickly, about 3-feet tall, which means they are kinda in the way in my kitchen and canning garden. Hopefully this one will transplant, although June is not a good month for that because of long hot, dry days ahead.

So what did I plant in this section of the garden this year?

Okra

Swiss chard

Bush beans

Yellow straight-neck squash

Corn

I replanted spaces in the rows where the seed didn't germinate. Mulching is next. I start with paper seed and feed bags and cardboard in between rows and then cover everything with wood chips, dried leaves, or straw. Then I've got the rest of the garden to do. I've definitely got my work cut out for me.