Showing posts with label cabinets. Show all posts

August 24, 2012

Kitchen Remodel: My New Dish Rack

I'm pleased to report a little more progress on the kitchen. When the weather's nice, we usually focus on outdoor projects like the garden or firewood, but on rainy days we can tackle a few other things. The other day, Dan finished this...

handcrafted dish rack
My new dish rack

A dish rack. I love it. It's one more wonderful space saver and I love that it shows off my dishes. :)

Close up 

Plus it helps make everything handy for putting away dishes. Silverware is in the top base cabinet drawer, dishes are on the rack, and glasses and bowls are in the wall cabinet above.

That's one more thing checked off the list! All that's left now is finishing the dining alcove, and the trim in the pantry hallway. Then I'll finally be able to present you with a complete photo tour of my new kitchen!


July 9, 2012

Kitchen Remodel: Providential Irony?

There are actually only a couple of things left to finish and then we'll be done with the kitchen. The list is down to a painting the toe kick, a plate rack, and the built-in dining table, which Dan is working on now. The other details fall to me, like the unpacking and putting away. Also on my list was a stool for my work area.

I showed you where Dan created a place for a work stool when he made my kitchen peninsula....

Photo from "Building The Kitchen Peninsula"

When I went to buy the stool, there was only one left, and it had slightly uneven legs. Being the impatient sort (and not trusting that the price wouldn't be higher when they got new ones in,) I bought it anyway.

Dan put a level to it every which-away and we still couldn't figure out how to correct it. But. The floor is slightly uneven under the peninsula too. When I set the stool a certain way, it is perfectly level, no wobble, no unevenness, no problem.

Amazingly the stool is perfectly level & stable in this spot.
My shelves are filling up, though I'm still
experimenting and rearranging things.

How about that! I just love my work area.

I'll show you where I decided to hang my cutting board too. Very convenient.

2 glue-on hooks hold the cutting board

Funny how the last few projects seem to take the longest. Maybe that's really just my impatience. Still, now's not the time to be in a hurry. Hopefully I'll have before and after photos to show you soon.

June 24, 2012

Around The Homestead

I haven't done one of these in awhile, but here are my updates and other bits since my last "Around The Homestead."

Growing Stuff

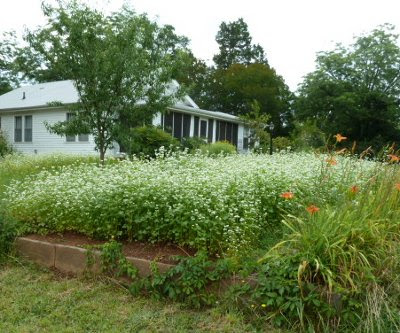
thick growth of buckwheat blooming near the house
Buckwheat

I planted buckwheat in the spot where I've had several unsuccesses at growing anything else. First summer it was a small vegetable garden. The next year I planted strawberries, an almond tree, and comfrey there. Unfortunately, wire grass all but strangled everything out. Last summer we covered it with black plastic, which disintegrated; what a mess. The buckwheat seems to be the best solution so far. In addition to the seed (groats), buckwheat makes good green manure, goat feed, and deer distraction because the deer love it (in fact I'm surprised they haven't found it yet.) According to Dick Raymond, planted thickly, it will choke out the weeds. We'll see if that includes wire grass. One thing, it certainly is better looking than the mess that was growing there before.

Weather Stuff

With all the rain, the front of the goat shed has been mud pit. I don't like that kind of situation, especially after Jasmine had so much trouble with hoof rot. It's caused by anaerobic bacteria which thrive in wet, muddy conditions. It's also associated with copper and zinc deficiencies. I finally thought of a tent gazebo we had packed away, and decided to see if I could make a "porch" in front of the goat shed.


I'm hoping this will keep the ground from getting any muddier. The straw is to give the goats something dry to walk on. Trouble is, the chickens love to rearrange this stuff all over the place.

Goat Stuff

With Jasmine gone, Surprise is not too crazy about having Gruffy for a companion.


She constantly complains about him and they've been going at it in the manner of goats, pushing, shoving, and head butting.

In one of their scuffles, one of Gruffy's scurs broke. Scurs are the remnants of horns that still grow after disbudding. He broke the other one in a tussle with our wether awhile back, so this is the second time it's happened. I don't know if you know this, but cayenne pepper powder is excellent for stopping bleeding. A good coating over the bloody scur works wonders. He was not cooperative however.

It takes two of us do do anything with Gruffy: vaccinations, hoof trimming, or treatments. I usually pin his neck between my knees (below actually because he's only 18 inches tall). That has worked well enough, except this time. He did not want that scur messed with. He tried to take off running, dragging me to the ground. I held on with my knees, but he kept running. He couldn't actually drag me away, but it didn't stop him. The best he could manage was running around in a circle, with me in the middle, my shoulder as the pivot point. After 2 or 3 turns Dan managed to grab him and we switched places.

Community Stuff

Dan and I pretty much keep to ourselves. That's just us and besides, we're busy. One day though, he was out in the pasture playing with the dogs when a man in a pick-up truck stopped and commented on our fence. He wondered if Dan hired out to do that kind of work (which he declined). Anyway they got to talking and the fellow told Dan his wife calls us a couple of hippies. That really took us aback and we wondered why. Because we have a large garden? Because we do a lot by hand? Because I wear my hair in a long braid down my back? Because we're not diligent about mowing the lawn? Because we'd rather let the weeds grow than drench everything with Round-Up? ;) Back in the day, I would certainly fit the hippy description (a little of my story here). But Dan? Never. He's been as square as they come from day one. [Que background music, "It's Hip To Be Square"] We were kind of hoping to be an inspiration to others, you know, to do something similar. Then again, maybe not.

Puppy Stuff

"We'll get up when it's time to eat."

I wanted to mention that the gelatin is still helping Kris, though he has set-backs on occasion. While Kody is growing at a slow, steady pace, Kris grows in spurts. We can almost see it. Those days he's mopey and limps, and I up his dose of gelatin. Usually the next day he's fine again, playful, happy and active.

Kitchen Stuff

Here's what I decided to do with that blind corner opening between the base cabinet and shelves...

lacy curtain to cover blind corner
I covered my blind corner with a lacy curtain

It's one of the lace curtains I'm going to use for the windows. Some of you suggested that the cat might find this spot and he has. He goes in through the curtain and then sits there and meows for me to let him out by opening the cabinet door. Like I have time for cat games.

Winter Wheat

I showed you how we got half of our harvest ("Winter Wheat 2012"). The rest was a problem. A lot of it was knocked down, by what(?). A lot of it was dragged down by vetch. It was impossible to scythe, so I used my hand sickle for some, then we decided to let the rest be. Á la Sepp Holzer, the stalks are forming a thick mulch mat and it will reseed itself. I'm interested in seeing how this turns out. There should never be a loss on a homestead, just a different purpose than originally expected. Successful permaculture seems to take some work to get established, but it certainly works for you once it is. Hopefully this will be one example of that.

I reckon that's all for now, except for this....

Parting Shots

Riley


June 15, 2012

Unexpected Spice Rack

There have been a number of things I've puzzled over as I've tried to work out the details for our kitchen remodel. Some have been things I've wanted to work into the design, like a place to keep a stool, or a spice rack. Other things have been the result of necessary, but unplanned design changes. Like the gap between the corner cabinet and the Amish built cabinet we hung on the wall over the peninsula.

Gap between cabinets was the result of  installation choices

In my original design, these two wall cabinets were directly adjacent to one another. No gap. The gap was the result of Dan wanting to make sure the Amish cabinet was firmly anchored to at least two wall studs. To do this it had to be moved to the right by several inches. The result was a 3 and 1/2 inch gap.

My first thought was to put a shelf at the bottom and turn it into a place to keep my cutting boards. Eventually though, we found this....

A Rev-a-Shelf fill pull out spice rack

This is pull out spice rack with adjustable shelves by Rev-a-Shelf. It's a cabinet filler, made to fill small spaces between cabinets. These come in both wall and base cabinet models, 3 or 6 inches wide. Perfect.

If you aren't familiar with Rev-a-Shelf, they make a lot of nifty storage items for cabinets. I've always thought they were a bit pricey, but we decided this spice rack was a good investment. I shopped around and found the best price (including shipping) at Rockler.

Spice rack in the closed position

Technically it is made for new installations, not retrofitting. We had already put in the two other cabinets, but that didn't stop Dan from taking it apart and figuring out how to get it in between them anyway. He had to cut into the top of the Amish cabinet, but it's really not noticeable. The spice rack kit did not include a door, so he had to make that too, and add the pull.

Spice rack pulled out 

I'm just thrilled with it. It solves two problems in one, and couldn't be a more perfect solution. I'll paint it to match the corner cabinet and fill it with my spices soon. Another thing checked off the countdown list. :)

June 6, 2012

Kitchen Remodel: The Endless Little Things

It's hard to believe but we're finally entering the home stretch of our kitchen remodel. The big projects are complete. More and more things are getting crossed off the to-do list and we're down to the seemingly endless list of little things. These days, it's looking something like this:

buy tall stool for workstation
sink & peninsula lighting

These mini pendants, one over the peninsula and
one over the sink, match the one in the dining nook

install under-cabinet light

A fluorescent light really brightens up this work area

buy or make plate rack
install spice rack
hook for cutting board (straight kind)
hang cast iron

We hung the cast iron cookware on
those iron brackets for hanging plants

finish trimwork in pantry hallway
install telephone

Gave this to Dan for Christmas 2010. It was on sale
at Heartland America. With coupon & free shipping
total cost was $20. Cheaply made, but I still like it. 

make peninsula endsplash
finish baseboards & corner mouldings
door and window mouldings (1 of 2)

Back door & one window down, sink window to go

modify list - sink window - how to trim?
paint door and window mouldings
paint miscellaneous trimwork

Bought these decorative pine brackets at Lowes

make rack to hang cooking utensils
buy or make knife holder
decide what to do with uncovered blind corner: sliding door? curtain?

One of the potential problems of doing your own
customized design plans, is ending up with
something you don't know what to do with!

drawer divider for silverware
storage for cookie sheets & muffin pans. Vertical rack? Where?
hooks for dish towels
finish painting cabinets and shelves


add to list - re-glue wallpaper edges where painters tape pulled it loose
add to list - clean up primer that leaked under painters tape

Tried ScotchBlue multi surface painters tape instead of
Frog Tape. What a mistake. The multi surfaces do not
include wallpaper, unpainted wallboard, or wood floors.
What else is there????

hang goat key holder
hang Dan's key rack box
order faucet repair kit
fix faucet
vinyl tile squares in sink cabinet

How I did this in this post (click here)

new compost bucket & lid, stainless steel?
add to list - get soap dish
finish hanging cabinet doors

Dan made the insets from our leftover tin ceiling panels.

install pull out shelf in sink cabinet

Waste basket will go here with cleaning supplies

add to list - get new trash can to fit slide out shelf
cover or veneer for toe kick
install rack inside sink cabinet door

Hoping this will help relieve clutter around the sink

dining booth: table, bench, & chair
clean the kitchen thoroughly
hang curtains
throw rugs
chair & bench cushions

After that, I can finally find and unpack all my kitchen boxes, which are spread out into the pantry, back porch, spare room, dining room, and my studio. This in turn necessitates not only deciding what to keep and figuring out where to put it in the kitchen, but in these rooms as well. Seems the kitchen is key to organizing the entire house! Last but not least is clean the house, because there's construction dust, dust, and more dust absolutely everywhere.

May 31, 2012

More Shelves For The Kitchen

I already showed you the shelves Dan made when he built my kitchen peninsula. I also mentioned in my "Kitchen Wall Cabinets" post that we would use shelving to connect the different styles, shapes, and colors of the cabinets we installed. Well, here are they are, plus a few more.

Shelves for mugs, coffee grinder, & tea pot

These will be painted the same green as the cabinets and will serve for coffee and tea making items.

I also wanted a place for cookbooks. The shelves below will be for just that, and were made from leftover pine flooring planks.

Shelves for cookbooks

Being above the peninsula gives easy access from either side of the kitchen. And here are some I'm just thrilled with...

Cubby shelves
(For a closer look at the doors on the wall cabinet
above, visit Dan's blog, Daniel Tate Pyrographic Art)

Dan made me some cubbies from leftover floor planks, just like the cookbook shelves. I haven't decided how to finish them yet. I've got enough green, so I don't want to paint them that. I'm thinking either stain them dark, to match the Amish cabinets, or leave natural and finish with polyurethane.

A shelf also solved an unexpected problem area. In the original kitchen, the moulding over the door to the addition (where the pantry, 2nd bathroom, and utility room are), was unconventionally tall. You can seen it in the photo below, but you have to look closely.


When we pulled it down to move the pantry door, we found a huge opening in the wall behind the moulding.


Dan suggested putting a shelf above the door to help hide it.


All of my new shelves need to be primed and painted, but I'm very glad to have every one of them. :)


May 23, 2012

Building The Kitchen Peninsula

Original idea for a peninsula
For a larger view of the entire floor plan, click here

The design of my kitchen peninsula has gone through more revisions than Carter has pills, as my grandmother used to say. The final version didn't actually present itself until we were halfway into building it! And here that is, in pictures.

One thing I wanted to incorporate was a small kitchen island we bought over a year ago. This was my starting point ...

Photo taken April 2011 in the "old" kitchen

I liked it because it matched the doors of my two Amish cabinets (pictures in this post, Kitchen Project: Attention To Detail). However it needed to be modified, starting with the wheels we didn't need. Dan removed those and built a base for it...


He also removed the butcher board top, and the knife holder and towel rack on the ends. I changed out the door and drawer pulls.

Top drawer has been temporarily removed

One thing I puzzled over for the longest, was how to best deal with blind corners. For the peninsula, we decided to build shelves from the corner base cabinet, across to the back of that former island.


Shelves were then built onto the end of the peninsula.


Next he started on the countertop.


Once this was cut to size, it was time to cut and glue on the laminate.

We opted for inexpensive laminate countertops rather than granite, to stretch our kitchen budget dollars. We saved more by not special ordering, but by buying store stock. We got a molded laminate counter for the sink wall, and a matching 4x8 foot sheet for the peninsula. We had to make this ourselves, because of the size I wanted, 36" wide.

The sheet was cut a little larger than the base and glued on with contact cement. With no proper workshop, most projects get done in whatever space is available. This project was accomplished in the dining room. And of course one has to purchase special tools for the job.

Gluing on the laminate

Dan used his router to trim it to size (that job outside :), and we secured it in place.

Countertop in place

Usually strips of the same laminate are glued to the edges to finish them off. We decided to trim the edges with a wood trim, stained and polyed to match the Amish cabinets and the floor.

Trim for countertop edging.

The finished size is of the peninsula is 52" x 36". It is short enough to give a 48 inch clearance from the front of the wood cookstove, and does not impede foot traffic from the back porch or dining room, to the sink, fridge, or bathroom. The distance between the peninsula and base wall cabinets is 36", which might be considered narrow by some. What it creates for me however, is a u-shaped, kitchen workstation: convenient, efficient, and out of traffic's way. The sink and all of my most used tools and ingredients will be easily accessible.

My newly created kitchen workstation. All I need is a tall stool.

A tall stool will fit underneath, for me to use when I have long hours of cutting, slicing, and chopping to prepare for canning or dehydrating. In my mind the stool was a must, but figuring out where to put it in a small kitchen was a puzzle. Besides resolving that, I think this design was a good solution for the blind corner too.

I don't reckon this is a conventional set-up. Most kitchens are based around the so-called "work triangle," which I think a useless concept (that opinion discussed in the body and comments of this post, I'm Curious About Your Kitchens.) A customized work station makes more sense to me.

Still on the checklist are to finish painting, make an end splash, and install overhead lighting. Other than that, it's already becoming the most used countertop in the kitchen.

May 17, 2012

Kitchen Wall Cabinets

Dan was on vacation last week so we made good progress in the kitchen. The first thing we worked on was installing the wall cabinets.

green over the fridge wall cabinet

First one up was the over-the-fridge cabinet. We originally hadn't planned on one of these, until we saw it where we bought the used base cabinet. I got it for about $22.

pair of Amish cabinets on either side of the kitchen window

Next up were the two Amish built wall cabinets we purchased in Pennsylvania almost 3 years ago. The doors on these cabinets were the inspiration for the entire kitchen.

green painted corner wall cabinet

Then the corner cabinet. We debated on whether to purchase one of these or make it (free online instructions, here). In the end we bought it from the same discount building supply where we've bought so many things we've needed for this project. There's much to be said for making things ourselves, but the balance of time and cost were in favor of buying it. I didn't get one with a lazy susan. One reason was because they were more expensive. Also, they leave a lot of dead space in the corners. We're going to do the same thing to this cabinet's door that we did to the sink cabinet doors.

wall cabinets up, shelves yet to be added

Turns out I did a pretty good job with patching the wallpaper, didn't I? :) The fridge will cover the last big bare spot on the left.

Since we are using an eclectic mix of cabinets, we decided the best way to tie them together will be with shelves. Rough idea sketch below...

sketch of where the shelves will go
Click sketch for a little better view.

A plate rack will go under the cabinet to the left of the window. Under the right cabinet will be a cup shelf. Shelves will connect that cabinet with the corner cabinet, including some shelves for spices. I think.

Next up was the 3-door Amish cabinet Dan bought.

3-door Amish built cabinet hung, sans doors

He woodburned the doors to this one, photo here.

I have a plan for the shelving for that wall too, which I originally showed you in my "Kitchen Remodel: A Place for Each Thing & Each Thing In It's Place" post...

An idea for my wall of shelves (click for bigger).

Thankfully everything is passing inspection...


Riley has been a bit jealous of all the attention the puppies get, so he's keeping close to make sure he gets his fair share.

After we put up the wall cabinets, we put the trim and baseboard in the corner the refrigerator belongs in. Then we brought it in from the porch.

kitchen remodel, fridge corner complete

After the wall cabinets were up, we started in on the peninsula. That required a bit more thinking, because we're not following a standard plan. But then, I never wanted a standard kitchen. Hopefully I'll have an update on that soon.